2-Ingredient Lemon Bars
The Easiest 2-Ingredient Lemon Bars You Will Ever Bake
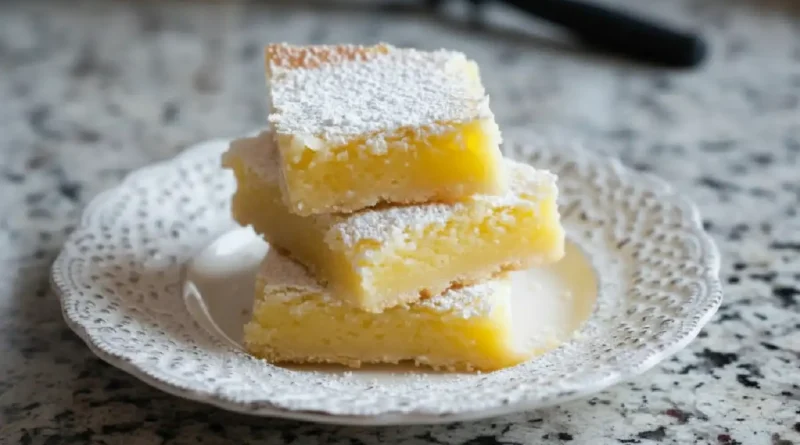
There is a specific kind of magic that happens when a recipe defies logic. Usually, a good lemon bar requires a cold-butter shortbread crust, a delicate custard, and a fair amount of prayer that the middle sets perfectly. But on a Tuesday afternoon when the craving for something bright and zesty hit and the pantry looked a bit bare, I discovered this two-ingredient wonder. As the scent of sweet citrus began to fill the kitchen, I realized that complexity doesn’t always equal quality. These bars emerge from the oven with a cloud-like texture that sits somewhere between a traditional bar and a lemon sponge cake. They are airy, vibrantly yellow, and finished with a slight golden chew on the edges that makes it impossible to stop at just one square.
Why You’ll Love This
-
It requires zero technical baking skills, making it the perfect entry-point for beginners or a stress-free win for pros.
-
The texture is incredibly light and pillowy, offering a refreshing alternative to heavy, dense brownies or cookies.
-
You can go from a craving to a finished tray in under thirty minutes, using items that have a long shelf life in your pantry.
-
It is remarkably budget-friendly without tasting like a shortcut.
My neighbor is a self-proclaimed dessert snob who usually spends hours tempering chocolate or folding puff pastry. When I brought over a plate of these, she spent ten minutes trying to guess the “secret ingredient” in the crust. When I finally confessed that there wasn’t even a crust to begin with—just a box of cake mix and a tin of lemon filling—she didn’t believe me until I showed her the recycling bin. She now keeps these two ingredients stocked at all times for “emergency” guests.
What Makes It Special
-
Angel Food Cake Mix: This serves as the structural foundation, providing the egg whites and leavening needed for that signature fluffy rise.
-
Lemon Pie Filling: This delivers the concentrated punch of tart citrus and provides the moisture that transforms dry mix into a velvety batter.
-
The Chemical Reaction: When these two specific ingredients meet, the acidity in the lemon reacts with the cake mix to create a beautiful, foamy aeration that sets into a soft, melt-in-your-mouth crumb.
Making It Happen
The process begins with finding your largest mixing bowl. You simply empty the dry angel food cake mix into the bowl and top it with the entire can of lemon pie filling. At first, it might look like there isn’t enough liquid, but as you begin to fold them together with a spatula, the mixture will start to grow. It becomes thick, frothy, and pale yellow. You want to stir until no dry streaks remain, but avoid over-mixing so you don’t lose that airy volume. Once the batter is uniform, you pour it into a prepared baking pan. As it bakes, the top will turn a beautiful light golden brown and develop a delicate, crackly surface. When you pull it out of the oven, the bars will be high and proud, though they will settle slightly as they cool, concentrating that intense lemon flavor.
You Must Know
-
Always use a dry angel food cake mix—do not follow the instructions on the back of the box to add water; the pie filling is your only liquid.
-
Patience is your best friend here. While they smell divine warm, these bars need to cool completely to set properly for clean slicing.
-
Line your pan with parchment paper with a bit of overhang. These bars are soft and a bit sticky, so having a “handle” to lift the entire block out of the pan makes serving much easier.
Serving Ideas and Pairings
These bars are stunning when finished with a heavy dusting of powdered sugar just before serving. For a more indulgent dessert, add a dollop of fresh whipped cream and a few raspberries on the side. If you are serving these at a brunch or afternoon tea, they pair beautifully with a hot Earl Grey tea or a crisp, cold glass of Sauvignon Blanc. The acidity in the wine mirrors the citrus in the bars for a very sophisticated flavor profile.
Make It Different
While the two-ingredient version is a classic, you can easily customize this base. For a tropical twist, swap the lemon filling for lime or even pineapple. If you want more texture, fold in a half-cup of shredded sweetened coconut or a tablespoon of fresh lemon zest to brighten the flavor even further. For those who need a dairy-free treat, most standard angel food mixes and fruit fillings are naturally dairy-free, but always double-check your labels. You can also press a layer of graham cracker crumbs into the bottom of the pan before adding the batter if you absolutely crave a traditional crust.
Storage and Reheating
These lemon bars stay incredibly moist thanks to the fruit filling. Store any leftovers in an airtight container at room temperature for up to two days, or in the refrigerator for up to five days. If you prefer them chilled, they actually take on a slightly chewier, fudge-like texture when cold. I do not recommend reheating them in the microwave as it can make the delicate sponge go rubbery; they are best enjoyed at room temperature or straight from the fridge.
Success Tips
To get those perfect, bakery-style squares, wipe your knife with a damp cloth between every single cut. This prevents the sticky crumb from tearing. Also, ensure your oven is fully preheated before the pan goes in. Because we are relying on the reaction between the lemon and the cake mix, a hot start is essential for the best rise and a tender, golden finish.
Frequently Asked Questions
Can I use a different cake mix like yellow or white?
No, this specific recipe relies on the unique properties of angel food cake mix, which contains egg whites and specific leaveners. A regular yellow cake mix would result in a very dense, oily mess without the addition of eggs and oil.
My bars didn’t rise very much, what happened?
Check the expiration date on your cake mix. If the leavening agents are old, they won’t react with the lemon filling. Also, make sure you don’t over-beat the batter; fold it gently until just combined.
Is the lemon flavor very strong?
It is a bright, clear lemon flavor, but it is balanced by the sweetness of the cake mix. If you want an extra tart “zing,” adding the zest of one fresh lemon to the batter works wonders.
Can I freeze these?
Yes. Wrap the sliced bars individually in plastic wrap and place them in a freezer bag. They will keep for up to three months. Thaw them on the counter for about an hour before eating.
Do I need to grease the pan?
Yes, even if using parchment paper, a light spray on the sides of the pan helps the bars climb and rise evenly without sticking to the edges.
Prep time: 5 minutes
Cook time: 20-25 minutes
Total time: 30 minutes
Servings: 12-16 bars
Category: Dessert
Difficulty: Easy
Cuisine: American
Yield: One 9×13 inch pan
Equipment: Large mixing bowl, spatula, 9×13 inch baking pan, parchment paper.
Ingredients
-
1 box (16 oz) Angel Food Cake Mix
-
1 can (21 oz) Lemon Pie Filling
-
Optional: Powdered sugar for dusting
Instructions
-
Preheat your oven to 350°F (175°C).
-
Grease a 9×13 inch baking pan and line it with parchment paper, leaving an inch of overhang on the sides.
-
In a large bowl, combine the dry angel food cake mix and the lemon pie filling.
-
Gently stir and fold the mixture together until the flour is fully incorporated and the batter looks foamy and aerated.
-
Spread the batter evenly into the prepared pan, smoothing the top with your spatula.
-
Bake for 20 to 25 minutes, or until the top is golden brown and a toothpick inserted into the center comes out clean.
-
Allow the bars to cool completely in the pan.
-
Once cool, use the parchment handles to lift the bars out. Dust with powdered sugar, slice into squares, and serve.
Notes
For the best results, use a high-quality lemon pie filling that lists lemon juice or lemon oil early in the ingredients. This ensures a natural citrus taste rather than a synthetic one.
Nutrition
Calories: 155 kcal | Carbohydrates: 36g | Protein: 2g | Fat: 0g | Sodium: 280mg | Sugar: 25g
