Bubblegum Cloud Slice Recipe
Bubblegum Cloud Slice Recipe: A Nostalgic No-Bake Dream
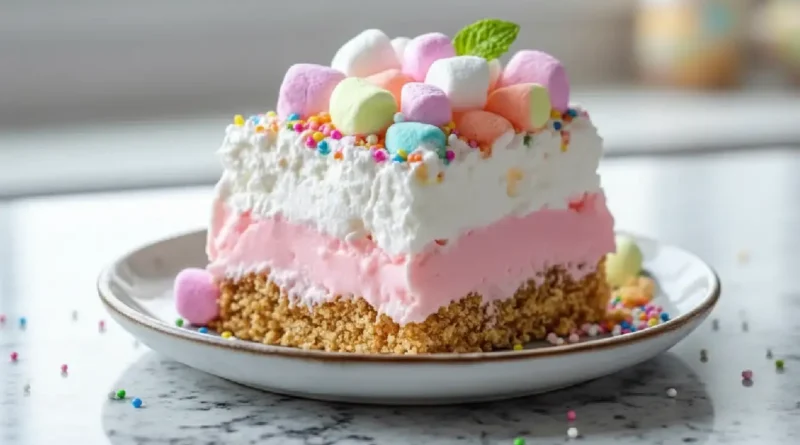
There is something undeniably magical about the scent of bubblegum. It transports you straight back to childhood summers, sticky fingers, and the simple joy of blowing the biggest bubble possible. But this Bubblegum Cloud Slice isn’t just a trip down memory lane; it is a sophisticated reinvention of those flavors wrapped in a texture so light, it truly lives up to its name. Imagine a buttery, golden graham cracker crust anchoring a layer of filling that tastes like sweet, creamy air. It’s vibrant, playful, and melts on your tongue in the most delightful way.
I first whipped this up on a rainy Tuesday when the house felt a bit too quiet and gray. I wanted something that looked like a party but didn’t require turning on the oven or spending hours measuring flour. The result was this pastel-hued masterpiece that brightened the entire kitchen.
Why You’ll Love This
- No Oven Required: This is the ultimate save-the-day dessert when you want something homemade without adding heat to your kitchen.
- Texture Heaven: The contrast between the crunchy, buttery base and the airy, mousse-like filling is incredibly satisfying.
- Nostalgia in a Bite: It captures that classic bubblegum flavor without being overly artificial or cloying.
- Visual Showstopper: The pastel pinks and blues mixed with colorful sprinkles make it an instant centerpiece for any table.
A Skeptic Converted
I have to tell you about my uncle, who is a staunch “chocolate or nothing” kind of dessert eater. When I brought this tray out after a family dinner, he actually laughed at the sprinkles and the pastel color, calling it “kid food.” I cut him a small square, mostly just to be polite. He took one bite, paused, and then quietly reached for a second piece. He admitted that the lightness of the whipped cream cut through the sweetness perfectly, and he loved how the crust added that necessary salty-sweet crunch. Now, he asks if I’m bringing the “cloud thing” to every potluck.
What Makes It Special
- The Bubblegum Yogurt: This is the secret weapon. It provides the base flavor and a slight tang that keeps the sweetness in check.
- Whipped Cream Fold: Using real whipped cream creates that signature “cloud” consistency that feels weightless on the palate.
- Versatile Crust: The graham cracker base is sturdy enough to hold the slice but tender enough to yield easily to a fork.
- Customizable Sweetness: You control the sugar levels, so it never becomes a tooth-aching sugar bomb.
Making It Happen
Creating this Bubblegum Cloud Slice is less about cooking and more about assembly. You start by building your foundation. Take your crushed graham crackers—I like to leave a few larger crumbs for texture—and toss them with that rich melted butter and a touch of sugar. The smell of wet sand and butter is your cue that it’s ready. Dump this into your 9×9 pan and press it down hard. You want a solid base, so use the bottom of a measuring cup to really pack it in. Slide that into the fridge to firm up while you work on the magic layer.
Next, you need to bloom your gelatin. Don’t rush this; let it sit in the warm water until it swells and looks thick. While that’s happening, grab your largest bowl and whisk together the whipped cream, that colorful bubblegum yogurt, the extract, and your powdered sugar. You want to mix until it looks velvety and smooth. Once your gelatin is ready, gently fold it into this creamy mixture. Use a light hand here—you want to keep all that air in the batter.
Finally, retrieve your crust from the fridge and pour this luscious, bubblegum-scented filling right over the top. Smooth it out with a spatula so it reaches every corner. It needs a good nap in the refrigerator to set properly, so give it at least an hour. Patience is the hardest ingredient here!
You Must Know
- Bloom Correctly: Ensure your gelatin is fully dissolved and bloomed before adding it. If it’s grainy, your filling won’t set smooth.
- Cold Whip: Make sure your whipped cream is cold when you start mixing. If it’s too warm, it might deflate and lose that cloud-like volume.
- Press Firmly: A loose crust will crumble when you cut it. Really press down on that graham cracker mixture to ensure nice, clean slices.
- Flavor Strength: Bubblegum extract can vary in potency. Taste a tiny bit of your cream mixture before adding the gelatin to see if you need an extra drop.
Serving Ideas
Because this slice is sweet and creamy, it pairs beautifully with things that cut through the richness.
- Drink Pairings: Serve this with a glass of cold sparkling lemonade to cleanse the palate, or an iced matcha latte for an earthy contrast.
- Side Dish: A bowl of fresh, tart berries (like raspberries or blackberries) on the side helps balance the sweetness of the bubblegum.
Make It Different
- The Cookie Base: Swap graham crackers for Golden Oreos or vanilla wafers for a sweeter, cake-like crust.
- Vegetarian Twist: If you don’t eat gelatin, agar-agar is a fantastic substitute that sets just as firmly.
- Flavor Swap: Not a fan of bubblegum? Use strawberry yogurt and strawberry extract for a “Strawberry Cloud,” or lemon for a citrus burst.
- Dairy-Free: Use coconut cream instead of dairy whipped cream and a dairy-free almond or coconut yogurt.
Storage and Reheating Recipe Tips
Since this is a no-bake, cold dessert, “reheating” isn’t on the menu! However, storage is key. Keep the Bubblegum Cloud Slice in the refrigerator at all times. If you leave it out in a warm room for too long, the filling will start to soften and lose its structure. It will stay fresh in an airtight container in the fridge for up to 3 days.
If you want to keep it longer, you can freeze the slices. Place them on a baking sheet to freeze individually, then transfer to a bag. Thaw them in the fridge for 30 minutes before eating for a frozen mousse treat.
Success Tips
For the cleanest slices, run your knife under hot water and wipe it dry before cutting into the set dessert. This melts through the gelatin layer smoothly without dragging the filling. Also, don’t skimp on the chill time. If you cut it too early, you’ll have a delicious pudding rather than a sliceable bar.
Frequently Asked Questions
Can I use plain yogurt instead of bubblegum yogurt?
Absolutely. If you can’t find bubblegum yogurt, plain vanilla or Greek yogurt works perfectly. just increase the bubblegum extract slightly to ensure the flavor still shines through.
My filling looks lumpy, what happened?
This usually happens if the gelatin wasn’t fully dissolved or if it cooled down too much before being mixed with the cold cream. Make sure your gelatin is liquid and smooth when you fold it in.
Can I make this ahead of time?
Yes! In fact, it’s better if you do. Making it the night before gives the gelatin plenty of time to set completely, resulting in a firmer texture.
Is this recipe gluten-free?
The filling is naturally gluten-free, but the base is not. To make the entire dish gluten-free, simply use gluten-free graham crackers or crushed gluten-free cookies for the crust.
Can I use fresh fruit in the filling?
I would avoid adding fresh fruit directly into the mix as the extra water content can mess with the setting process. It is better to serve fresh fruit on top or on the side.
Recipe Card
Prep time: 15 minutes
Cook time: 0 minutes
Total time: 1 hour 15 minutes
Servings: 9-12 squares
Category: Dessert
Difficulty: Easy
Cuisine: American
Yield: 1 9×9 inch pan
Equipment:
Mixing bowls
9×9 inch baking pan
Spatula
Whisk
Ingredients
For the Base:
1 cup of crushed graham crackers (or digestive biscuits for a healthier option)
½ cup of unsalted butter, melted
¼ cup of granulated sugar
For the Filling:
2 cups of whipped cream (or coconut cream for a dairy-free alternative)
1 cup of bubblegum-flavored yogurt (vanilla yogurt can be a substitute)
1 teaspoon of bubblegum extract
1 tablespoon of gelatin (or agar-agar for a vegetarian option)
¼ cup of powdered sugar
For the Topping:
½ cup of mini marshmallows
¼ cup of colorful sprinkles
Fresh mint leaves for garnish (optional)
Instructions
- Prepare the Base: In a mixing bowl, combine the crushed graham crackers, melted butter, and granulated sugar. Mix until the texture resembles wet sand. Press this mixture firmly into the bottom of a greased 9×9 inch baking pan to form a solid, even layer. Place the pan in the refrigerator to chill while you prepare the filling.
- Make the Filling: In a small bowl, dissolve the gelatin in 3 tablespoons of warm water. Let it sit for a few minutes until it thickens. Meanwhile, in a large bowl, combine the whipped cream, bubblegum yogurt, bubblegum extract, and powdered sugar. Whisk or mix until the consistency is smooth and creamy.
- Add Gelatin: Gently fold the dissolved gelatin into the cream mixture. Ensure it is fully incorporated without deflating the cream too much.
- Assemble the Dessert: Pour the bubblegum filling over the chilled graham cracker base. Use a spatula to spread it evenly to the edges.
- Chill Again: Return the pan to the refrigerator. Let it set for at least 60 minutes, or until the filling is firm to the touch.
- Add the Toppings: Once set, decorate the top with mini marshmallows and colorful sprinkles for that festive finish. Add fresh mint leaves if desired.
- Serve: Slice into squares while cold and serve immediately.
Nutrition
Calories: 280kcal | Carbohydrates: 32g | Protein: 3g | Fat: 16g | Saturated Fat: 10g | Cholesterol: 45mg | Sodium: 110mg | Potassium: 40mg | Sugar: 22g | Vitamin A: 500IU | Calcium: 60mg | Iron: 0.5mg
