Honey Butter Chicken Recipe
Easy Honey Butter Chicken Recipe: The Perfect 20-Minute Weeknight Dinner
There is a specific sound that happens when honey hits a hot, buttery pan—a sharp sizzle that quickly settles into a rhythmic bubble. It is the sound of a kitchen turning into a sanctuary. I remember the first time I experimented with this Honey Butter Chicken recipe on a Tuesday evening when the fridge looked bare and my energy was low. The aroma of toasted garlic and sweet nectar filled the house, cutting through the damp chill of a rainy afternoon. By the time the chicken was glazed in that glossy, golden sauce, the day’s stress had completely evaporated. This dish is more than just a meal; it is a warm hug in a skillet, offering a perfect balance of savory richness and floral sweetness that clings to every tender bite.
Why You’ll Love This
-
It takes less than twenty minutes from the moment you turn on the stove to the moment you sit down to eat.
-
The ingredient list relies almost entirely on pantry staples you likely already have in your cupboards.
-
It hits that elusive “fakeaway” sweet spot—tasting like high-end restaurant quality with half the effort and cost.
-
The texture provides a satisfying contrast between the crispy, seared edges of the chicken and the velvet-smooth butter glaze.
I once served this to a close friend who claimed they absolutely hated the combination of fruit or honey with meat. They were the ultimate skeptic, convinced that dinner should be strictly salty. I didn’t say a word, just set the plate down with a side of steamed greens. Halfway through the meal, the table went silent. They weren’t just eating; they were using a piece of crusty bread to swipe up every last drop of the amber-colored sauce from the bottom of the bowl. They asked for the recipe before they even finished their glass of water.
What Makes It Special
-
Boneless Skinless Thighs: Using thighs ensures the meat stays incredibly juicy and tender, even under the high heat required for a good sear.
-
Wildflower or Clover Honey: These varieties provide a delicate, floral sweetness that doesn’t overwhelm the savory garlic.
-
Unsalted Butter: This allows you to control the seasoning perfectly, adding a creamy, luxurious mouthfeel to the finished glaze.
-
Fresh Garlic: Mincing it fresh rather than using the jarred version provides a pungent, spicy kick that cuts through the richness of the honey.
-
Light Soy Sauce: This adds a necessary hit of umami and a deep golden color without making the dish overly salty.
Making It Happen
The process begins by preparing your chicken. Cut the meat into bite-sized pieces, ensuring they are uniform so they cook at the same rate. Pat them thoroughly dry with a paper towel—this is the secret to getting those beautiful, crispy golden edges. Toss the pieces lightly in seasoned flour, shaking off any excess so the coating remains thin and delicate. Heat a splash of oil in a heavy-bottomed skillet until it shimmers. Drop the chicken in, making sure not to crowd the pan; you want them to sear, not steam. Let them sit undisturbed for a few minutes until a deep brown crust forms, then flip them to color the other side.
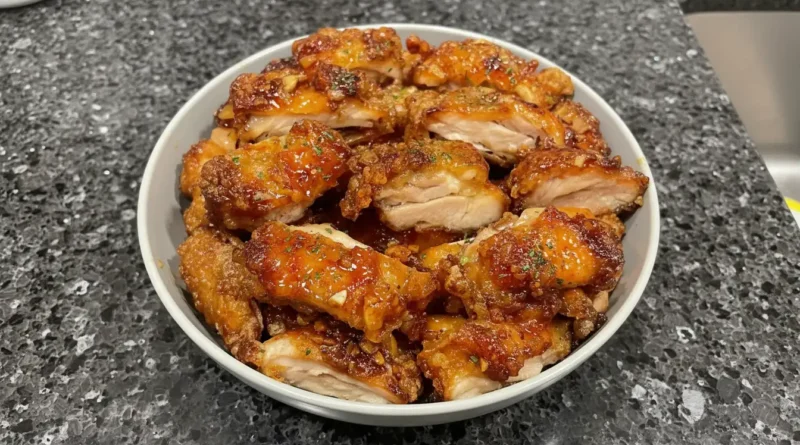
Once the chicken is cooked through and crispy, scoot the pieces to the edge of the pan or remove them briefly. Lower the heat and drop in a generous knob of butter. As it foams and turns slightly nutty, stir in the minced garlic. The smell will be incredible. Before the garlic has a chance to burn, pour in the honey and soy sauce. Whisk it all together, letting the mixture bubble and reduce until it thickens into a sticky, translucent glaze. Toss the chicken back into the center, coating every single piece in that liquid gold. The sauce should cling to the meat, creating a glossy finish that looks like it belongs on a magazine cover.
You Must Know
-
Do not crowd the skillet; if you put too much chicken in at once, the temperature drops and the meat will release moisture rather than browning.
-
Keep an eye on your heat once the honey goes in; sugar burns quickly, so a medium-low flame is your best friend during the glazing stage.
-
Use a heavy skillet if possible, like cast iron or stainless steel, to maintain even heat distribution for that perfect sear.
Serving Ideas
This dish is a natural partner for a bowl of fluffy jasmine rice or a mound of creamy mashed potatoes to soak up the extra sauce. If you want something lighter, try serving it inside crisp lettuce cups with a sprinkle of toasted sesame seeds. For a drink pairing, a crisp, cold Riesling or a sparkling apple cider provides a bright acidity that balances the richness of the butter and honey beautifully.
Make It Different
If you prefer a bit of heat, whisk a teaspoon of red chili flakes or sriracha into the sauce. For a dairy-free version, you can swap the butter for a high-quality vegan butter substitute or even coconut oil, though the flavor will be slightly more tropical. If you are watching your carb intake, skip the flour coating and sear the chicken plain; the sauce is flavorful enough to carry the dish on its own.
Storage and Reheating
If you happen to have leftovers, they store beautifully in an airtight container in the fridge for up to three days. When reheating, do so gently in a pan over low heat with a tiny splash of water or chicken broth. This helps loosen the honey sauce back into its original silky consistency without overcooking the chicken. Avoid the microwave if you can, as it can make the chicken feel rubbery.
Success Tips
For the best results, use the highest quality honey you can find; the nuances of a good honey really shine here. Also, don’t skip the step of patting the chicken dry. Moisture is the enemy of a good sear, and that crispy texture is what makes the transition into the sticky sauce so satisfying. Finally, finish the dish with a squeeze of fresh lemon juice right before serving to brighten all the flavors.
Frequently Asked Questions
Can I use chicken breast instead of thighs?
Yes, you certainly can. Just be careful not to overcook them, as breasts dry out much faster than thighs. Keep the pieces a bit larger to retain moisture.
Is this recipe too sweet for kids?
Most children actually love this recipe because of the honey, but you can always increase the soy sauce or add a pinch more salt if you want to lean further into the savory side.
Can I make this in an air fryer?
You can cook the flour-dusted chicken in the air fryer at 400°F for about 10-12 minutes, then toss it in the honey butter sauce prepared on the stovetop.
What if my sauce is too thin?
Let it simmer for an extra minute or two. The sugars in the honey will naturally thicken as the water evaporates. Just watch it closely so it doesn’t turn into hard candy.
Can I add vegetables to the same pan?
Absolutely. Broccoli florets or snap peas work wonderfully. Add them to the pan after the chicken is browned but before you start the sauce so they have time to soften.
Recipe Card
Prep time: 10 minutes
Cook time: 15 minutes
Total time: 25 minutes
Servings: 4
Category: Main Course
Difficulty: Easy
Cuisine: American-Asian Fusion
Yield: 4 servings
Equipment: Large skillet, whisk, chef’s knife, mixing bowl.
Ingredients:
1.5 lbs boneless skinless chicken thighs, cut into bite-sized pieces
1/2 cup all-purpose flour
1 tsp salt
1/2 tsp black pepper
2 tbsp olive oil
4 tbsp unsalted butter
1/3 cup honey
2 tbsp soy sauce
3 cloves garlic, minced
1 tbsp fresh lemon juice
Optional: Sesame seeds and chopped green onions for garnish
Directions:
-
In a medium bowl, whisk together the flour, salt, and pepper. Toss the chicken pieces in the flour until evenly coated, then shake off the excess.
-
Heat the olive oil in a large skillet over medium-high heat. Add the chicken in a single layer and cook for 5-7 minutes, turning occasionally, until golden brown and crispy on all sides.
-
Remove the chicken from the pan and set aside. Wipe out any excess burnt flour bits with a paper towel.
-
Reduce the heat to medium-low and add the butter to the skillet. Once melted, add the minced garlic and sauté for 30 seconds until fragrant.
-
Stir in the honey, soy sauce, and lemon juice. Let the mixture simmer for 2-3 minutes until it begins to thicken and bubble.
-
Return the chicken to the skillet and toss thoroughly to coat in the glaze. Cook for another 1-2 minutes until the sauce is thick and sticky.
-
Garnish with sesame seeds or green onions if desired and serve immediately.
Notes:
If the sauce becomes too thick, add a tablespoon of warm water to thin it out. For a gluten-free version, substitute the all-purpose flour with cornstarch or a gluten-free flour blend.
Nutrition:
Calories: 385kcal | Carbohydrates: 24g | Protein: 28g | Fat: 20g | Saturated Fat: 8g | Cholesterol: 115mg | Sodium: 750mg | Sugar: 18g
