Step by Step Pain aux Raisins Recipe
The Ultimate Flaky Morning Treat: A Step by Step Pain aux Raisins Recipe
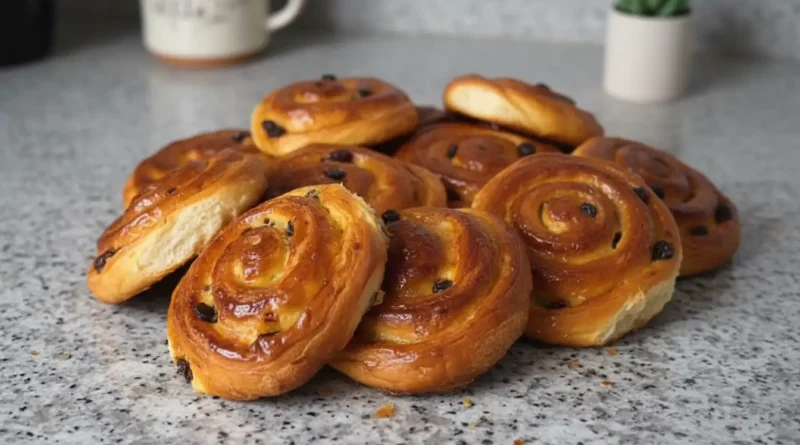
There is a specific kind of magic that happens in a kitchen when butter meets yeast and patience. It starts with the scent—that unmistakable, heady aroma of caramelizing sugar and rich pastry dough wafting from the oven. For me, Pain aux Raisins isn’t just a pastry; it’s a memory of standing outside a small boulangerie in Montmartre, watching the morning mist lift while holding a warm, spiraled treat wrapped in tissue paper. Making these at home might seem like a daunting mountain to climb, but once you hear that first crackle of the golden, shattered layers, you’ll realize every minute spent folding and chilling was worth it. This recipe is about bringing that slow, Parisian morning into your own kitchen, turning simple staples like flour and milk into something truly extraordinary.
Why You’ll Love This
-
Superior Texture: Unlike grocery store versions that can be doughy, these are intensely flaky on the outside and custardy in the center.
-
Total Control: You can choose the quality of your butter and the soak of your raisins, ensuring every bite is exactly how you like it.
-
The “Pro” Feeling: There is an immense sense of pride that comes from successfully laminating your own dough; it’s a baking milestone that feels like winning a marathon.
-
Perfect for Hosting: These can be prepared ahead of time, meaning you can serve fresh, warm pastries for brunch without waking up at 4:00 AM.
My neighbor, Marcus, has always been a self-proclaimed “raisin hater.” He’s the type of person who meticulously picks every dried fruit out of a cookie. When I first tested this recipe, I didn’t tell him what was inside the golden spirals. I watched him take a tentative bite of the crispy edge, then a larger one of the cream-filled center. He finished the entire pastry before asking, “What were those purple bits? They actually tasted good.” It turns out that when you soak raisins in hot water and a hint of rum, they transform from chewy distractions into juicy, flavor-packed gems that even the toughest critics can’t resist.
What Makes It Special
-
Laminated Dough (Détrempe): This isn’t just bread dough; it’s a carefully balanced mix of milk, water, and flour designed to support hundreds of thin layers of butter.
-
High-Quality Butter: The butter block (beurrage) is the soul of the pastry. Using unsalted butter with a high fat content ensures the layers stay distinct and the flavor remains rich.
-
Silky Pastry Cream: Infused with vanilla paste, the custard provides a moisture barrier that keeps the inside of the spiral tender while the outside stays crisp.
-
The Rum-Soaked Raisins: Soaking the fruit ensures they don’t draw moisture out of the dough, keeping them plump and flavorful during the high-heat bake.
-
Glossy Sugar Syrup: Brushing the pastries immediately after they leave the oven gives them that professional bakery shine and a subtle extra crunch.
Making It Happen
The journey begins with the dough, a simple mixture that requires just enough kneading to feel smooth and elastic. Once it has rested in the cool dark of the refrigerator, you introduce it to the butter block. This is where the dance of lamination starts. You’ll wrap the cold butter in the dough like a precious letter, then begin the process of rolling and folding.
As you roll the dough into long rectangles and fold it into thirds, you are creating the architecture of the pastry. Each “turn” multiplies the layers. It’s a rhythmic process: roll, fold, rest. The resting periods in the fridge are crucial; they allow the gluten to relax and the butter to firm up, preventing it from melting into the dough.
While the dough rests for the final time, you’ll whisk together a thick, glossy pastry cream, watching it bubble and thicken on the stove until it’s velvet-smooth. When it comes time to assemble, you spread that chilled cream over the rolled-out dough, sprinkle the plump raisins, and roll it into a tight log. Slicing through that log reveals the beautiful spiral that gives the dish its name. After a final proof where the pastries puff up with air, they head into a hot oven to transform into deep golden treasures.
You Must Know
-
Keep It Cold: If at any point the dough feels sticky or the butter feels soft, put it back in the fridge. Cold butter is what creates the steam that lifts the layers.
-
Don’t Over-Flour: Use just enough flour to keep things moving. Too much extra flour can make the pastry dry and tough.
-
Level Surfaces: When rolling, keep your pressure even. This ensures the butter is distributed equally throughout the dough, rather than being pushed to one side.
Serving Ideas
These are best enjoyed while still slightly warm from the oven. Pair them with a strong, dark roast coffee or a bowl of café au lait for the classic French experience. If you’re serving them for a celebratory brunch, a crisp glass of dry sparkling wine or a light mimosas balances the richness of the butter perfectly.
Make It Different
-
The Chocolate Twist: If you really can’t do raisins, swap them out for dark chocolate chips or chunks for a “Pain au Chocolat” inspired spiral.
-
Citrus Brightness: Add the zest of one orange to the pastry cream for a bright, floral note that cuts through the buttery layers.
-
Alcohol-Free: Simply omit the rum and soak the raisins in hot orange juice or Earl Grey tea for a deep, complex flavor.
Storage and Reheating
Pain aux Raisins are at their peak on the day they are baked. However, if you have leftovers, store them in an airtight container at room temperature for up to two days. To bring back that “just-baked” crunch, avoid the microwave. Instead, pop them in a 175°C oven for 5–8 minutes. They also freeze beautifully; just wrap them individually and thaw before reheating in the oven.
Success Tips
Be patient with the proofing. Depending on how warm your kitchen is, it might take the full two hours (or even a bit more) for the pastries to look light and airy. If you bake them too soon, they won’t have that signature honeycomb interior. Also, don’t be afraid of a dark bake. You want a deep golden brown—this is where the flavor of the caramelized butter and sugar lives.
Frequently Asked Questions
Can I use store-bought puff pastry instead?
You can, but it won’t be the same. Traditional Pain aux Raisins uses a yeasted laminated dough (croissant dough), which gives it a bread-like interior that puff pastry lacks.
What if my butter leaks out during baking?
This usually happens if the dough wasn’t proofed long enough or if the butter layers were too thick. Make sure the pastries are very puffy before they go into the oven.
Can I make the dough the day before?
Yes! In fact, letting the dough (détrempe) rest in the fridge overnight before you start the lamination process makes it much easier to handle.
My pastry cream is lumpy, can I fix it?
Absolutely. Just push it through a fine-mesh sieve while it’s still warm, and it will be perfectly smooth again.
Do I have to use a sugar syrup?
It’s optional, but highly recommended. It provides that professional “sticky” finish and helps keep the pastry moist.
Step by Step Pain aux Raisins Recipe Card
Prep time: 1 hour (plus 5+ hours chilling/proofing)
Cook time: 18 minutes
Total time: Approx. 7 hours
Servings: 16–18 pastries
Category: Breakfast/Pastry
Difficulty: Advanced
Cuisine: French
Yield: 18 Spirals
Equipment
-
Rolling pin
-
Baking sheets
-
Parchment paper
-
Small saucepan
-
Whisk
-
Plastic wrap
-
Pastry brush
Ingredients
Dough (détrempe)
-
2 1/4 teaspoons instant yeast (or active dry)
-
160 g whole milk, lukewarm
-
120 g water
-
470 g all-purpose flour, plus extra for dusting
-
50 g granulated sugar
-
1 1/2 teaspoons salt
-
30 g unsalted butter, room temperature
Butter block (beurrage)
-
250 g unsalted butter, cold
-
1.5 Tbsp all-purpose flour
Pastry Cream
-
240 g whole milk
-
1 teaspoon vanilla paste or extract
-
35 g sugar
-
15 g cornstarch
-
2 large egg yolks
-
Pinch salt
-
20 g unsalted butter
Raisins
-
100 g raisins
-
Hot water for soaking
-
1 tablespoon rum (optional)
Egg wash
-
1 egg
-
1 Tbsp water
Sugar syrup
-
50 g sugar
-
60 g water
Instructions
-
Prepare the Dough: In a large bowl, combine milk, water, yeast, and sugar. (If using active dry, let sit for 10 minutes until frothy). Add flour and salt, mixing until a rough dough forms. Knead on a floured surface for 3 minutes. Work in the 30g of room temperature butter and knead until smooth. Roll into a rectangle, wrap in plastic, and refrigerate for at least 2 hours.
-
Create the Butter Block: Mix cold butter with 1.5 tbsp flour. Roll between parchment paper into a 20×15 cm rectangle. Fold parchment edges to make a tidy frame. Refrigerate until firm.
-
Lamination: Roll the chilled dough to 20×32 cm. Place the butter block in the center, fold the dough over to encase it, and seal the edges.
-
First Turn: Roll into a long rectangle (6mm thick). Cut off uneven ends. Fold the top third down and bottom third up (like a letter). Wrap and chill for 30 minutes.
-
Second and Third Turns: Repeat the rolling and folding process two more times, chilling for 30 minutes between the second and third, and at least 2 hours after the final fold.
-
Make the Pastry Cream: Simmer milk and vanilla. Whisk yolks, sugar, salt, and cornstarch. Slowly pour hot milk into the egg mixture while whisking. Return to the pan and whisk over medium heat until bubbling and thick (about 1 minute). Whisk in butter. Cover with plastic wrap (touching the surface) and chill.
-
Assemble and Shape: Soak raisins in hot water (and rum) for 20 minutes, then drain. Roll dough into a 40×30 cm rectangle. Spread the cold pastry cream over it, leaving a 2cm border on one long edge. Sprinkle with raisins. Roll tightly into a cylinder. Chill the log for 20 minutes.
-
Slice and Proof: Slice into 2cm thick rounds. Place on lined trays. Cover and proof at room temperature for about 2 hours until puffed.
-
Bake: Preheat oven to 190°C. Brush with egg wash. Bake for 18 minutes until deep golden.
-
Finish: Dissolve sugar in water over heat to make syrup. Brush onto the hot pastries immediately after baking. Cool on a rack.
Notes
-
Mastering the Timeline: While you can do this in one day, these pastries benefit greatly from a two-day schedule. Prepare the dough (détrempe) and the pastry cream on evening one. On morning two, perform your lamination, shaping, and baking. This prevents the process from feeling rushed and allows the dough to develop a deeper flavor.
-
The Pliability Secret: The biggest challenge in lamination is keeping the butter and dough at the same consistency. If the butter is too hard, it will shatter into shards; if it is too soft, it will melt into the dough. Aim for a texture similar to cold modeling clay.
-
Flour Selection: This recipe uses all-purpose flour for a tender bite. If you prefer a bit more “chew” or structure, you can substitute 100g of the all-purpose flour with high-protein bread flour.
-
Yeast Performance: If you are unsure about the freshness of your yeast, always bloom it in the warm milk first. If it doesn’t foam within ten minutes, start over with fresh yeast to ensure your pastries actually rise.
Nutrition (Estimated per pastry)
-
Calories: 310 kcal
-
Total Fat: 16g
-
Saturated Fat: 10g
-
Cholesterol: 65mg
-
Sodium: 220mg
-
Total Carbohydrates: 38g
-
Dietary Fiber: 1g
-
Sugars: 14g
-
Protein: 5g
There is something deeply meditative about the process of making Pain aux Raisins. It forces you to slow down, to feel the texture of the dough, and to trust the cooling power of your refrigerator. While the steps are many, the result is a pastry that far surpasses anything you could find in a plastic wrapper. When you pull that tray of bubbling, golden spirals out of the oven and brush them with that final glisten of syrup, you aren’t just a home cook—you are a pâtissier. Enjoy the process, and more importantly, enjoy the shatter of those buttery layers with your first morning cup of coffee.
