Raspberry Icebox Cake
The Perfect Raspberry Icebox Cake: A Refreshing Summer Dessert
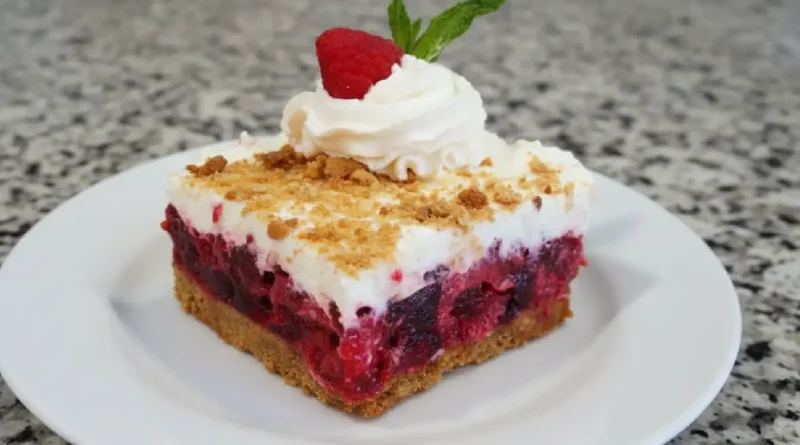
There is something deeply nostalgic about an icebox cake. It brings back memories of humid afternoons when the kitchen felt too hot for a heavy oven-baked cake, yet the craving for something sweet remained. This Raspberry Icebox Cake is the answer to those moments. It features a golden, buttery graham cracker base that provides a sturdy foundation for layers of vibrant, tart raspberries and a cloud-like marshmallow cream. The magic happens in the refrigerator, where the flavors meld together to create a dessert that is as beautiful to slice as it is refreshing to eat. Whether you are hosting a backyard gathering or simply want a cool treat to end a weeknight meal, this dish delivers a bright pop of flavor and a creamy, satisfying texture.
Why You’ll Love This
-
The balance of tart raspberries and sweet marshmallow cream creates a sophisticated flavor profile that isn’t overly sugary.
-
It is an ideal make-ahead dessert, allowing you to prepare it a day in advance so you can focus on your guests.
-
The texture contrast between the crisp, baked crust and the velvety whipped topping makes every bite interesting.
-
It uses simple, accessible ingredients to produce a result that looks and tastes like it came from a professional bakery.
My neighbor, who famously claims to have no room for dessert and typically avoids anything with gelatin, was the first person to ask for a second slice of this cake. I had brought it over for a casual Sunday lunch, and he was skeptical of the pink hue and the marshmallow topping. However, after one small bite, he was won over by the authentic raspberry flavor and the way the whipped cream lightened the entire dish. He later admitted that it reminded him of the old-fashioned desserts his grandmother used to make, but with a fresh, modern brightness that he couldn’t stop eating.
What Makes It Special
-
Frozen Raspberries: These provide a consistent, intense berry flavor and help the gelatin set quickly while adding a wonderful texture.
-
Large Marshmallows: Melting these into warm milk creates a unique, stable fluffiness that keeps the topping airy without being runny.
-
Buttery Graham Cracker Crust: A brief bake transforms simple crumbs into a nutty, golden base that holds up beautifully under the fruit layer.
-
Heavy Whipping Cream: Freshly whipped cream adds a richness and structural integrity that pre-packaged toppings simply cannot match.
Making It Happen
The process begins with the foundation. You will combine your finely crushed graham crackers with melted butter and a touch of brown sugar, pressing the mixture firmly into your pan. A quick ten-minute stay in the oven is all it takes to toast the crumbs and lock in that buttery flavor. While the crust cools, you move on to the vibrant heart of the cake. Dissolving the raspberry gelatin in boiling water creates a fragrant, ruby-red liquid. By stirring in the frozen raspberries, you not only chill the mixture faster but also infuse it with real fruit. This layer is spread over the cooled crust and set aside to firm up.
The final flourish is the marshmallow cream. You gently warm the milk and stir in the marshmallows until they melt into a smooth, glossy ribbon. Once this has cooled slightly, you fold in your stiffly whipped heavy cream. This part of the process requires a gentle hand to keep the air in the mixture. You spread this snowy white layer over the raspberries, sprinkle your reserved graham cracker crumbs on top, and let the refrigerator do the rest of the work. After a few hours of chilling, the layers are set and ready to be sliced into perfect, clean squares.
You Must Know
-
Ensure the graham cracker crust is completely cool before adding the raspberry layer to prevent the crust from becoming soggy.
-
When melting the marshmallows in the microwave, use short bursts of heat and stir frequently to avoid scorching the milk or toughening the marshmallows.
-
Wait until the raspberry gelatin is partially set—meaning it has thickened to a consistency similar to egg whites—before spreading it over the crust for the best layer definition.
Serving Ideas
This cake is delightful on its own, but you can elevate the presentation by serving it with a few fresh raspberries and a sprig of mint on the side. For a beverage pairing, a cold glass of homemade lemonade or a sparkling hibiscus tea complements the tartness of the berries beautifully. If you are serving this at an adult gathering, a crisp, dry rosé or a light Prosecco provides a lovely effervescent contrast to the creamy topping.
Make It Different
-
Berry Variations: You can easily swap the raspberry gelatin and frozen raspberries for strawberry or blackberry versions for a different fruit profile.
-
Crust Swap: For a richer flavor, try using crushed chocolate wafers or gingersnaps instead of graham crackers.
-
Dietary Adjustments: Use gluten-free graham crackers if you are catering to a gluten-sensitive guest. You can also use a dairy-free heavy cream alternative and plant-based milk, though the texture of the marshmallow fluff may vary slightly.
Storage and Reheating
Because this is a chilled dessert, it must be stored in the refrigerator. Keep the pan covered with plastic wrap or a tight-fitting lid to prevent the cream from absorbing any fridge odors. It will stay fresh and delicious for up to three days. This recipe is not suitable for reheating, as the gelatin and marshmallow cream will melt. If the cake has been sitting in the fridge for a full day, the crust may soften slightly, but many people find they actually prefer the way the flavors have deepened by the second day.
Success Tips
-
Use a heavy-bottomed glass or a measuring cup to press the graham cracker crumbs into the pan for an even, compact crust.
-
For the cleanest slices, wipe your knife with a warm, damp cloth between each cut.
-
Don’t rush the chilling process; giving the cake the full four hours ensures the marshmallow layer is stable enough to hold its shape when served.
Frequently Asked Questions
Can I use fresh raspberries instead of frozen?
Yes, you can use fresh berries, but keep in mind that frozen berries help the gelatin set faster. If using fresh, you may need to chill the gelatin mixture in the fridge a bit longer before adding it to the crust.
Do I have to bake the crust?
While you can skip the baking, the ten minutes in the oven really helps the crust stay together and adds a much-needed toasted flavor that balances the sweetness of the toppings.
What if I don’t have a microwave for the marshmallows?
You can melt the marshmallows and milk in a small saucepan over low heat on the stove. Just be sure to stir constantly so nothing sticks to the bottom.
Can I freeze this cake to serve it like an ice cream cake?
You can freeze it, but the texture of the gelatin layer changes once thawed. It is best enjoyed chilled directly from the refrigerator for that signature “icebox” consistency.
Is it possible to use a different size pan?
This recipe is specifically tailored for a 9×13-inch pan to get the ideal layer thickness. Using a smaller pan will result in very thick layers that may take much longer to set properly.
Prep time: 20 minutes
Cook time: 10 minutes
Total time: 4 hours 30 minutes
Servings: 12
Category: Dessert
Difficulty: Easy
Cuisine: American
Yield: 1 9×13 inch cake
Equipment: 9×13-inch baking pan, mixing bowls, microwave-safe bowl, whisk, spatula.
Ingredients
-
24 graham crackers, crushed
-
1/3 cup butter, melted
-
1/4 cup packed brown sugar
-
1 (6 ounce) package raspberry flavored Jell-O® mix
-
1 cup boiling water
-
15 ounces frozen raspberries
-
1/3 cup milk
-
20 large marshmallows
-
1 cup heavy whipping cream, whipped
Directions
-
Prepare the Base: Preheat your oven to 350°F (175°C). In a medium bowl, combine the crushed graham crackers, melted butter, and brown sugar. Mix until it looks like wet sand. Reserve 1/4 cup of this mixture for the top, then press the rest firmly into the bottom of a 9×13-inch pan.
-
Bake and Cool: Bake the crust for 10 minutes until golden and fragrant. Remove from the oven and let it cool completely.
-
The Berry Layer: In a heat-proof bowl, dissolve the raspberry gelatin in 1 cup of boiling water. Stir in the frozen raspberries; the cold berries will help the gelatin thicken. Once it’s partially set (thick but still pourable), spread it evenly over the cooled crust.
-
The Creamy Topping: Warm the milk in a microwave-safe bowl until hot. Add the marshmallows and stir until they are completely melted and smooth. Let this mixture cool down for a few minutes.
-
Fold and Assemble: Gently fold your whipped heavy cream into the marshmallow mixture until combined. Spread this fluffy white layer over the raspberry layer.
-
Finish and Chill: Sprinkle that reserved 1/4 cup of graham cracker crumbs over the top. Cover and refrigerate for at least 3 to 4 hours (or overnight) to let everything set perfectly before slicing.
