Old-Fashioned Southern Pecan Pralines
Old-Fashioned Southern Pecan Pralines: A Buttery, Melt-in-Your-Mouth Candy Recipe
Introduction
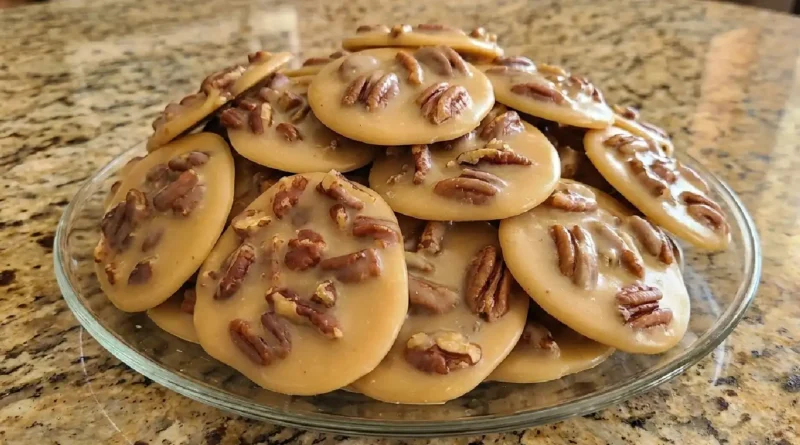
There’s something about homemade pecan pralines that stops people mid-conversation. Maybe it’s the way that glossy, caramel coating catches the light, or how it shatters between your teeth before melting into something creamy and deeply sweet. These aren’t the mass-produced candies from a gift box. They’re the kind of treat that tastes like someone actually cared enough to stand at the stove and watch sugar turn golden, stirring in pecans until they’re coated in pure butterscotch heaven.
Pecan pralines trace back through generations of Southern kitchens, where they appeared on holidays, at church bazaars, and wrapped in wax paper as gifts. The recipe itself isn’t complicated, but it demands your attention. That’s exactly why people love making them. You get to control every element—the color of the caramel, how quickly the mixture sets, whether you want them thin and crispy or thick and chewy. The result feels fancy enough to serve at a dinner party but simple enough that even a first-time candy maker can pull it off.
This recipe for old-fashioned Southern pecan pralines has been refined over years of testing. It uses butter, brown sugar, and vanilla to create a praline that tastes like nostalgia in candy form.
Why You’ll Love This
- They come together in about 30 minutes from start to finish, making them perfect for last-minute gifts or unexpected guests
- The butter-forward flavor is richer and more satisfying than store-bought versions, with a natural sweetness that doesn’t feel cloying
- Once you master the basic technique, you can adjust the texture to your preference—softer if you like them chewy, or firmer if you prefer them to snap cleanly
- They’re naturally vegetarian and require just a handful of common pantry ingredients you likely already have on hand
- Homemade pralines cost a fraction of what gourmet candy shops charge, but taste dramatically better
The Backstory
My brother-in-law showed up to Thanksgiving convinced he didn’t like sweets. He’s the type who pushes dessert around his plate and claims he’s “just not a candy person.” My mother, undeterred, made a batch of her pecan pralines the afternoon before dinner. When he walked into the kitchen and caught the smell of caramelized sugar and toasted pecans, he didn’t say anything. He just reached for one.
Three hours later, half the batch was gone. He ate them straight from the cooling rack, one after another, while watching football. When he finally spoke, it was just: “These are why people have traditions.” He asked for the recipe before he left. He’s made them every Christmas since.
What Makes It Special
- Brown sugar and butter: These two ingredients create a praline that tastes richer and more complex than those made with white sugar alone. The molasses notes add depth and warmth
- Pecans, toasted first: Starting with lightly toasted pecans intensifies their natural nuttiness and prevents them from tasting raw or one-dimensional when mixed into the candy
- Vanilla extract: A quality vanilla doesn’t just add flavor—it smooths out the sweetness and makes the whole thing taste more refined and balanced
- The cooking temperature: Getting to exactly 238°F (the soft-ball stage) is the difference between pralines that stay creamy and smooth versus ones that turn grainy and crystallized
- The working window: The mixture stays workable for only a few minutes after it comes off the heat. This short timeframe actually works in your favor—it forces you to move decisively, which keeps the texture consistent
Making It Happen
Start by gathering your ingredients and setting up your workspace. You’ll want a candy thermometer clipped to a heavy-bottomed saucepan, a wooden spoon for stirring, and a baking sheet lined with parchment paper. Have everything ready before you begin, because once the cooking starts, there’s no time for searching through drawers.
Pour the brown sugar, butter, and heavy cream into your saucepan. Stir everything together over medium heat until the mixture comes to a gentle boil. Clip your thermometer to the side of the pan and let it cook without stirring. This is important—stirring during cooking can cause the sugar to crystallize and ruin the texture. Just let it bubble away quietly while you watch the temperature climb.
Around 235°F, you’re getting close. Keep watching. The mixture will be darker than you might expect, almost amber in color. When your thermometer reads exactly 238°F, remove the pan from the heat immediately. Stir in the vanilla extract and salt, then fold in the toasted pecans. The mixture will thicken noticeably as you stir, and small bubbles will form on the surface.
You have a narrow window here—maybe two to three minutes—before the mixture becomes too stiff to work with. Quickly drop spoonfuls onto your parchment-lined baking sheet, spacing them about two inches apart. If the mixture hardens before you finish, you can warm it gently over very low heat for a few seconds to soften it again. Don’t overheat it, though. Just a few seconds will do.
Let the pralines sit at room temperature for about 30 minutes while they firm up completely. This is when they’ll go from sticky and warm to set and snappable.
You Must Know
- Use a reliable candy thermometer and check that it reads 32°F in ice water before you start. An inaccurate thermometer ruins more batches than any other single factor
- Don’t skip toasting the pecans. Bring them to a 350°F oven for about 8 minutes, just until fragrant. This step transforms them from neutral to rich and complex
- The humidity in your kitchen matters. On very humid days, the pralines may stay soft longer than you expect. This isn’t a disaster—it just means they’ll have a slightly chewier texture
- Don’t use margarine or oil as a substitute for butter. Butter is essential to the flavor and texture. There’s no real workaround here
- If your pralines turn out grainy instead of smooth, the mixture cooled too quickly or you stirred it too much. This is fixable for next time, but not salvageable for this batch
Serving Ideas & Pairings
Pecan pralines pair beautifully with strong, bitter drinks that cut through their sweetness. Serve them alongside black coffee, espresso, or a cup of dark tea. They’re also wonderful with a glass of bourbon or whiskey neat, which echoes the deep caramel notes in the candy itself.
For a complete dessert spread, arrange them alongside other candies like fudge or toffee. Individually wrapped in small pieces of parchment or tissue paper, they make perfect additions to cheese boards or charcuterie arrangements, offering a sweet counterpoint to salty, savory components.
Make It Different
For a nuttier flavor: Substitute half the pecans with toasted walnuts or almonds. The switch changes the personality of the praline while maintaining that classic texture.
For a spiced version: Add 1/4 teaspoon of cinnamon and a pinch of cayenne pepper to the mixture right before adding the pecans. The warmth of the spices plays beautifully against the sweetness.
For a lower-sugar approach: Replace half the brown sugar with coconut sugar. The texture will be slightly less smooth, but the flavor deepens considerably.
For a darker, more caramelized version: Cook the mixture to 240°F instead of 238°F. You’ll get a less creamy, more brittle texture with deeper caramel notes.
For those avoiding dairy: This recipe doesn’t adapt well to non-dairy butter substitutes. If you need to skip dairy entirely, consider making a pecan brittle instead, which uses oil and achieves excellent results without butter.
Storage & Reheating
Pralines actually taste their best within the first 24 hours, when they’re at their ideal texture. Store them in an airtight container at room temperature, layered between parchment paper so they don’t stick together. They’ll stay fresh and crispy for up to a week, though their texture will gradually soften as they absorb ambient moisture.
Don’t refrigerate them. Cold temperatures make the texture dense and waxy. If your house is particularly warm or humid, you can store them in the coolest part of your kitchen, or use airtight containers with packets of uncooked rice inside to absorb excess moisture.
If pralines become soft or sticky after a few days and you want to restore their original texture, place them in a 200°F oven for about 5 minutes. Don’t leave them longer—you’re just removing surface moisture, not re-cooking them. Let them cool completely before eating.
Success Tips
The difference between a good batch and a great one often comes down to small details. Use fresh butter and cream. Old cream that’s been in the refrigerator for weeks won’t whip the air into the mixture the way fresh cream does, and you’ll notice it in the final texture.
Temperature matters more than you think. If your kitchen is cold, the mixture will set faster on the baking sheet, which actually works in your favor—you’ll have crisp edges and a creamier center. If your kitchen is warm, it sets more slowly, giving you a softer, chewier praline. Neither is wrong; it’s just a texture preference.
The color of your caramel tells you more than the thermometer does. A good praline mixture should be medium amber—not pale, not dark brown. If it looks too light, it hasn’t developed enough flavor. If it’s too dark, it’ll taste slightly bitter. That medium amber stage happens right around 238°F, which is why that temperature matters so much.
When you drop the mixture onto the baking sheet, use a second spoon to help push it off the first one. Wet spoons work better than dry ones because they reduce sticking. And work quickly but without panic. Rushing leads to sloppy pralines; overthinking leads to ones that harden before you finish.
Frequently Asked Questions
Why did my pralines turn grainy instead of smooth? Graininess happens when sugar crystals form during cooking, usually caused by stirring the mixture, temperature fluctuations, or crystallized sugar on the sides of the pan. For your next batch, use a pastry brush dipped in water to wipe down the sides of the pan occasionally while it cooks, don’t stir once it boils, and try to keep the heat steady.
Can I double this recipe? Yes, but be careful. Doubling the recipe in the same saucepan can make it harder to control the temperature. If you want to double it, use a larger saucepan and watch the thermometer even more closely. The cooking time might shift slightly because of the increased volume.
What’s the difference between pralines and brittle? Pralines are cooked to the soft-ball stage (238°F), which gives them a creamy, smooth texture. Brittle is cooked to the hard-crack stage (300°F+), which gives it a snappy, glass-like texture. Pralines are richer because they include butter and cream, while brittle is often just sugar and nuts.
How do I know if my candy thermometer is accurate? Place it in a glass of ice water and it should read 32°F. Then place it in boiling water and it should read 212°F. If it reads differently, the thermometer is off, and you’ll need a new one. Don’t guess on temperature—it’s not worth ruining a batch.
Can I make these without a candy thermometer? It’s not recommended, but you can use the cold-water test as a backup. Drop a small spoonful of hot mixture into ice water. If it forms a soft ball that holds its shape but flattens under pressure, you’re at the right stage. This method is less precise, but it works if your thermometer breaks mid-batch.
Recipe Card Info
Prep Time: 15 minutes Cook Time: 15 minutes Total Time: 30 minutes Servings: About 24 pralines Category: Candy/Confections Difficulty: Intermediate Cuisine: Southern American Yield: 1.5 pounds Equipment: Candy thermometer, heavy-bottomed saucepan, wooden spoon, baking sheet, parchment paper
Ingredients
1 cup brown sugar, packed 1/2 cup heavy cream 4 tablespoons unsalted butter 2 cups pecan halves, lightly toasted 1 teaspoon vanilla extract 1/4 teaspoon salt
Directions
Combine brown sugar, heavy cream, and butter in a heavy-bottomed saucepan. Stir over medium heat until the mixture reaches a boil. Clip candy thermometer to the side of the pan and stop stirring. Let the mixture cook undisturbed until the thermometer reads 238°F, about 10-12 minutes. This will be a medium amber color.
Remove from heat immediately and stir in vanilla extract and salt. Fold in the toasted pecans, stirring until the mixture begins to thicken and becomes slightly grainy-looking on the surface. Work quickly.
Drop spoonfuls of mixture onto parchment-lined baking sheet, spacing them about 2 inches apart. Work as fast as you can—the mixture hardens quickly. If it becomes too stiff before you finish, warm it gently over very low heat for a few seconds.
Allow pralines to set at room temperature for 30 minutes until completely firm. Store in an airtight container at room temperature, layered between parchment paper.
Notes
Don’t stir the mixture after it starts boiling—this can cause crystallization. Use a reliable candy thermometer and verify its accuracy in ice water before cooking. The toasting step for pecans is worth your time and dramatically improves the final flavor. On humid days, pralines may stay slightly soft—this is normal and doesn’t affect taste. If they become too soft after storage, place them in a 200°F oven for 5 minutes to restore crispness.
Nutrition
Per praline (approximate): 120 calories | 8g fat | 11g carbohydrates | 0g protein | 1g fiber
