No Bake Banana Split Dessert
The Ultimate No-Bake Banana Split Dessert Recipe: A Classic Crowd-Pleaser
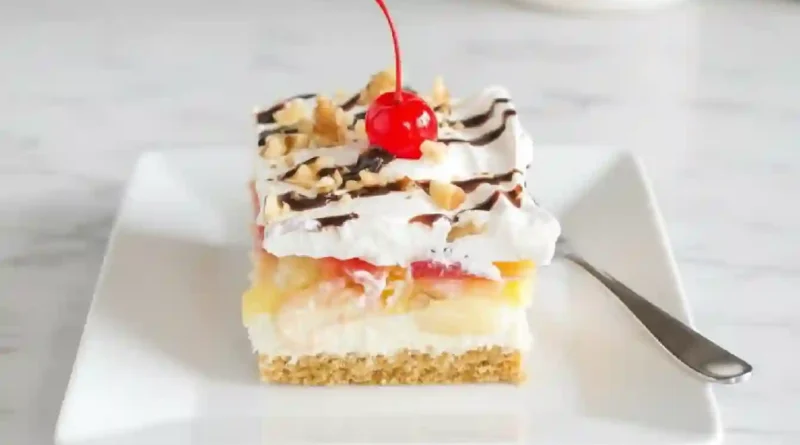
There is something undeniably nostalgic about a banana split. It brings back memories of sun-drenched afternoons at the local diner, the smell of sweet cream, and the excitement of that final maraschino cherry perched on top. This No-Bake Banana Split Dessert captures all that magic but transforms it into a lush, sliceable lasagna-style treat that is perfect for potlucks or family gatherings. It starts with a salty-sweet graham cracker base, followed by a velvety cream cheese cloud, and finished with layers of vibrant fruit and crunchy walnuts. It is cool, refreshing, and looks like a masterpiece on the table without ever requiring you to turn on the oven.
Why You’ll Love This
-
Zero Oven Time: You can keep your kitchen cool while still serving a decadent, homemade dessert that feels incredibly special.
-
The Perfect Texture Balance: From the buttery, golden crunch of the crust to the silky pineapple and pillowy whipped topping, every bite offers a different sensation.
-
A Crowd Favorite: This recipe yields a generous 9×13-inch pan, making it the ideal “bring-along” dish for summer BBQs, office parties, or holiday dinners.
-
Customizable Layers: It is easy to adapt based on what fruit is in season or what your family prefers, making it a versatile staple in your recipe box.
I remember bringing this to a family reunion where my uncle, a self-proclaimed “dessert traditionalist” who usually turns his nose up at anything that isn’t a warm apple pie, was hovering by the buffet. He took a skeptical sliver, then a larger square, and eventually asked for the recipe. He couldn’t believe something so light and creamy didn’t involve hours of labor. Watching a picky eater go back for thirds is the ultimate stamp of approval for this dish.
What Makes It Special
-
Buttery Graham Cracker Crust: The foundation provides a sturdy, slightly salty contrast to the sweet toppings.
-
Tangy Cream Cheese Filling: Whipped with sugar and folded into a light topping, this layer adds a cheesecake-like richness that anchors the fruit.
-
Crushed Pineapple: This brings a tropical brightness and essential moisture that keeps the dessert refreshing rather than heavy.
-
Fresh Strawberry Garnish: The tartness of the berries cuts through the sweetness of the bananas and chocolate syrup perfectly.
-
Textural Toppings: The combination of snappy walnuts and soft maraschino cherries creates that iconic soda-fountain aesthetic.
Making It Happen
We begin by building the foundation. In a bowl, you will toss the golden graham cracker crumbs with melted butter, using a fork to ensure every crumb is moistened and fragrant. Once it looks like wet sand, press it firmly into your baking dish to create a tight, even base. Let this chill in the refrigerator to set while you move on to the heart of the dessert.
Next, we create the creamy center. You’ll beat the room-temperature cream cheese and sugar until the mixture is light and aerated. Gently fold in the first portion of the whipped topping with a spatula, being careful not to deflate the air you’ve just worked in. Spread this snowy mixture over your chilled crust, creating a smooth, white canvas.
Now comes the fun part: the layering. Arrange the rounds of sliced bananas across the cream cheese, followed by a layer of well-drained crushed pineapple. The strawberries go on next, adding a beautiful pop of red. Once your fruit is nestled together, cover everything with a final blanket of whipped topping. To finish, drizzle the chocolate syrup in elegant lines, scatter the walnuts for a satisfying crunch, and dot the top with cherries. The most important part is the wait; the dessert needs at least four hours in the cold to allow the flavors to marry and the layers to firm up into a sliceable delight.
You Must Know
-
Drain the Pineapple Thoroughly: Use a fine-mesh sieve or even press the pineapple with a spoon to remove as much juice as possible. Excess liquid will make the crust soggy.
-
Room Temperature is Key: Ensure your cream cheese is truly soft before mixing to avoid any tiny lumps in your filling.
-
The Chill Factor: Do not rush the refrigeration. The layers need time to set so you can cut clean, beautiful squares.
-
Banana Selection: Use bananas that are yellow with just a few brown spots. If they are too ripe, they will become too mushy within the layers.
Serving Ideas
This dessert is best served cold, straight from the refrigerator. For a true diner-style experience, serve it alongside a tall glass of ice-cold milk or a cup of dark roast coffee to balance the sweetness. If you want to go all out, you can serve individual slices in shallow bowls with an extra dollop of whipped cream on the side.
Make It Different
-
Nut-Free Option: Swap the walnuts for crushed pretzels or toasted coconut flakes if there are allergies to consider.
-
Fruit Swaps: If strawberries aren’t in season, try using fresh raspberries or even blueberries for a different flavor profile.
-
Gluten-Free: Use gluten-free graham cracker crumbs to make this accessible for everyone at the table.
-
Indulgent Drizzles: Swap the chocolate syrup for caramel sauce or a warm peanut butter drizzle for a different twist on the classic split.
Storage and Recipe Tips
This No-Bake Banana Split Dessert should be kept covered in the refrigerator. Because it contains fresh fruit and dairy, it is best enjoyed within 3 to 4 days. As it sits, the bananas may begin to soften and the pineapple may release a bit of juice, but the flavor remains excellent. This dish does not freeze well, as the texture of the bananas and the cream cheese layer will change significantly upon thawing.
Success Tips
For the cleanest slices, wipe your knife with a warm, damp cloth between every single cut. This prevents the white whipped topping from dragging into the fruit layers. Additionally, if you are making this for a formal event, wait to add the chocolate drizzle and the cherries until just before serving to keep the top looking pristine and prevent the syrup from bleeding into the topping.
Frequently Asked Questions
Can I make this a day in advance?
Yes, this is actually one of those rare desserts that tastes even better the next day. Making it 24 hours ahead of time allows the crust to soften just slightly and the flavors to fully develop.
Can I use real whipped cream instead of Cool Whip?
You can, but keep in mind that fresh whipped cream is less stable. If you use the real stuff, the dessert will likely only stay firm for about 48 hours before it begins to weep or become watery.
How do I keep the bananas from browning?
Since the bananas are tucked between the cream cheese and the pineapple, they are largely protected from the air. The acidity in the pineapple also helps preserve their color naturally.
My crust is crumbling when I slice it. What happened?
This usually happens if the butter wasn’t fully incorporated or if the crust wasn’t pressed down firmly enough. Use the bottom of a flat measuring cup to really pack the crumbs into the corners of the pan.
Can I use frozen strawberries?
It is not recommended. Frozen strawberries release too much moisture when they thaw, which will turn your beautiful dessert into a watery mess. Stick with fresh berries for the best results.
Recipe Card
Prep time: 30 minutes
Cook time: 0 minutes
Total time: 4 hours 30 minutes (includes chilling)
Servings: 12-15 servings
Category: Dessert
Difficulty: Easy
Cuisine: American
Yield: 1 9×13 inch pan
Equipment: 9×13-inch baking dish, electric hand mixer, rubber spatula, medium mixing bowls.
Ingredients
For the Crust:
-
2 cups graham cracker crumbs
-
½ cup unsalted butter, melted
For the Cream Cheese Layer:
-
12 ounces cream cheese, at room temperature
-
¼ cup granulated sugar
-
8 ounces Cool Whip
For the Fruit & Toppings:
-
3 to 4 bananas, sliced
-
20 ounce canned crushed pineapple, drained well
-
16 ounces strawberries, hulled and sliced
-
8 ounces Cool Whip
-
½ cup walnuts, chopped
-
Chocolate syrup
-
Maraschino cherries
Instructions
-
Grease a 9×13-inch baking dish and set it aside to prepare for the layers.
-
In a medium bowl, combine the graham cracker crumbs and the melted butter. Use a fork to stir until the mixture resembles wet sand and all crumbs are evenly coated.
-
Transfer the crumb mixture to the prepared pan. Press firmly and evenly into the bottom of the dish. Place the pan in the refrigerator to chill while you prepare the filling.
-
In another bowl, beat the softened cream cheese and granulated sugar on medium speed for about 3 minutes until the texture is light and fluffy.
-
Using a rubber spatula, gently fold in 8 ounces of Cool Whip until the mixture is uniform. Spread this evenly over the chilled graham cracker crust.
-
Place the banana slices in a single layer over the cream cheese filling. Top the bananas with the well-drained crushed pineapple, followed by an even layer of the sliced strawberries.
-
Spread the remaining 8 ounces of Cool Whip over the fruit layer, smoothing the top with your spatula.
-
Garnish the top by sprinkling the chopped walnuts, drizzling generously with chocolate syrup, and placing maraschino cherries across the surface.
-
Refrigerate for at least 4 hours, though overnight is preferred for the best texture.
Notes
If substituting fresh whipped cream for the Cool Whip, ensure it is whipped to very stiff peaks. Note that leftovers with fresh cream will only last about 2 days before losing stability.
Nutrition
Calories: 345 kcal | Carbohydrates: 42g | Protein: 4g | Fat: 19g | Saturated Fat: 11g | Sodium: 210mg | Fiber: 2g | Sugar: 28g
Would you like me to create a printable PDF version of this recipe card or perhaps suggest a variation using different crust options?
