Biscoff Cheesecake Recipe
Easy No-Bake Biscoff Cheesecake Recipe (No Bake) | The Ultimate Guide
There’s a certain magic that happens when you combine a beloved cookie with the creamy indulgence of cheesecake. For me, that magic is called Biscoff Cheesecake. I first encountered this dessert at a friend’s potluck, a single slice that disappeared from my plate in what felt like seconds. The memory of that flavor—the warm, spiced, almost caramelized biscuit base, the impossibly smooth filling, and that glossy, rich topping—stuck with me. I knew I had to recreate it. After many happy (and delicious) trials, this no-bake version was born. It’s become my secret weapon, the dessert that earns wide-eyed looks of wonder and the inevitable question: “Can I have the recipe?”
Why You’ll Love This Biscoff Cheesecake
-
It’s a true crowd-pleaser. The unique, comforting flavor of Biscoff is something almost everyone adores, making it a guaranteed hit at any gathering.
-
There’s no baking required. This is the ultimate easy cheesecake. You don’t need to worry about water baths, cracking, or turning on the oven, making it perfect for warm days or busy schedules.
-
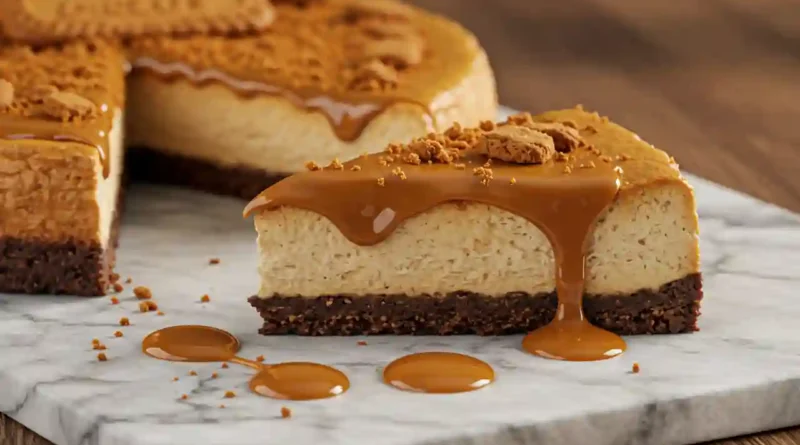
It’s a textural dream. Imagine a crisp, buttery base giving way to a luxuriously creamy, thick filling, all topped with a smooth, molten-style Biscoff layer and a final crunch of biscuit crumbs.
-
It feels decadent and special. This isn’t your everyday dessert. It’s the one you make for birthdays, celebrations, or when you simply want to treat yourself and your loved ones to something extraordinary.
I’ll never forget the time I served this to my friend’s father, a man famously skeptical of any dessert that isn’t apple pie. He eyed the slice with polite suspicion, took a small bite, and then proceeded to finish the entire piece in silence. He looked up, nodded slowly, and said, “Now that’s something else. What do you call those biscuits again?” He’s since requested it for his birthday.
What Makes It Special
The beauty of this Biscoff cheesecake lies in its simplicity and the powerhouse ingredients that do all the flavor work for you.
-
Biscoff Biscuits: These aren’t just any cookie. Their unique blend of cinnamon, ginger, nutmeg, and brown sugar creates a deeply spiced, caramelized flavor that forms the foundation of the entire dessert.
-
Biscoff Spread (Cookie Butter): This is the star of the show. It’s like peanut butter’s more sophisticated, spiced cousin. We use it in the filling for an intense flavor and again melted for that iconic, glossy topping.
-
Full-Fat Cream Cheese: Using a high-quality, full-fat brand like Philadelphia ensures a rich, tangy, and stable base for the filling that whips up beautifully without becoming watery.
-
Double Cream: This is what gives the filling its incredible, lush texture that holds its shape perfectly, mimicking the density of a baked cheesecake without the fuss.
Making It Happen
Let’s create this masterpiece together. First, take your Biscoff biscuits and crush them into fine crumbs. You can do this by placing them in a sturdy zip-top bag and rolling them with a rolling pin, or pulsing them in a food processor. Mix these gorgeous golden crumbs with the melted butter until it resembles wet sand. Press this mixture firmly into the base of your prepared tin. I like to use the bottom of a glass to get it really even and compact. Pop this into the fridge to set and become firm.
Now, for the heavenly filling. In a large bowl, pour in your cold double cream. Add the room-temperature cream cheese and the Biscoff spread. Using an electric whisk is highly recommended here—it makes the job quick and ensures everything combines into a supremely thick, smooth mixture. You’re looking for a consistency that’s almost as thick as soft-serve ice cream; when you lift the whisk, the peaks should hold their shape.
Retrieve your now-set base from the fridge. Spoon the thick cheesecake mixture over the top and smooth it out with a spatula into one beautiful, even layer. Gently tap the tin on the counter to release any air bubbles. Now, the hardest part: patience. This needs to chill in the fridge for at least three hours, though overnight is truly ideal for the cleanest slices.
When you’re nearly ready to serve, prepare the pièce de résistance: the topping. Gently melt the additional Biscoff spread. You can do this in short bursts in the microwave or in a pan over very low heat. The goal is to just melt it, not to cook it or make it hot. Let it cool for a minute. Remove your set cheesecake from the fridge and, while it’s still in its tin, slowly pour the melted spread over the center. Using the back of a spoon, gently coax it to the edges until the entire top is covered in a glossy, smooth blanket of cookie butter. Be careful not to mix it into the filling below. Finally, sprinkle the reserved crushed biscuits around the perimeter for that final bit of crunch and visual flair. For the absolute best results, let it set back in the fridge for another hour before serving.
You Must Know
-
Patience is your secret ingredient. Rushing the chilling times is the number one reason a no-bake cheesecake won’t set properly. Overnight chilling is a game-changer for texture and slicing.
-
Temperature matters. Your cream must be cold to whip properly, and your cream cheese should be at room temperature to avoid lumps.
-
Line your tin. Even with a springform pan, lining the base with a circle of parchment paper guarantees a stress-free release.
-
Warm your knife. For picture-perfect slices, dip a sharp knife in hot water, wipe it dry, and then cut. Repeat this between each slice.
Serving Ideas
This Biscoff cheesecake is a superstar all on its own, but a dollop of freshly whipped cream or a scoop of vanilla bean ice cream on the side never hurts. For a contrasting flavor, a drizzle of salted caramel sauce or a few fresh raspberries add a wonderful touch. Drink-wise, a cup of strong coffee, a glass of cold milk, or even a sweet dessert wine like a Riesling are all fantastic pairings that complement the warm spices.
Make It Different
-
Dietary Tweaks: For a gluten-free version, use gluten-free Biscoff-style biscuits and spread. While I haven’t tested it, a dairy-free cream cheese and coconut cream alternative could work for the filling.
-
Flavor Twists: Swirl some melted chocolate or salted caramel sauce into the cheesecake filling before chilling. Add a teaspoon of instant espresso powder to the filling to enhance the caramel notes.
-
Ingredient Swap: No Biscoff spread? A smooth peanut butter or speculoos spread would be the closest substitute.
Storing Your Masterpiece
This cheesecake must be stored covered in the refrigerator. It will keep beautifully for up to 4 days. I do not recommend freezing this particular recipe, as the topping can become granular and the filling may separate upon thawing.
Success Tips
The key to a flawless release is running a thin, warmed knife around the edge of the cheesecake before you attempt to unlock the springform pan. Place the base of the tin on a large can or a tall glass and gently push the sides down. Slide the cheesecake, still on its base, onto your serving plate.
Frequently Asked Questions (FAQ)
Q: Can I use light cream cheese?
A: I strongly recommend against it. Full-fat cream cheese provides the necessary structure and rich flavor. Light versions contain more water and can result in a softer, less stable filling that may not set firmly.
Q: My melted Biscoff spread for the topping is very thick. What did I do wrong?
A: You likely overheated it, which can cause the oils to separate. Gently warm it only until it’s just melted and fluid. If it’s too thick to pour, add a tiny, tiny amount of neutral oil (like vegetable or sunflower) and whisk to combine.
Q: How far in advance can I make this?
A: Perfectly! This is an excellent make-ahead dessert. You can prepare it completely, including the final topping, and keep it covered in the fridge for up to two days before serving.
Q: What size tin did you use?
A: I use a 7-inch (18cm) springform or loose-bottom tin for a nice, tall cheesecake. An 8-inch tin will work, but your cheesecake will be slightly shorter and will require less chilling time (check it after 2 hours).
Q: Is Biscoff spread the same as cookie butter?
A: Essentially, yes. Biscoff is the brand name for the original Speculoos cookie butter. Other brands make similar products, often called “cookie butter” or “speculoos spread,” and they will work just fine in this recipe.
Biscoff Cheesecake Recipe
Prep time: 30 minutes
Cook time: 0 minutes
Chill time: 4 hours (overnight best)
Total time: 4 hours 30 minutes (plus chilling)
Category: Dessert
Difficulty: Easy
Cuisine: American
Yield: 10 slices
Ingredients
For the base:
-
200 g Biscoff biscuits, crushed
-
80 g unsalted butter, melted
For the cheesecake filling:
-
300 ml double cream (or heavy cream), cold
-
400 g full-fat cream cheese, at room temperature
-
200 g Biscoff spread (cookie butter)
For the topping:
-
150 g Biscoff spread, melted
-
50 g Biscoff biscuits, crushed
Instructions
-
Combine the crushed Biscoff biscuits with the melted butter until it resembles wet sand. Press the mixture firmly and evenly into the base of a 7-inch springform tin. Chill in the refrigerator while you prepare the filling.
-
In a large bowl, pour in the cold double cream. Add the room-temperature cream cheese and the 200g of Biscoff spread. Using an electric hand whisk, beat the mixture together until it is very thick and holds its shape, similar to the consistency of soft-serve ice cream.
-
Remove the chilled base from the fridge. Spoon the cheesecake mixture over the base and smooth the top with a palette knife or spatula. Tap the tin gently on the counter to remove any air bubbles.
-
Return the cheesecake to the refrigerator to set for a minimum of 3 hours, though overnight is highly recommended for the best results.
-
Shortly before serving, gently melt the 150g of Biscoff spread for the topping until it is smooth and pourable. Allow it to cool slightly so it is not hot.
-
Remove the set cheesecake from the fridge. Pour the melted Biscoff spread over the center of the cheesecake. Using the back of a spoon, gently spread it to the edges, creating a smooth, even layer. Be careful not to disturb the set filling below.
-
Sprinkle the remaining crushed Biscoff biscuits around the outer edge of the cheesecake. Return it to the fridge for at least another hour to allow the topping to set.
-
To serve, carefully run a warm knife around the inside edge of the tin to loosen the cheesecake before unclipping and removing the sides.
Notes
Allergy Info: Contains gluten, dairy, and soy.
Nutrition: (Per slice, approximate) Calories: 645kcal | Carbohydrates: 45g | Protein: 7g | Fat: 50g | Saturated Fat: 24g | Sodium: 320mg | Sugar: 30g.
