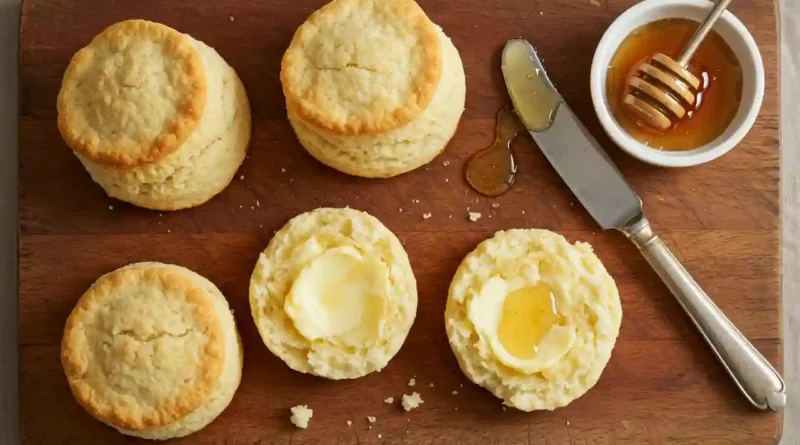
Buttermilk Biscuits with Honey Butter
The Simple Joy of a Warm Biscuit
There’s a certain magic that happens in the kitchen when simple ingredients transform into something extraordinary. For me, that magic is embodied in the humble buttermilk biscuit. This recipe isn’t just about following steps; it’s about creating a moment. I remember cool weekend mornings at my grandmother’s house, where the scent of baking biscuits would weave through the air, a warm and buttery promise of the comfort to come. She’d pull a golden, steaming tray from the oven, the tops crisp and the insides impossibly fluffy. Then, with a knowing smile, she’d slather a pat of honey butter on one, watching it melt into every tender layer before handing it to me. That first bite—flaky, salty, sweet, and rich—is a core memory. This recipe is my tribute to that feeling. It’s a promise that with a little care, you can create that same heartwarming experience right in your own home.
Why You’ll Love This Buttermilk Biscuits with Honey Butter Recipe
-
Unbeatable Homemade Flavor: The taste of a biscuit fresh from your oven, slathered with freshly whipped honey butter, is miles away from anything store-bought. It’s a truly rewarding baking experience.
-
Surprisingly Simple: With just a handful of pantry staples and a few key techniques, you can achieve bakery-quality results without any special equipment.
-
The Ultimate Comfort Food: These buttermilk biscuits are the edible equivalent of a warm hug. They are perfect for a slow weekend breakfast, a holiday brunch, or just because.
-
Incredibly Versatile: While the honey butter is a dream pairing, these biscuits are a blank canvas. They can be served with gravy for dinner, with jam for tea, or as the base for a breakfast sandwich.
A Triumph for a Picky Eater
I once made a batch of these for a family gathering where my young nephew, a famously picky eater who would rarely venture beyond plain pasta, was visiting. He watched, intrigued, as I brushed the golden tops with melted butter straight from the oven. Hesitantly, he took one. Then, without a word, he finished it and reached for another. His mother looked on in stunned silence—it was the first time he’d ever asked for a second helping of anything that wasn’t a cookie. That’s the power of a perfect buttermilk biscuit; it can win over even the most skeptical of hearts.
What Makes It Special
The brilliance of this dish lies in the quality and interaction of its simple components.
-
Cold Butter: This is the non-negotiable secret to flaky layers. When small pieces of cold butter steam in the hot oven, they create pockets of air, leading to that signature lift and tender texture.
-
Full-Fat Buttermilk: The tangy acidity of buttermilk not only adds incredible flavor but also reacts with the baking powder, giving the biscuits an extra boost and a wonderfully soft, moist crumb.
-
The Lamination Technique: Gently folding and rolling the dough a few times is what creates those beautiful, pull-apart layers you see in the best Southern-style biscuits.
-
The Honey Butter: Using high-quality, softened butter and a good, flavorful honey transforms a simple compound butter into a sweet, creamy spread that melts luxuriously into the warm biscuits.
Making It Happen: Crafting Your Biscuits
This process is a gentle dance—the less you fuss, the more tender your buttermilk biscuits will be. Start by preheating your oven to a hot 425°F (220°C) and lining a baking sheet with parchment paper. This high heat is crucial for that initial explosive rise and golden-brown crust.
In a large bowl, whisk together your dry ingredients: the flour, baking powder, sugar, and salt. This ensures every bit of the dough is evenly seasoned and leavened. Now, add your cold, cubed butter. Using your fingertips or a pastry cutter, work the butter into the flour until the mixture resembles a coarse meal with some pea-sized pieces of butter remaining. These visible butter bits are your ticket to flakiness.
Create a well in the center and pour in the cold buttermilk. Use a fork to gently stir until a shaggy, sticky dough just begins to form. It will look messy, and that’s perfect. Turn this dough out onto a lightly floured surface. With floured hands, gently pat it into a rough rectangle about an inch thick. Now, for the layers: fold the dough over onto itself. Gently roll or pat it back out to that one-inch thickness. Repeat this folding process four more times.
Finally, pat or roll the dough into a final one-inch thick rectangle. Take your biscuit cutter (or a floured glass) and press straight down without twisting. Twisting seals the edges and prevents a good rise. Place the cut biscuits on your prepared baking sheet, ensuring they are just touching each other. This helps them climb upwards as they bake, giving you those tall, proud biscuits.
Bake for 12-15 minutes, or until they are puffed high and gloriously golden brown on top. While they bake, make the honey butter by simply whipping the softened butter and honey together in a small bowl until smooth and combined.
You Must Know
-
Keep Everything Cold: The butter and buttermilk must be cold. I even recommend chilling the bowl and pastry cutter for 10 minutes beforehand.
-
No Overworking: Handle the dough as little as possible. Over-mixing develops gluten, leading to tough biscuits.
-
Don’t Twist the Cutter: Press straight down and lift straight up. Twisting compresses the dough layers and impedes rising.
-
Bake Them Close: Placing the biscuits snugly on the pan helps them rise up, not out.
Serving Your Masterpiece
These buttermilk biscuits with honey butter are a star on their own, but they also love company. Serve them alongside savory breakfast dishes like scrambled eggs, crispy bacon, and cheesy grits. For a holiday brunch, they are exceptional with a glazed ham. For a simple and satisfying dinner, pair them with a hearty bowl of potato soup or chili. A glass of cold whole milk, a hot cup of coffee, or a sharp black tea are all perfect beverage pairings to cut through the richness.
Make It Different
-
Cheesy Garlic: Add 1 cup of shredded sharp cheddar cheese and 1/2 teaspoon of garlic powder to the dry ingredients for a savory twist.
-
Herb-Infused: Fold 2 tablespoons of freshly chopped chives or rosemary into the dough with the buttermilk.
-
Gluten-Free: Substitute a 1:1 gluten-free all-purpose flour blend with xanthan gum already included.
-
Dairy-Free: Use frozen, grated vegan butter and cold unsweetened almond milk mixed with 1 tablespoon of lemon juice (let it sit for 5 minutes to curdle) as a buttermilk substitute.
Storing and Reheating Your Biscuits
Storage: Allow leftover biscuits to cool completely. Store them in an airtight container at room temperature for up to 2 days. For longer storage, freeze the baked biscuits in a freezer bag for up to 3 months.
Reheating: To recapture that fresh-from-the-oven magic, reheat biscuits in a 350°F (175°C) oven for 10 minutes, or until warmed through. You can also microwave them for 15-20 seconds, but the oven method will best restore the crispy exterior.
Success Tips for the Best Biscuits
For the absolute best results, measure your flour correctly by spooning it into the measuring cup and leveling it off. If you press the cup into the flour bag, you’ll use too much and end up with dry biscuits. If you don’t have a biscuit cutter, a sharp knife works beautifully for cutting square biscuits, which eliminates any scraps and re-rolling.
Frequently Asked Questions (FAQ)
Q: Can I make the dough ahead of time?
A: Absolutely. You can prepare the dough, cut out the biscuits, and place them on the baking sheet. Cover them tightly with plastic wrap and refrigerate for up to 12 hours before baking. You may need to add a minute or two to the baking time.
Q: I don’t have buttermilk. What can I use?
A: A great substitute is to make your own “soured milk.” Place 1 tablespoon of white vinegar or lemon juice in a measuring cup, then add enough regular milk to reach the 1-cup line. Stir and let it sit for 5-10 minutes until it thickens and curdles slightly.
Q: Why are my biscuits tough?
A: This is almost always due to overworking the dough. Handle it as gently and as little as possible once the liquid is added to develop those tender layers.
Q: Can I freeze the unbaked biscuits?
A: Yes! This is a fantastic trick. Freeze the cut biscuits, uncovered, on a baking sheet until solid. Then transfer them to a freezer bag. Bake from frozen, adding a few extra minutes to the baking time.
Q: My biscuits didn’t rise very high. What happened?
A: This could be due to old baking powder (check the expiration date!), over-handling the dough, twisting the cutter, or your oven not being hot enough. Ensure your ingredients are fresh and your oven is fully preheated.
Recipe Card: Buttermilk Biscuits with Honey Butter
Prep Time: 15 minutes
Cook Time: 15 minutes
Total Time: 30 minutes
Category: Breakfast, Bread
Difficulty: Easy
Cuisine: American
Yield: 8-10 biscuits
Ingredients
For the Biscuits:
-
2 1/2 cups all-purpose flour, plus more for dusting
-
2 tablespoons baking powder
-
1 teaspoon granulated sugar
-
1 teaspoon salt
-
8 tablespoons (1 stick) cold unsalted butter, cut into small cubes
-
1 cup cold full-fat buttermilk
For the Honey Butter:
-
1/2 cup (1 stick) unsalted butter, softened
-
3 tablespoons honey
Instructions
-
Preheat your oven to 425°F (220°C). Line a baking sheet with parchment paper.
-
In a large bowl, sift or whisk together the flour, baking powder, sugar, and salt.
-
Add the cold, cubed butter to the flour mixture. Using a pastry cutter or your fingertips, work the butter into the flour until the mixture resembles coarse meal with a few pea-sized pieces of butter remaining.
-
Pour the cold buttermilk into the flour-butter mixture. Use a fork to gently stir until a shaggy, sticky dough forms. Do not overmix.
-
Turn the dough out onto a lightly floured surface. Gently pat it into a 1-inch thick rectangle. Fold the dough in half, then gently pat or roll it back out to a 1-inch thickness. Repeat this folding process 4 more times.
-
After the final fold, pat or roll the dough into a final 1-inch thick rectangle. Using a floured 2.5 or 3-inch round biscuit cutter, press straight down without twisting to cut out biscuits. Gather scraps, pat together gently, and cut out more biscuits.
-
Place the biscuits on the prepared baking sheet, arranging them so they are just touching each other.
-
Bake for 12-15 minutes, or until the tops are golden brown and the biscuits have risen high.
-
While the biscuits bake, prepare the honey butter by whipping the softened butter and honey together in a small bowl until smooth and fully combined.
-
Serve the biscuits warm from the oven, slathered generously with honey butter.
Notes
-
Freezing Unbaked Biscuits: For easy future breakfasts, freeze the unbaked, cut biscuits on a baking sheet until solid. Transfer to a resealable freezer bag and freeze for up to 3 months. Bake from frozen, adding 3-5 minutes to the baking time.
-
Buttermilk Substitute: If you don’t have buttermilk, you can make a quick version by adding 1 tablespoon of lemon juice or white vinegar to a measuring cup and then adding enough milk to reach the 1-cup line. Let it sit for 5-10 minutes before using.