Cheesy Garlic Bread Loaf Recipe
Table of Contents
ToggleCheesy Garlic Bread Loaf Recipe That Disappears in Minutes
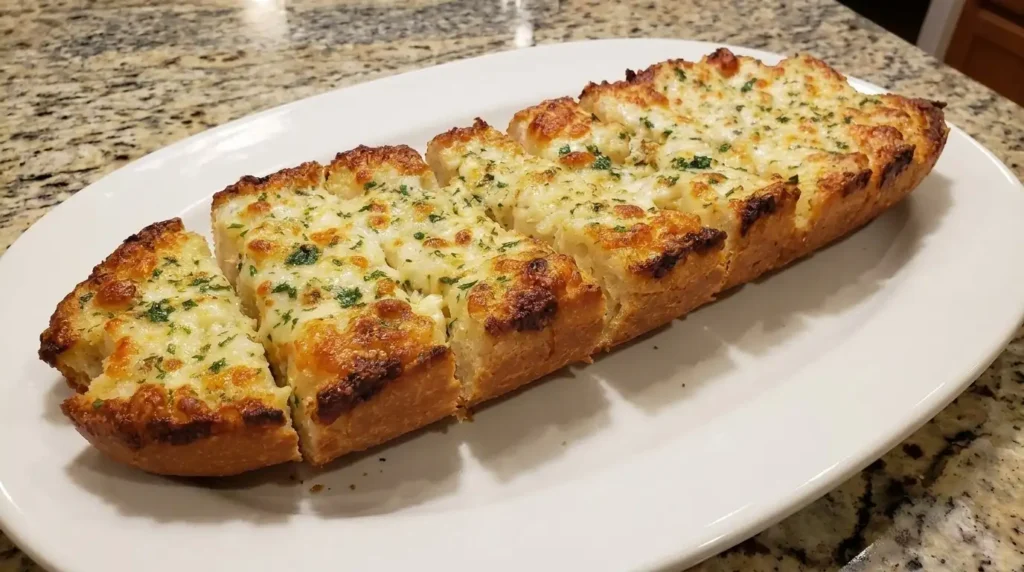
There’s a specific sound that happens when you pull a loaf of cheesy garlic bread out of the oven — that faint crackle as the crust settles, the cheese still bubbling at the edges, garlic butter hissing quietly in the pan below. I first made this loaf on a Tuesday night when I had nothing planned for dinner and half a stick of butter staring at me from the fridge door. What started as “let’s just make something with bread and cheese” turned into a recipe I now make on purpose, not by accident.
This cheesy garlic bread loaf is soft on the inside, golden and crisp where the butter soaks in, and pulls apart in warm, stringy pieces once the cheese melts through every crack. It’s the kind of thing you set on the table and watch vanish before the rest of dinner is even plated. Garlic, butter, and a blend of melty cheese do most of the work here — no fancy technique required, just a loaf of bread and a little patience while it bakes.
Why You’ll Love This
- It comes together with basic pantry ingredients — no special trip to the store required
- The garlic butter soaks into every crevice, so each bite is flavorful, not just the top layer
- It works as an appetizer, a side dish, or honestly, dinner on its own with a glass of wine
- Kids and picky eaters tend to go for it without any convincing
- You can prep it ahead and just bake it right before serving
The Backstory
My mother-in-law is not an easy person to impress at the dinner table. She grew up baking bread from scratch and has strong opinions about butter-to-garlic ratios that she’s never shy about sharing. The first time she came over for dinner, I made this loaf almost as an afterthought, worried she’d find it too simple. She ate two pieces before the main course even hit the table, then quietly asked for the recipe on her way out the door — no compliments, no fanfare, just that request, which from her is basically a five-star review. Since then, it’s become the thing she asks me to bring whenever there’s a family gathering, and I’ve never once shown up without it.
What Makes It Special
- Butter and garlic, cooked together gently — this softens the sharp bite of raw garlic into something warm and rounded, not overpowering
- A blend of mozzarella and a sharper cheese like cheddar or parmesan — mozzarella brings the stretch, the sharper cheese brings depth so it doesn’t taste one-note
- Fresh parsley — a small handful cuts through the richness and adds a bit of color and freshness
- A crusty loaf as the base — something with structure, like a sourdough or French loaf, holds up to all that butter without turning soggy
- A pinch of salt and cracked pepper — small, but it rounds out the sweetness of the melted cheese
Making It Happen
Start by melting butter in a small pan over low heat, then add minced garlic and let it cook gently for a minute or two — just until it turns fragrant, not browned or bitter. Stir in chopped parsley and a pinch of salt, then set that aside to cool slightly while you deal with the bread.
Take your loaf and slice it in a crosshatch pattern, cutting down close to the base but not all the way through, so the loaf stays intact and holds its shape. This is what creates all those little pockets for the butter and cheese to melt into later.
Wrap the loaf loosely in foil, leaving the top open, and place it on a baking sheet. Drizzle or brush the garlic butter generously into every cut, working it down into the crevices so nothing goes to waste. Then stuff shredded cheese between the slices — don’t be shy here, push it down so it melts through the whole loaf rather than just sitting on top.
Bake in a preheated oven until the cheese turns soft and the bread is warmed through, then open the foil and let it bake uncovered for a few more minutes so the top turns golden and slightly crisp at the edges. Pull it out when the cheese is bubbling and just starting to turn spotty brown in places. Let it sit for a minute before pulling it apart — that short rest keeps the cheese from sliding right off when you tear into it.
You Must Know
- Use room-temperature butter for the garlic mixture, since cold butter clumps and doesn’t spread evenly into the cuts
- Don’t cut all the way through the bottom of the loaf — you need that base to hold everything together
- Shred your own cheese if you can. Pre-shredded cheese has anti-caking additives that keep it from melting as smoothly
- Keep an eye on the oven during the uncovered stage — the line between golden and burnt moves fast
- Let the loaf rest for a couple of minutes after baking so the cheese sets slightly before serving
Serving Ideas & Pairings
This loaf works well next to a bowl of tomato soup or a simple marinara for dipping. It also holds its own alongside a big green salad with a sharp vinaigrette to balance the richness. For pasta night, it’s a natural side. If you’re serving it as an appetizer, a light red wine or a cold beer pairs nicely, and for something non-alcoholic, sparkling water with a wedge of lemon cuts through the buttery richness well.
Make It Different
- Spicy version: add red chili flakes or a swirl of hot honey into the garlic butter for some vibrant heat
- Herb swap: try fresh basil or chives instead of parsley for a different aromatic note
- Cheese swap: gruyère or smoked gouda adds a deeper, smoky flavor if you want something beyond mozzarella and cheddar
- Dairy-free: use a plant-based butter and a good melting dairy-free cheese blend — the texture won’t be identical, but it still works
- Extra toppings: caramelized onions or crispy bacon bits tucked between the slices add another layer of flavor
Storage & Reheating
Leftovers keep well wrapped tightly in foil or an airtight container in the fridge for up to three days. To reheat, wrap the loaf back in foil and warm it in the oven at a moderate temperature until the cheese turns soft and melty again — this keeps the bread from drying out the way a microwave tends to. If you’re only reheating a slice or two, a toaster oven works well and keeps the edges crisp.
Success Tips
Don’t rush the garlic butter step. Letting the garlic cook low and slow for even just a minute changes the whole flavor — raw garlic butter tastes sharp and a little harsh once baked, while gently cooked garlic turns mellow and sweet. Also, resist the urge to overload the loaf with cheese all at once; layering it in gradually as you stuff the cuts helps it melt more evenly instead of pooling in one spot. And if your loaf seems to be browning too fast on top before the inside is warmed through, tent it loosely with foil again for a few minutes.
Frequently Asked Questions
Can I make this ahead of time? Yes. You can prep the loaf with the garlic butter and cheese, wrap it tightly, and refrigerate it for a few hours before baking. Just add a few extra minutes to the bake time since it’ll be starting from cold.
What kind of bread works best? A sturdy, crusty loaf like sourdough, French bread, or Italian bread holds up best. Softer sandwich bread tends to fall apart once it’s loaded with butter and cheese.
Can I freeze cheesy garlic bread loaf? You can freeze it unbaked, wrapped tightly in foil and then plastic wrap, for up to a month. Bake straight from frozen, adding extra time until it’s heated through and the cheese melts fully.
Why did my cheese turn greasy instead of melty? This usually happens with pre-shredded cheese or if the oven runs too hot for too long. Shredding cheese fresh and keeping an eye on bake time helps keep the texture smooth rather than oily.
Can I make this on the grill instead of the oven? Yes, wrap it in foil and place it over indirect heat on a covered grill, checking periodically until the cheese melts and the bread warms through. It adds a slightly smoky note that works really well with the garlic.
Recipe Card Info
Prep time: 15 minutes Cook time: 20 minutes Total time: 35 minutes Servings: 6 to 8 Category: Appetizer, Side Dish Difficulty: Easy Cuisine: American, Italian-inspired Yield: 1 loaf
Equipment: Baking sheet, foil, small saucepan, bread knife, box grater
Ingredients:
- 1 large crusty loaf (sourdough or French bread)
- 1/2 cup unsalted butter, softened
- 4 to 6 cloves garlic, minced
- 2 cups shredded mozzarella cheese
- 1 cup shredded sharp cheddar or parmesan cheese
- 2 tablespoons fresh parsley, chopped
- 1/2 teaspoon salt
- 1/4 teaspoon cracked black pepper
Directions:
- Preheat the oven to 375°F (190°C)
- Melt butter in a small saucepan over low heat, add minced garlic, and cook gently for 1 to 2 minutes until fragrant
- Stir in parsley, salt, and pepper, then set aside
- Slice the loaf in a crosshatch pattern, cutting down close to the base without cutting all the way through
- Place the loaf on a sheet of foil on a baking sheet
- Brush or drizzle the garlic butter into every cut
- Stuff shredded mozzarella and cheddar between the slices
- Wrap the loaf loosely in foil, leaving the top exposed
- Bake for 15 minutes, then uncover and bake for another 5 to 8 minutes until the cheese is bubbling and golden
- Let rest for 2 minutes before pulling apart and serving
Notes:
For extra flavor, try adding a swirl of hot honey or chili flakes into the garlic butter before brushing it on. Fresh-shredded cheese melts more evenly than pre-shredded varieties.
Nutrition (per serving, approximate):
Calories: 320, Protein: 12g, Carbohydrates: 24g, Fat: 20g, Saturated Fat: 11g, Sodium: 480mg, Fiber: 1g
