Cheesy Taco Breadsticks
Cheesy Taco Breadsticks: Your New Favorite Crowd-Pleasing Appetizer!
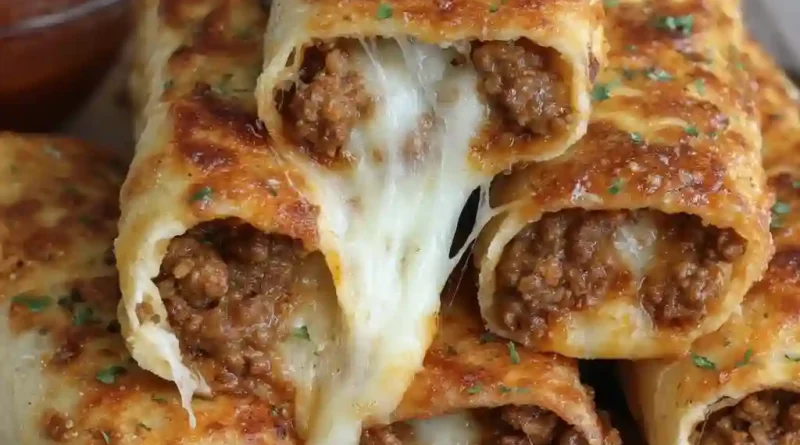
Remember that feeling of pure, unadulterated joy when you walked into your favorite pizza place as a kid, the air thick with the scent of baking dough and melting cheese? That’s exactly the warm, nostalgic hug these Cheesy Taco Breadsticks deliver. I dreamed these up one chaotic Tuesday when taco night cravings collided head-on with my urge for something bready and cheesy. The result? Pure magic. Imagine pillowy-soft breadsticks, twisted to perfection, slathered with flavorful refried beans, smothered in molten seasoned beef and gooey cheese, then baked until golden-brown and irresistible. The moment I pulled that first bubbling tray from the oven, showered it with fresh cilantro, and dipped one into cool sour cream, I knew this wasn’t just dinner – it was an instant classic. It’s the ultimate fusion of crispy, tender, and savory, guaranteed to disappear faster than you can say “¡Olé!”.
Why You’ll Love This Cheesy Taco Breadsticks Recipe
-
Instant Crowd-Pleaser: Be prepared for recipe requests! These are the ultimate party starter or game-day snack that disappears in minutes.
-
Weeknight Hero: Uses simple ingredients and comes together surprisingly quickly for something that tastes this indulgent.
-
Fun & Interactive: Twisting the breadsticks is oddly satisfying and makes the presentation pop.
-
Comfort Food Bliss: Hits all the right notes – warm, cheesy, savory, with that perfect bread-to-topping ratio.
-
Kid (& Adult!) Magnet: Combines beloved taco flavors with the universal appeal of breadsticks – picky eaters don’t stand a chance.
The Unexpected Fan Club
I initially whipped these up thinking they’d be a fun twist for my taco-obsessed husband. Little did I know, the real convert would be visiting my notoriously skeptical brother-in-law, Mike. Mike’s culinary reviews usually range from a noncommittal “it’s fine” to a detailed critique. Imagine my shock when, after his first bite of a cheesy taco breadstick, he went completely silent. Then came the mumbled, mouth-full, “Whoa. These are… really good.” Followed by a second, and a third. By the end of the night, he was unabashedly scraping the last bits of cheesy beef from the baking sheet. High praise, indeed! Seeing someone usually so reserved get genuinely excited about a dish? That’s the real magic of these breadsticks.
What Makes These Taco Breadsticks Special
It’s all about the layers and textures working in harmony:
-
The Fluffy Base: Store-bought pizza dough makes it easy, baking up tender inside with slightly crispy edges – the perfect vessel.
-
Flavor Foundation: Creamy refried beans add richness and help bind the toppings, while zesty taco seasoning infuses the ground beef (or turkey!) with authentic spice.
-
Cheese, Glorious Cheese: A double dose! Melty Monterey Jack (or Pepper Jack for kick) provides the gooey pull, while sharp cheddar adds a savory depth and beautiful golden color.
-
The Finishing Touches: A brush of garlicky butter post-bake adds aroma and shine, while fresh cilantro and cool sour cream cut through the richness perfectly.
Making It Happen: Your Cheesy Taco Breadstick Journey
-
Preheat & Prep: Fire up your oven to 400°F (200°C). Line a large baking sheet with parchment paper – trust me, cleanup is a breeze this way! Lightly flour a clean surface.
-
Shape the Base: Gently stretch or roll your pizza dough into a large rectangle, roughly 10×15 inches. Carefully transfer it to your prepared baking sheet. Don’t worry if it’s not perfect!
-
Beany Goodness: Spread the refried beans evenly over the dough, leaving just a tiny border (about ½ inch) around the edges. This is your flavor glue!
-
Savory Toppings: Sprinkle the cooked, seasoned taco meat evenly over the beans. Now, unleash the cheese! Layer on both the Monterey Jack (or Pepper Jack) and the cheddar, covering that meaty goodness completely.
-
The Twist: Here’s the fun part! Using a sharp knife or pizza cutter, slice the dough vertically into 1-inch wide strips. Carefully lift each strip, give it 3-4 twists along its length, and lay it back down slightly spaced apart. Don’t stress about perfection – rustic is charming!
-
Bake to Golden Perfection: Pop the tray into your hot oven. Bake for 18-22 minutes. You’re looking for beautifully golden-brown edges, the cheese fully melted and bubbly, and the dough cooked through.
-
Garlic Butter Bliss: While they bake, melt the butter and stir in the garlic powder. As soon as the breadsticks come out of the oven, generously brush this fragrant garlic butter all over the tops. It adds incredible aroma and that irresistible sheen.
-
Final Flourish: Immediately sprinkle the fresh chopped cilantro over the top. The heat will release its wonderful fragrance. Serve piping hot with bowls of sour cream and your favorite salsa for dipping!
You MUST Know: Tips for Cheesy Taco Breadstick Success
-
Dough Temperature is Key: Let refrigerated pizza dough sit at room temperature for 20-30 minutes before stretching. Cold dough fights back!
-
Drain Your Meat Well: Excess grease from the taco meat can make the bottom soggy. Drain it thoroughly in a colander after cooking.
-
Don’t Overcrowd: Give those breadsticks a little space (about ½ inch) on the baking sheet for optimal air circulation and even browning.
-
Fresh Garlic Option: For an extra punch, use 1 minced garlic clove instead of garlic powder in the butter. Add it to the melted butter off the heat to avoid burning.
-
The Cheese Pull Factor: For maximum gooeyness, shred your own cheese! Pre-shredded often has anti-caking agents that can hinder melting.
Serving Up the Fun
These cheesy taco breadsticks are superstars all on their own, served hot from the oven with bowls of cool, creamy sour cream and vibrant salsa for dipping. They’re perfect for:
-
Game Day Feasts: The ultimate finger food for watching sports.
-
Potluck Perfection: Easy to transport and always a hit.
-
Weeknight Fun: Serve with a simple side salad (think crisp romaine with lime vinaigrette) for a satisfying meal.
-
Drink Pairings: Keep it casual with ice-cold beer (a lager or Mexican-style works great), margaritas for a fiesta vibe, or sparkling water with lime for a refreshing contrast.
Make It Different: Customize Your Cheesy Taco Breadsticks
-
Meatless Marvel: Swap the ground beef for seasoned lentils, black beans, or plant-based crumbles.
-
Spice Level: Use Pepper Jack cheese instead of Monterey Jack, add diced jalapeños to the toppings, or use hot taco seasoning.
-
Chicken Twist: Substitute seasoned shredded chicken (rotisserie works great!) for the ground beef.
-
Vegan Version: Use vegan pizza dough, refried beans (check for lard-free), vegan taco “meat” (like seasoned walnuts or lentils), and your favorite melty vegan cheeses. Skip the sour cream or use a vegan alternative.
-
Gluten-Free: Use a certified gluten-free pizza dough.
-
Extra Veggie Boost: Add a layer of sautéed onions and bell peppers under the cheese, or sprinkle with corn or black olives.
-
Breakfast Breadsticks: Skip the taco seasoning and beans. Layer with cooked scrambled eggs, crumbled breakfast sausage, and cheddar cheese.
Keeping & Reheating the Cheesy Goodness
-
Storage: Let leftovers cool completely. Store in an airtight container in the refrigerator for up to 3 days.
-
Reheating (Best Results): Reheat individual breadsticks in an air fryer at 350°F (175°C) for 3-5 minutes until hot and slightly crisp again. Alternatively, place them on a baking sheet in a 350°F (175°C) oven for 8-12 minutes. Microwaving will make them soft/chewy (but still tasty!).
-
Freezing (Unbaked): Assemble the breadsticks (through step 5, including twisting). Freeze solid on the baking sheet, then transfer to a freezer bag. Bake from frozen, adding 5-10 minutes to the baking time. (Baked breadsticks can be frozen but texture suffers slightly).
Baking Sheet Success Secrets
-
Parchment is Paramount: Seriously, it prevents sticking and makes cleanup effortless. Foil can work but might stick more.
-
Center Rack: Bake on the center rack for even heat distribution.
-
Golden Brown is Your Guide: Ovens vary! Start checking at 18 minutes. The edges should be deep golden brown, and the cheese should be fully melted and bubbly. The bottom should sound hollow if tapped lightly.
-
Let it Rest (Briefly!): Allow the breadsticks to sit for just 2-3 minutes after brushing with butter before serving. This helps the cheese set slightly so it doesn’t all slide off when you pick one up!
Frequently Asked Questions (FAQs)
-
Can I use crescent roll dough instead of pizza dough?
-
You can, but the texture will be different – more flaky pastry than breadstick. Unroll the crescent dough sheets and press the seams together before adding toppings. Baking time may be slightly less, so watch closely!
-
-
My breadsticks got soggy on the bottom! What happened?
-
The most common culprit is excess moisture. Ensure your taco meat is drained very well after cooking. Also, don’t overload the dough with toppings. Using parchment paper helps moisture evaporate.
-
-
Can I make these ahead of time?
-
Yes! Assemble the breadsticks (through step 5, including twisting) up to a day ahead. Cover tightly with plastic wrap and refrigerate. Bake as directed, adding 2-4 minutes if needed since the dough is cold. You can also freeze unbaked (see storage section).
-
-
What kind of salsa is best for dipping?
-
Any kind you love! A classic tomato salsa, a roasted tomatillo salsa (salsa verde), or even a fruity mango salsa all work beautifully. Choose your heat level!
-
-
Can I use ground turkey or chicken?
-
Absolutely! Ground turkey or chicken are excellent leaner options. Just make sure to season it well with your taco seasoning and drain any excess liquid after cooking.
-
Cheesy Taco Breadsticks Recipe
Yield: 8-10 Breadsticks
Prep Time: 20 minutes
Cook Time: 20 minutes
Total Time: 40 minutes
Category: Appetizer, Snack, Main Dish
Cuisine: Tex-Mex
Difficulty: Easy
Ingredients
-
The Base:
-
1 lb store-bought pizza dough (or homemade), at room temperature
-
Light flour, for dusting
-
-
Flavor Foundation:
-
1/2 cup refried beans (canned or homemade)
-
1 lb ground beef (or turkey/chicken)
-
1 packet (about 2-3 Tbsp) taco seasoning
-
1/4 cup water
-
-
The Cheesy Glory:
-
1 cup shredded Monterey Jack cheese (or Pepper Jack)
-
1 cup shredded sharp cheddar cheese
-
-
Garlic Butter Finish:
-
2 Tbsp unsalted butter, melted
-
1/2 tsp garlic powder
-
-
For Serving:
-
2 Tbsp fresh cilantro, chopped
-
Sour cream
-
Salsa
-
Instructions
-
Preheat & Prep: Preheat oven to 400°F (200°C). Line a large rimmed baking sheet (approx 18×13 inches) with parchment paper. Lightly flour a clean work surface.
-
Shape Dough: Gently stretch or roll the pizza dough into a rough rectangle (about 10×15 inches). Carefully transfer it to the prepared baking sheet.
-
Spread Beans: Using a spoon or offset spatula, spread the refried beans evenly over the dough, leaving a ½-inch border around the edges.
-
Cook & Season Meat: Brown the ground beef in a skillet over medium-high heat, breaking it up. Drain excess fat. Stir in the taco seasoning and water. Cook for 1-2 minutes until thickened. Remove from heat.
-
Layer Toppings: Sprinkle the seasoned taco meat evenly over the refried beans. Sprinkle both shredded cheeses evenly over the meat.
-
Cut & Twist: Using a sharp knife or pizza cutter, cut the dough vertically into 1-inch wide strips (you’ll get 10-12 strips). Carefully lift each strip and twist it 3-4 times along its length. Place it back on the baking sheet, spacing them slightly apart (about ½ inch).
-
Bake: Bake in the preheated oven for 18-22 minutes, or until the dough is golden brown and cooked through, and the cheese is melted and bubbly.
-
Garlic Butter: While baking, melt the butter and stir in the garlic powder. As soon as the breadsticks come out of the oven, brush the garlic butter mixture generously over the tops.
-
Garnish & Serve: Immediately sprinkle with chopped fresh cilantro. Serve hot with sour cream and salsa for dipping.
Notes
-
Dough Tip: Ensure pizza dough is at room temperature (20-30 mins out of the fridge) for easier stretching.
-
Cheese: Shredding your own cheese from a block gives the best melt and flavor. Pre-shredded works in a pinch.
-
Drain Meat: Thoroughly draining the cooked taco meat is crucial to prevent a soggy bottom.
-
Make Ahead: Assemble (through step 6) up to 1 day ahead. Cover tightly and refrigerate. Bake as directed, adding 2-4 minutes if cold. Unbaked twists can be frozen (see storage section).
Tools You’ll Need
-
Large rimmed baking sheet (approx 18×13 inches)
-
Parchment paper
-
Rolling pin (optional, helpful for dough)
-
Sharp knife or pizza cutter
-
Skillet (for browning meat)
-
Colander (for draining meat)
-
Small bowl (for garlic butter)
-
Pastry brush (or spoon for butter)
-
Cutting board
-
Spatula or offset spatula (for spreading beans)
Allergy Info
-
Contains: Wheat (Gluten), Dairy (Milk), Soy (check taco seasoning/refried beans), possibly Eggs (check pizza dough ingredients).
-
Potential Allergens: Check specific brands of pizza dough, taco seasoning, and refried beans for other allergens like nuts or sesame if processed in shared facilities.
Nutrition Disclaimer: Nutritional information is an estimate only and can vary significantly based on specific ingredients used, brands, and portion sizes. This recipe is intended as a delicious treat.
