Chocolate Italian Love Cake
Chocolate Italian Love Cake Recipe That Melts in Every Layer
Introduction
There are cakes that look beautiful. Then there are cakes that do something almost magical in the oven — something that makes you stop, tilt your head, and quietly say, “Wait. How did that happen?”
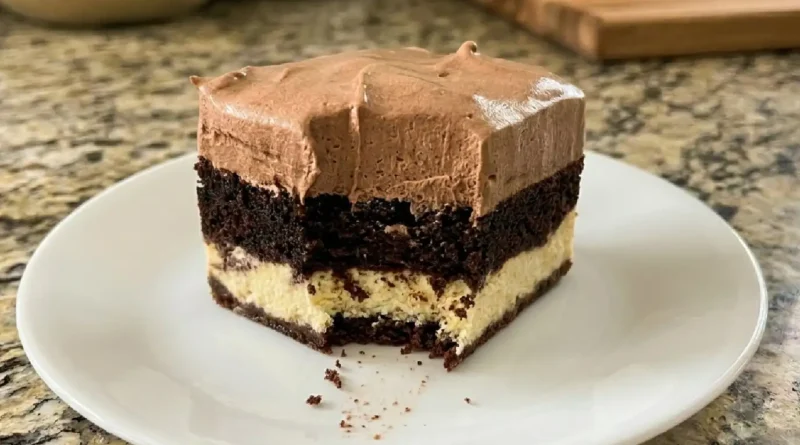
This Chocolate Italian Love Cake is exactly that kind of cake. You pour the chocolate batter into the pan first, then spoon a pillowy ricotta filling right on top. And then — here is the part that never gets old — the layers switch places as they bake. The creamy ricotta sinks to the bottom while the dense, fudgy chocolate rises to the top, wrapping the whole thing in a glossy chocolate pudding frosting that sets like a dream in the refrigerator overnight.
I first made this for a dinner party when I needed something that could be assembled the day before. A cake that actually improves with time? That alone was enough to win me over. But the first bite — that contrast between the rich, almost brownie-like chocolate base and the cool, lightly sweetened ricotta center — sealed it. This is the kind of dessert people ask about before they finish their slice.
Why You’ll Love This
- The layers flip on their own during baking, so it looks like a complicated technique but requires almost no special skill
- It is genuinely better the next day, which means all your work is done before the party starts
- The ricotta filling stays smooth and cool against the dense chocolate, giving every bite a contrast that feels intentional and sophisticated
- One box of chocolate cake mix does most of the heavy lifting, making this approachable even on a busy weeknight
- It feeds a crowd from a single 9×13 pan with very little effort
The Backstory
My mother-in-law is not easily impressed by desserts. She has strong opinions about what a cake should be — firm structure, not too sweet, nothing “gimmicky.” When I brought this to our family Easter gathering, I watched her take one cautious bite, pause, then quietly cut herself a second piece before anyone else at the table had finished their first.
She asked me for the recipe twice that evening. Once when dessert was served and again before we left, in case she had “misplaced” the first version. That is the moment I knew this Chocolate Italian Love Cake had earned a permanent place in my rotation. It won over the toughest critic in the room without trying.
What Makes It Special
- Ricotta cheese brings a milky, tender richness to the filling that is far more interesting than a standard cream cheese layer — it stays light and slightly grainy in the best way, almost like a baked cheesecake center
- Chocolate cake mix creates a deeply chocolatey, moist base that bakes up dense enough to hold its structure through the layer swap
- Eggs and vanilla in the ricotta filling keep everything cohesive and give the center a soft, custardy set rather than a rubbery texture
- Chocolate instant pudding and Cool Whip combine into a frosting that is silky, cold, and just barely sweet — it finishes the cake without overwhelming it
- Whole milk loosens the pudding frosting to a spreadable consistency that firms up beautifully as it chills
Making It Happen
Start by preheating your oven to 350°F and greasing a 9×13 inch baking pan thoroughly — this cake needs to release cleanly when sliced. Prepare the chocolate cake mix according to the package directions, using whatever combination of oil, water, and eggs the box calls for. Once the batter is smooth, pour it directly into the prepared pan and set it aside.
In a separate bowl, beat together the ricotta cheese, eggs, granulated sugar, and vanilla extract until the mixture is completely smooth. You want no lumps here — a hand mixer works well and only takes about two minutes. Gently spoon the ricotta filling over the top of the chocolate batter in the pan, spreading it as evenly as you can without pressing it into the batter below.
Slide the pan into the oven and bake for 45 to 55 minutes. As the cake bakes, the denser ricotta layer will slowly sink through the chocolate batter, which rises around it and eventually covers the top entirely. When you pull the pan from the oven, the surface will look like a plain chocolate cake. Let it cool completely — and this part matters — to room temperature before adding the frosting.
For the frosting, whisk together the chocolate instant pudding packets with cold whole milk until it thickens. Fold in the Cool Whip until the mixture is smooth and uniform, then spread it over the cooled cake in an even layer. Cover the pan and refrigerate the cake for at least four hours, though overnight is ideal. The frosting sets firm, the layers settle into each other, and the whole cake becomes something genuinely special by morning.
You Must Know
- Do not try to rush the cooling step. Frosting a warm cake will cause the pudding layer to slide off and create a mess rather than a clean, firm topping
- The ricotta filling does not need to be perfectly smooth across the top of the batter — it will even out during baking as the layers shift
- Use full-fat ricotta for the creamiest, most flavorful filling; low-fat versions can release excess moisture and make the center watery
- Overnight refrigeration is not optional if you want clean, layered slices — four hours is the minimum, but the texture at the 12-hour mark is noticeably better
- Check doneness by inserting a toothpick into the chocolate portion (the edges), not the ricotta center, which will still feel soft even when fully set
Serving Ideas & Pairings
This cake is rich and cold from the refrigerator, so it pairs naturally with something warm or bright to cut through the chocolate. A strong cup of black coffee or a dark espresso works beautifully alongside a slice. For something lighter, fresh raspberries or sliced strawberries scattered on the plate add a tart, fruity contrast that keeps the dessert from feeling heavy.
If you’re serving it at a dinner party, bring the whole pan to the table and slice it there — the visible layers are part of the presentation. A small dollop of lightly whipped cream on the side adds visual contrast without adding sweetness the cake doesn’t need.
Make It Different
For a mocha version: Replace half the milk in the cake mix with strongly brewed black coffee, cooled to room temperature. The chocolate flavor deepens considerably and adds a subtle bitterness that balances the sweet ricotta.
For a citrus twist: Add one tablespoon of orange zest and a half teaspoon of almond extract to the ricotta filling. The citrus brightens the whole cake and makes it feel a little more Italian in character.
For a lighter frosting: Swap the Cool Whip for an equal amount of freshly whipped heavy cream sweetened with two tablespoons of powdered sugar. The result is less sweet and more refined.
For a gluten-free version: Use a gluten-free chocolate cake mix in place of the standard one. The ricotta filling and pudding frosting are already naturally gluten-free, so no other adjustments are needed.
For added texture: Fold half a cup of mini chocolate chips into the ricotta filling before spooning it over the batter. They add little pockets of melted chocolate throughout the center layer.
Storage & Reheating
Store the cake covered tightly with plastic wrap or in an airtight container in the refrigerator for up to five days. The flavors actually continue to develop over the first couple of days, so leftovers are genuinely worth looking forward to.
This cake is meant to be served cold, straight from the refrigerator. Reheating is not recommended — the pudding frosting will melt and lose its structure, and the contrast between the cool filling and the chocolate base is part of what makes the texture so good. If you prefer a slightly softer slice, let it sit at room temperature for ten minutes before serving rather than warming it in the microwave.
To freeze, wrap individual slices tightly in plastic wrap, then place them in a freezer-safe zip-top bag. They will keep for up to two months. Thaw overnight in the refrigerator rather than on the counter.
Success Tips
The biggest variable in this recipe is the ricotta. Different brands have very different moisture levels — some are quite wet straight from the container. If yours seems loose, drain it through a fine mesh strainer or cheesecloth for thirty minutes before mixing the filling. This small step prevents a watery center layer and helps the ricotta set properly during baking.
When making the pudding frosting, whisk the pudding powder and milk together first until it thickens before folding in the Cool Whip. If you add the Cool Whip too early while the pudding is still liquid, the mixture will stay loose and never firm up to a spreadable consistency.
Finally, use a sharp knife run under hot water and wiped dry between slices for the cleanest cross-section. The layered reveal is worth showing off.
Frequently Asked Questions (FAQ)
Can I make this cake ahead of time? Yes — and you should. This cake is actually best made the night before serving. The layers need time to fully set in the refrigerator, and the flavors meld together in a way that makes overnight cake noticeably better than same-day cake.
Why does the ricotta layer switch places with the chocolate batter? Ricotta is denser than the aerated chocolate cake batter. During baking, gravity pulls the heavier filling down through the lighter batter while heat causes the chocolate to rise and bake over the top. It is simple physics, but it looks like a trick every time.
Can I use homemade chocolate cake instead of a box mix? Absolutely. Any standard chocolate cake recipe that yields enough batter for a 9×13 pan will work. Just make sure the batter is not too thick — it needs to be fluid enough for the ricotta layer to sink through.
What if my cake still looks jiggly in the center after 55 minutes? The center will always look slightly underdone because of the ricotta filling, which sets differently than cake batter. Test doneness at the outer edges of the pan with a toothpick — once those come out clean, the cake is ready. The ricotta center will firm up as it cools and chills.
Can I use a different flavor of pudding for the frosting? Yes. Vanilla pudding mixed with Cool Whip makes a lighter, less intense topping that lets the chocolate cake itself shine a little more. White chocolate pudding is another good option. Whatever you choose, stick to instant pudding — cook-and-serve varieties will not set properly when combined with Cool Whip.
Recipe Card
Recipe Name: Chocolate Italian Love Cake
Prep Time: 20 minutes Cook Time: 50 minutes Chill Time: 4 hours (overnight recommended) Total Time: 5 hours 10 minutes (or overnight) Servings: 15 to 18 slices Category: Dessert Difficulty: Easy Cuisine: Italian-American Yield: One 9×13 inch cake
Equipment
- 9×13 inch baking pan
- Hand mixer or stand mixer
- Two large mixing bowls
- Rubber spatula
- Whisk
- Plastic wrap or airtight lid for storage
Ingredients
For the Cake Layer:
- 1 box (15.25 oz) chocolate cake mix, plus ingredients listed on the box (typically oil, water, and eggs)
For the Ricotta Filling:
- 2 lbs (32 oz) whole milk ricotta cheese
- 4 large eggs
- 3/4 cup granulated sugar
- 1 teaspoon pure vanilla extract
For the Chocolate Pudding Frosting:
- 2 packages (3.9 oz each) chocolate instant pudding mix
- 3 cups cold whole milk
- 1 container (8 oz) Cool Whip, thawed
Directions
Step 1 — Prepare the pan and oven: Preheat oven to 350°F. Grease a 9×13 inch baking pan thoroughly with butter or non-stick spray and set aside.
Step 2 — Make the chocolate batter: Prepare the chocolate cake mix according to package directions. Pour the finished batter into the greased pan and spread it evenly.
Step 3 — Make the ricotta filling: In a large bowl, use a hand mixer to beat together the ricotta cheese, eggs, granulated sugar, and vanilla extract until completely smooth and lump-free, about 2 minutes.
Step 4 — Layer and bake: Gently spoon the ricotta filling over the top of the chocolate batter, spreading it as evenly as possible without mixing the two layers. Bake for 45 to 55 minutes, until the top appears set and a toothpick inserted into the edges (not the center) comes out clean. The layers will naturally swap during baking. Cool the cake completely to room temperature.
Step 5 — Make the frosting: Whisk together the instant pudding mixes and cold milk in a large bowl until thickened, about 2 minutes. Fold in the Cool Whip until smooth and uniform.
Step 6 — Frost and chill: Spread the pudding frosting evenly over the cooled cake. Cover the pan and refrigerate for a minimum of 4 hours, or overnight for best results. Slice cold and serve.
Notes
- Full-fat ricotta produces the best texture. If your ricotta seems very wet, drain it through a fine mesh strainer for 30 minutes before using.
- Do not frost the cake while it is still warm. The pudding frosting will not set and will slide off.
- Leftovers keep refrigerated for up to 5 days and actually improve in flavor over the first two days.
- Individual slices can be frozen for up to 2 months. Thaw overnight in the refrigerator before serving.
Nutrition (Approximate per serving, based on 16 servings)
- Calories: 380 kcal
- Total Fat: 17g
- Saturated Fat: 9g
- Cholesterol: 85mg
- Sodium: 420mg
- Total Carbohydrates: 48g
- Dietary Fiber: 1g
- Total Sugars: 31g
- Protein: 10g
- Calcium: 180mg
Nutrition values are estimates based on standard ingredient brands and may vary.
