Chocolate Turtle Cake
The Ultimate Gooey Chocolate Turtle Cake Recipe: A Decadent Crowd-Pleaser
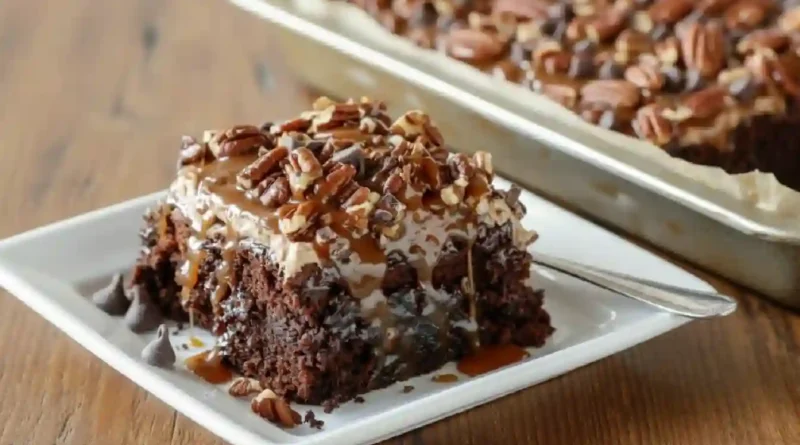
There is a specific kind of magic that happens in a kitchen when sugar and butter begin to melt together. When I first made this Chocolate Turtle Cake Recipe, the scent of rich devil’s food and toasted pecans filled every corner of my home, creating an atmosphere that felt like a warm hug. It is a dessert of contrasts: the cake is dark and tender, the caramel is silky and buttery, and the pecans provide a necessary, earthy crunch. Every bite offers a transition from the soft, moist crumb of the cake to a molten, gooey center that stays perfectly creamy even after it cools. This isn’t just a dessert; it’s an experience of deep, chocolatey comfort that lingers long after the last crumb is gone.
Why You’ll Love This
-
Texture Heaven: You get the trifecta of dessert textures—moist cake, gooey caramel, and crunchy pecans.
-
Deceptively Simple: It uses a clever shortcut with a cake mix but tastes like it was labored over for hours in a professional bakery.
-
Crowd Favorite: It’s rich enough for a holiday celebration but easy enough for a Tuesday night craving.
-
The “Wow” Factor: When you cut into the cake and that golden caramel layer reveals itself, it never fails to impress.
A Skeptic Turned Believer
I once served this to a close friend who famously claimed she “wasn’t a cake person” and usually reached for a savory snack instead of a dessert. She watched skeptically as I drizzled the extra caramel topping over the warm slices. After one small, hesitant bite, her entire expression shifted. She didn’t just finish her piece; she ended up asking for the recipe before the night was over. She told me it was the first time a chocolate cake felt balanced to her—the saltiness of the pecans and the depth of the devil’s food cake kept the sweetness from being overwhelming.
What Makes It Special
-
Betty Crocker™ Super Moist™ Devil’s Food Cake: This provides the perfect, tender foundation with a deep cocoa profile that stands up to the sweetness of the caramel.
-
Melting Caramels and Evaporated Milk: By melting whole caramels with evaporated milk, you create a thick, velvety sauce that doesn’t just disappear into the cake but creates a distinct, decadent layer.
-
Chopped Pecans: These add a buttery, nutty crunch that cuts through the richness and mimics the classic turtle candy flavor.
-
Semisweet Chocolate Chips: These pockets of melted chocolate add a second layer of indulgence, ensuring every forkful is loaded with cocoa.
Making It Happen
The process begins by preparing the base. After mixing your devil’s food batter according to the box instructions, you pour exactly half of it into your prepared pan. This first layer acts as the foundation, baking just long enough—about 12 minutes—to become firm enough to support the heavy toppings without letting them sink to the bottom.
While that base sets, you move to the stove. Melting the unwrapped caramels with the evaporated milk requires a little patience and frequent stirring over medium-low heat. You’ll watch as the hard candies transform into a smooth, golden lava. Once you fold in the pecans, you pour this liquid gold over the warm, par-baked cake. Sprinkle the chocolate chips evenly across the surface, and then carefully spread the remaining batter over the top. This “sandwich” method traps the caramel and chocolate inside, creating that signature gooey center during the final bake.
You Must Know
-
The Half-Bake Rule: Do not skip the initial 12-minute bake for the first layer of batter. If you pour the caramel onto raw batter, it will sink, and you’ll lose that beautiful layered effect.
-
Unwrap in Advance: Unwrapping 36 caramels takes longer than you think. Do this before you start the cake so you aren’t rushing while the first layer is in the oven.
-
Gentle Spreading: When adding the final layer of batter over the caramel and chips, drop it in small dollops across the surface first, then gently spread it. This prevents the caramel from swirling into the top layer.
Serving Ideas
This cake is spectacular when served slightly warm. A scoop of high-quality vanilla ice cream is almost mandatory, as the cold creaminess balances the warm, molten caramel perfectly. For a drink pairing, a strong, dark roast coffee or a cold glass of whole milk provides the perfect bitter or fresh contrast to the rich chocolate. If you are serving this at a dinner party, a small glass of tawny port also complements the nutty, caramel notes beautifully.
Make It Different
-
Salted Turtle: Sprinkle a pinch of flaky sea salt over the caramel layer before adding the top batter to lean into the salted caramel trend.
-
Nut Alternatives: If pecans aren’t your favorite, toasted walnuts work beautifully, or you can omit them entirely for a smooth, nut-free version.
-
Double Chocolate: Use a chocolate fudge cake mix instead of devil’s food for an even more intense cocoa experience.
-
Mocha Twist: Substitute the water in the cake mix recipe with brewed, room-temperature coffee to enhance the chocolate flavor.
Storage and Reheating
This cake keeps remarkably well. Store it loosely covered at room temperature for up to three days. If you prefer to keep it longer, it can be refrigerated for up to five days. To recapture that “just-baked” gooeyness, pop a slice in the microwave for 15–20 seconds. This softens the caramel and melts the chocolate chips all over again.
Success Tips
To ensure your Chocolate Turtle Cake Recipe comes out perfectly every time, use a light-colored metal or glass pan if possible. Dark pans tend to brown the edges too quickly. Also, let the cake cool for at least 30 minutes before slicing. While it’s tempting to dive in immediately, this resting period allows the caramel layer to set just enough so it doesn’t run straight out of the cake when you cut your first piece.
FAQ
Can I use caramel sauce from a jar instead of melting caramels?
It is best to stick to the melted caramels and evaporated milk. Jarred caramel sauce is often too thin and will soak into the cake rather than forming a distinct, gooey layer.
Do I have to use Devil’s Food cake mix?
While Devil’s Food offers the best flavor balance, a standard Milk Chocolate or Chocolate Fudge mix will also work well.
How do I know when the cake is fully done?
The top should spring back when lightly touched with your finger. Avoid using a toothpick to test the center, as you will hit the caramel layer and it will always come out “wet,” which can be misleading.
Can I freeze this cake?
Yes. Wrap individual slices tightly in plastic wrap and foil. Thaw at room temperature and reheat briefly in the microwave before serving.
What if I can’t find evaporated milk?
In a pinch, you can use heavy cream, though evaporated milk provides a specific cooked-milk flavor that works best with the caramels.
Recipe Card: Chocolate Turtle Cake
Prep time: 20 minutes
Cook time: 40 minutes
Total time: 1 hour
Servings: 12 to 15
Category: Dessert
Difficulty: Intermediate
Cuisine: American
Yield: One 13×9-inch cake
Equipment: 13×9-inch baking pan, 1-quart saucepan, mixing bowls.
Ingredients
-
1 box Betty Crocker™ Super Moist™ Devil’s Food Cake Mix
-
Water, vegetable oil, and eggs as called for on the cake mix box
-
1 bag (11 oz) caramels, unwrapped (about 36 pieces)
-
1/2 cup evaporated milk
-
1 cup chopped pecans
-
1 cup semisweet chocolate chips
-
Optional: Caramel topping, extra chopped pecans, and vanilla ice cream for serving
Instructions
-
Preheat and Prep: Heat your oven to 350°F (or 325°F if using a dark or nonstick pan). Generously spray the bottom and sides of a 13×9-inch pan with cooking spray.
-
The Base Layer: Prepare the cake mix according to the directions on the box. Pour exactly half of the batter into the prepared pan. Bake for 12 minutes.
-
The Caramel Center: While the base bakes, combine the unwrapped caramels and evaporated milk in a 1-quart saucepan. Place over medium-low heat and stir frequently until the mixture is completely smooth and melted. Stir in the 1 cup of chopped pecans.
-
Layering: Remove the cake from the oven. Carefully pour the hot caramel and pecan mixture over the warm cake. Sprinkle the chocolate chips evenly over the caramel.
-
The Top Layer: Gently spread the remaining cake batter over the chocolate chips, covering as much of the surface as possible.
-
Final Bake: Return the pan to the oven and bake for an additional 25 to 28 minutes. The cake is done when the top springs back when lightly touched.
-
Cool and Serve: Run a knife around the edges of the pan to loosen the cake. Let it cool for at least 30 minutes. Before serving, drizzle with extra caramel topping and pecans if desired. Serve with a scoop of vanilla ice cream.
Notes
Store any leftovers loosely covered at room temperature. For the best texture, avoid tightly sealing the cake while it is still warm to prevent the crust from becoming soggy.
Nutrition
(Per Serving – based on 15 servings)
Calories: 380 kcal | Total Fat: 18g | Saturated Fat: 7g | Cholesterol: 45mg | Sodium: 340mg | Total Carbohydrates: 52g | Dietary Fiber: 2g | Sugars: 38g | Protein: 5g
