Cotton Candy Cake
Cotton Candy Cake Recipe: A Whimsical, Pastel Party Showstopper
Introduction: A Slice of Cloud-Nine
There’s a certain magic to cotton candy. It’s the first thing you smell at a fairground—a sweet, airy promise of pure joy. For years, I wanted to capture that fleeting, fluffy feeling in a cake. Not just a pink cake, but one that truly tastes like the spun-sugar clouds of childhood memory. After many experiments (some more successful than others!), this Cotton Candy Cake was born. It’s a tender, moist vanilla cake subtly infused with that iconic flavor, swirled with pastel batters, and cloaked in a cloud-like Swiss meringue buttercream. The first time I sliced into it, revealing the soft, marbled interior, I knew it was special. It doesn’t just taste sweet; it tastes like happiness, like a celebration in every bite.
Why You’ll Love This Cake
-
Pure Nostalgia in Every Bite: It delivers the authentic, whimsical flavor of cotton candy, transforming a simple cake into a conversation-starting experience.
-
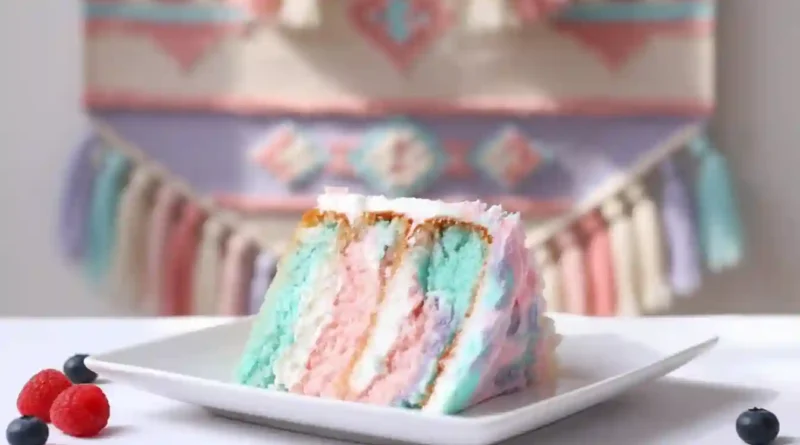
A Visual Showstopper: The marbled pastel layers and the beautifully “spackled” frosting look professionally stunning, yet the techniques are simple and forgiving.
-
Incredibly Soft and Tender Crumb: Using room temperature ingredients and proper creaming creates a cake that’s moist, light, and melts in your mouth.
-
The Frosting is a Dream: Silky, not too sweet, and perfectly sturdy, this Swiss meringue buttercream is a game-changer for any baker.
The True Test: A Picky Eater’s Seal of Approval
I’ll admit, I was nervous to serve this to my nephew, a legendary skeptic of anything beyond plain chocolate. He eyed the pastel swirls with suspicion. But one small bite, and his eyes went wide. “It tastes like the circus!” he declared, immediately asking for a second slice. It was the ultimate victory. This cake has a unique, playful flavor that charms both kids and adults, breaking down even the most stubborn dessert reservations.
What Makes It Special
-
Cotton Candy Flavoring: This is the star. Unlike extracts, a high-quality flavoring captures the true, nuanced taste of spun sugar without being medicinal.
-
Swiss Meringue Buttercream: Made by cooking egg whites and sugar into a meringue before adding butter, it results in a frosting that’s less sugary, luxuriously smooth, and incredibly stable for decorating.
-
Color Gel: These concentrated pastes provide vibrant, bold colors without thinning your batter or frosting, ensuring those beautiful pastel hues.
-
The Marbling Technique: Randomly spooning and gently swirling the colored batters creates a unique, organic masterpiece inside every cake—no two slices are exactly alike.
Making It Happen: A Baker’s Narrative
Start by bringing your butter, eggs, and milk to room temperature; this simple step is the secret to a perfectly emulsified, tender cake. Preheat your oven and prepare your pans. While they wait, whisk together your dry ingredients—flour, baking powder, and salt—giving them a good aerating.
In your stand mixer, cream the softened butter and sugar. Let it go for a full three minutes until it’s pale, fluffy, and almost white. This incorporates air, which is your leavening friend. Add the eggs, one by one, letting each disappear into the mix before adding the next. Then, pour in that magical cotton candy flavoring.
Now, with the mixer on low, add your dry ingredients and milk alternately, starting and ending with the flour. The batter will be thick and luscious. Here’s the fun part: carefully divide it and color it with your gels. Don’t be shy with the color! Spoon dollops of each hue randomly into your prepared pans. A single, gentle swirl with a skewer is all it needs to create that gorgeous marble.
Bake until the tops spring back and a toothpick comes out clean. Let the cakes rest, then turn them out to cool completely. Patience here ensures your frosting won’t melt.
For the buttercream, combine egg whites and sugar in your scrupulously clean mixer bowl. Set it over a pot of simmering water, whisking constantly until the sugar dissolves and the mixture feels hot and smooth. This cooks the egg whites safely. Then, whip it into glossy, stiff, cool peaks. Switching to the paddle, add the soft butter piece by piece. It will look curdled—don’t panic! Keep mixing on medium speed. Suddenly, it will snap together into a bowl of the silkiest, most luxurious frosting you’ve ever made. Add the flavoring and give it one final whip.
To assemble, stack and fill your cooled layers with a generous amount of buttercream, then apply a thin “crumb coat.” A quick chill firms everything up. For the final finish, frost the cake smoothly. Divide your remaining frosting, color portions, and use the “spackling” technique to create that dreamy, cloud-like effect. A final smooth scrape with your bench scraper blends the colors softly. Pipe simple white pearls, and crown it with a fluffy puff of real cotton candy—but only right before serving!
You Must Know: Tips for Success
-
Room Temperature is Non-Negotiable: It ensures everything blends smoothly without overmixing, which leads to a tough cake.
-
Grease-Free Meringue: Even a speck of yolk or grease in your bowl can prevent your egg whites from whipping. Wipe everything down with lemon juice or vinegar first.
-
Trust the Buttercream Process: When adding butter to the meringue, it will go through a soupy, then curdled-looking stage. Just keep the mixer running; it will become perfectly smooth.
-
Gel Colors Only: Liquid food coloring will throw off the consistency of both your batter and frosting.
-
Add Cotton Candy at the Last Second: Humidity is its enemy. Place it on the cake just as your guests are ready for dessert.
Serving Ideas & Perfect Pairings
Slice this cake on a decorative stand to show off its layers. It’s the perfect centerpiece for birthdays, baby showers, or any festive gathering. For a whimsical dessert spread, pair it with scoops of classic vanilla bean ice cream or a bowl of fresh, tart berries to cut the sweetness. Drink-wise, a glass of icy cold milk is a nostalgic win, while a sparkling Prosecco or a floral white tea complements its playful elegance for the adults.
Make It Different: Swaps & Twists
-
Flavor Swap: Use vanilla bean paste or clear vanilla extract for a classic funfetti vibe.
-
Color Theme: Match the gel colors to your party—mint green and lavender, or sunshine yellow and peach.
-
Dietary Tweaks: Use a reputable gluten-free 1:1 flour blend. For a dairy-free version, use plant-based butter and milk (opt for oat or soy for richness).
-
Cupcake Version: Divide the batter into lined muffin tins and bake for 18-22 minutes. Frost with the colored buttercream.
Storage & Reheating Tips
Store the cake (without the fresh cotton candy topping) in an airtight container at room temperature for up to 2 days, or in the refrigerator for up to 5 days. The chilled cake will firm up; let it sit at room temperature for an hour before serving to soften the frosting and crumb. You can freeze individual wrapped slices for up to 2 months. Thaw overnight in the refrigerator.
Success Tips for a Flawless Cake
-
Weigh your flour for accuracy (1 cup = 120g) to avoid a dense cake.
-
Use cake strips around your pans for perfectly level layers.
-
If your kitchen is very warm, pop the buttercream into the fridge for 10 minutes if it becomes too soft to work with.
-
A turntable is immensely helpful for achieving a smooth, professional-looking finish.
Frequently Asked Questions (FAQ)
Q: I can’t find cotton candy flavoring. What can I use?
A: The flavoring is key for authenticity. Look for it online at specialty baking stores. In a pinch, you can use 2 teaspoons of vanilla extract and 1/2 teaspoon of raspberry or bubblegum extract to approximate a berry-sweet flavor, but it won’t be quite the same.
Q: My buttercream is soupy and won’t thicken!
A: This means your meringue or your butter was too warm. Place the entire bowl in the refrigerator for 15-20 minutes, then re-whip. It should come together.
Q: Can I make any parts ahead of time?
A: Absolutely! The cake layers can be baked, wrapped tightly, and frozen for up to a month. Thaw before assembling. The buttercream can be made and refrigerated for up to a week; let it come to room temperature and re-whip until smooth before using.
Q: Why did my colors turn brownish after baking?
A: Some gel colors can darken with heat. Using high-quality, heat-stable gels (often labeled “no-taste” or “professional”) will preserve the bright pastels.
Q: Can I use 8-inch pans instead?
A: Yes, but your layers will be thinner. Use two 8-inch pans and start checking for doneness around 25-28 minutes.
Cotton Candy Cake Recipe
Prep Time: 1 hour
Cook Time: 35 minutes
Total Time: 1 hour 35 minutes (plus cooling)
Servings: 12
Category: Dessert
Difficulty: Intermediate
Cuisine: American
Yield: One 6-inch, 3-layer cake
Ingredients
Cotton Candy Cake:
-
2 1/4 cups (270g) all-purpose flour, spooned & leveled
-
2 1/4 tsp baking powder
-
3/4 tsp salt
-
3/4 cup (170g) unsalted butter, room temperature
-
1 1/2 cup (300g) granulated sugar
-
3 large eggs, room temperature
-
1 1/2 tsp cotton candy flavoring
-
1 cup (240ml) whole milk, room temperature
-
Fuchsia, sky blue, and violet color gel
Cotton Candy Buttercream:
-
6 large egg whites
-
1 1/2 cups (300g) granulated sugar
-
2 cups (450g) unsalted butter, room temperature, cubed
-
1 tsp cotton candy flavoring
Assembly:
-
Fuchsia, sky blue, and violet color gel
-
Cotton candy (for garnish, just before serving)
Instructions
-
For the Cake: Preheat oven to 350°F (175°C). Grease, flour, and line three 6-inch cake pans.
-
Whisk flour, baking powder, and salt in a medium bowl. Set aside.
-
In a stand mixer with paddle attachment, cream butter and sugar on medium-high for 3 minutes until pale and fluffy. Reduce speed. Add eggs one at a time, mixing fully after each. Mix in cotton candy flavoring.
-
On low speed, alternate adding flour mixture and milk (3 flour additions, 2 milk), beginning and ending with flour. Mix just until combined.
-
Divide batter equally into four bowls. Color three bowls with the different gels. Randomly spoon colored batters into the prepared pans. Gently swirl once with a skewer.
-
Bake for 30-35 minutes, until a toothpick inserted comes out clean. Cool in pans for 10 minutes, then turn out onto a wire rack to cool completely.
-
For the Buttercream: Combine egg whites and sugar in a clean mixer bowl. Place over a pot of simmering water, whisking constantly, until mixture reaches 160°F (71°C) and sugar is dissolved.
-
Attach bowl to stand mixer. Whisk on high until stiff, glossy peaks form and bowl is cool to the touch (5-10 minutes).
-
Switch to paddle attachment. On medium-low, add butter one cube at a time. Mix until fully smooth and creamy (it may appear curdled briefly; keep mixing). Add flavoring and whip until combined.
-
To Assemble: Place one cake layer on a stand. Spread with 2/3 cup buttercream. Repeat with remaining layers. Apply a thin crumb coat over entire cake. Chill for 20 minutes.
-
Frost cake with remaining buttercream, smoothing the sides and top. Divide leftover frosting, coloring portions as desired. Using a small offset spatula, “spackle” colors onto the cake in a random pattern. Smooth with a bench scraper to blend.
-
Pipe a simple border with any remaining white buttercream. Top with fresh cotton candy immediately before serving.
Nutrition Information (per serving): Calories: ~650 | Fat: 38g | Carbs: 72g | Protein: 6g
Nutrition is an estimate.
