Deep Dish Skillet Brookie Recipe
The Ultimate Deep Dish Skistle Brookie: A Cookie & Brownie Love Story
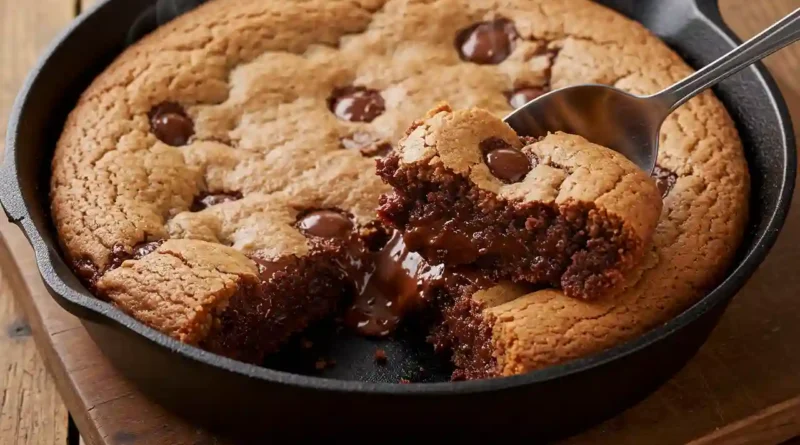
There’s a special kind of magic that happens in a cast iron skillet. It’s the promise of a golden, crispy crust and a tender, molten center. And when that magic involves the epic collision of two dessert titans—the fudgy brownie and the buttery chocolate chip cookie—you know you’re in for something spectacular. This Deep Dish Skillet Brookie is my go-to recipe for impressing guests, satisfying a serious chocolate craving, or turning an ordinary Tuesday into a celebration. I remember the first time I pulled this giant, fragrant, puffed-up masterpiece from the oven. The aroma of rich chocolate and toasted butter filled the kitchen, and the sound of spoons scraping against the warm cast iron was the only review I needed. It’s not just a dessert; it’s an experience, a shared moment of pure, unadulterated joy.
Why You’ll Love This Deep Dish Skillet Brookie
-
The Ultimate Dessert Debate Solver: Can’t choose between a chewy chocolate chip cookie and a fudgy brownie? You don’t have to. This recipe delivers the best of both worlds in every single spoonful.
-
Unbeatable Social Sharing: Serving dessert straight from the skillet in the middle of the table creates a warm, communal feeling. It’s the centerpiece that gets everyone talking and digging in together.
-
Surprisingly Simple to Make: Using quality boxed mixes as a base streamlines the process without sacrificing that decadent, homemade taste. It’s effortlessly impressive.
-
A Textural Dream: The contrast between the crispy, caramelized edges, the soft cookie layer, and the dense, gooey brownie base is nothing short of perfection.
A Surprise Hit with the Pickiest Eater
I once served this at a family gathering for my nephew, a renowned picky eater whose diet seemed to consist solely of “beige” foods. He eyed the skillet with deep suspicion, criticizing the visible chocolate chunks and “mixed-up” appearance. After much cajoling, he agreed to a “tiny bite.” That tiny bite turned into a second, larger scoop, and then a third. He finally looked up, cheeks dusted with chocolate, and declared, “Okay, this is the only dessert I’ll eat from now on.” It was a sweet victory, proving that this brookie has the power to win over even the most stubborn of critics.
What Makes It Special
-
The Cast Iron Skillet: This isn’t just for show. Cast iron heats evenly and retains heat magnificently, creating an unparalleled crispy, golden crust on the outside while keeping the interior luxuriously soft and gooey.
-
Double Chocolate Delight: Using a chocolate fudge brownie mix ensures an intensely chocolatey and moist base that stands up to the cookie layer.
-
Buttery Cookie Bliss: The chocolate chip cookie mix, enriched with real butter, bakes into a soft and chewy disc that beautifully marries with the fudgy brownie beneath.
-
Chocolate Chip Bonus: The extra half-cup of chocolate chips sprinkled on top creates glorious pockets of melted chocolate, making each bite even more indulgent.
Making It Happen
Begin by preheating your oven to 350°F (175°C). This is crucial for getting that perfect bake. Generously spray your 12-inch cast iron skillet with nonstick cooking spray; this will ensure your brookie releases beautifully for serving.
Now, let’s make the layers. In a large bowl, focus on the brownie base. Combine the chocolate fudge brownie mix with vegetable oil, water, and two large eggs. Stir until the mixture is just combined and gloriously glossy; be careful not to overmix. Pour this rich, dark batter into the prepared skillet, spreading it evenly across the bottom.
Next, create the cookie layer. In a medium bowl, combine the chocolate chip cookie mix with the melted butter and one large egg. Stir until a soft, cohesive cookie dough forms. Using a spoon or your fingers, drop generous dollops of this cookie dough across the surface of the brownie batter. You don’t need to spread it perfectly—gently pressing it down slightly is fine. The two batters will swirl together enticingly as they bake. For the final touch, sprinkle the entire surface with that extra half-cup of chocolate chips.
Place the hefty skillet into your preheated oven and bake for 40 to 45 minutes. You’ll know it’s ready when the top is a beautiful golden brown and the edges are pulling away from the skillet slightly. The center might still look a tiny bit soft—that’s exactly what you want for that fudgy, gooey texture. The most important step? Let it rest. Allow the skillet brookie to cool for at least 20-30 minutes before serving. This allows it to set, making it easier to slice and ensuring those perfect, clean layers.
You Must Know
-
The Skillet is Key: A 12-inch cast iron skillet is highly recommended for its heat distribution and rustic presentation. If you must substitute, use a 12-inch oven-safe baking dish or a 9×13 inch pan, though baking time may vary.
-
Don’t Skip the Rest: Resisting the urge to dive in immediately is hard, but letting the brookie cool is non-negotiable for achieving the ideal texture.
-
Check Your Mixes: Different brands of brownie and cookie mix may require slightly different ingredients or quantities. Always check the back of the box you’re using to confirm.
-
The Toothpick Trick Isn’t Perfect: Because of the gooey brownie layer, a toothpick inserted into the center will not come out completely clean. Look for moist crumbs, not wet batter.
Serving Ideas
Serve this Deep Dish Skillet Brookie warm, right from the pan. Scoop out generous portions and place them in bowls. It is absolutely sublime when topped with a cold scoop of vanilla bean ice cream, which slowly melts into the warm chocolate layers. A drizzle of caramel or hot fudge sauce takes it over the top. For a drink pairing, a glass of cold milk is a classic choice, while a cup of strong black coffee or a rich stout beer provides a wonderful bitter contrast to the sweetness.
Make It Different
-
Nutty Delight: Stir ½ cup of chopped walnuts or pecans into the brownie batter or sprinkle them on top with the chocolate chips.
-
Sea Salt Sophistication: A light sprinkle of flaky sea salt over the top just after baking enhances all the chocolate flavors.
-
Peanut Butter Paradise: Swirl ½ cup of creamy peanut butter into the cookie dough layer before baking.
-
Mint Chocolate Chip: Add ½ teaspoon of peppermint extract to the cookie dough and use dark chocolate chips for a refreshing twist.
-
Gluten-Free Friendly: Use certified gluten-free brownie and cookie mixes to easily accommodate dietary needs.
Storage and Reheating
Storage: Once completely cooled, cover the skillet tightly with plastic wrap or transfer leftovers to an airtight container. It will keep at room temperature for up to 2 days or in the refrigerator for up to 4 days.
Reheating: To recreate that fresh-from-the-oven experience, reheat individual portions in the microwave for 15-20 seconds until warm. For a larger portion, warm it in a 350°F oven for about 10 minutes, covered with foil to prevent drying out.
Success Tips
-
Bring all refrigerated ingredients (like eggs) to room temperature before you start. This helps the batters combine more smoothly and evenly.
-
If your cookie dough seems a bit dry after mixing, add a teaspoon of water to help it come together.
-
For picture-perfect slices, use a sharp knife and wipe it clean between cuts.
Frequently Asked Questions (FAQ)
Can I make this brookie with entirely homemade batters?
Absolutely! You can use your favorite homemade brownie and chocolate chip cookie recipes. Simply prepare each batter according to their respective recipes and layer them in the skillet as directed.
My brookie is very gooey in the middle even after cooling. Is it underbaked?
A certain level of gooeyness is desired and expected. However, if it seems excessively wet and underbaked, you can pop it back into the oven for another 5-10 minutes. Remember, it will continue to set as it cools.
Can I prepare this in advance?
You can prepare the batters and layer them in the skillet a few hours ahead of time. Cover it tightly and refrigerate. You may need to add a few extra minutes to the baking time since it will be going into the oven cold.
I don’t have a 12-inch skillet. What can I use?
A 10-inch skillet will work, but the brookie will be thicker and will require a longer baking time. Start checking for doneness around the 50-minute mark. A 9×13 inch baking pan is also a good alternative.
Can I freeze the brookie?
Yes, it freezes well. Once completely cooled, slice it and wrap individual portions tightly in plastic wrap and then foil. Freeze for up to 3 months. Thaw overnight in the refrigerator or at room temperature and reheat gently.
Deep Dish Skillet Brookie Recipe Card
Prep time: 15 minutes
Cook time: 45 minutes
Total time: 1 hour
Category: Dessert
Difficulty: Easy
Cuisine: American
Yield: 8-10 servings
Ingredients
For the Brownies
-
1 (18.4 oz) box Chocolate Fudge Brownie Mix (I used Betty Crocker)
-
2/3 cup vegetable oil
-
1/4 cup water
-
2 large eggs
For the Cookies
-
1 (17.5 oz) box Chocolate Chip Cookie Mix (I used Betty Crocker)
-
1/2 cup butter, melted
-
1 large egg
-
1/2 cup chocolate chips (for topping)
Instructions
-
Preheat your oven to 350°F (175°C). Generously spray a 12-inch cast iron skillet with nonstick cooking spray.
-
In a large bowl, combine the brownie mix, vegetable oil, water, and 2 eggs. Mix until just combined and smooth. Pour the batter into the prepared skillet, spreading it evenly.
-
In a medium bowl, combine the cookie mix, melted butter, and 1 egg. Stir until a soft dough forms.
-
Drop dollops of the cookie dough evenly over the brownie batter. Gently press them down slightly. Sprinkle the 1/2 cup of chocolate chips over the top.
-
Bake for 40-45 minutes, or until the top is golden brown and the edges are set. The center may still look slightly soft.
-
Remove from the oven and let the skillet cool on a wire rack for at least 20-30 minutes before slicing and serving.
Notes
-
If using a different brand of brownie or cookie mix, always check the ingredient list on the box, as required additions may vary.
-
A 12-inch oven-safe baking dish or a 9×13 inch pan can be used if you don’t have a cast iron skillet. Baking time may need to be adjusted.
