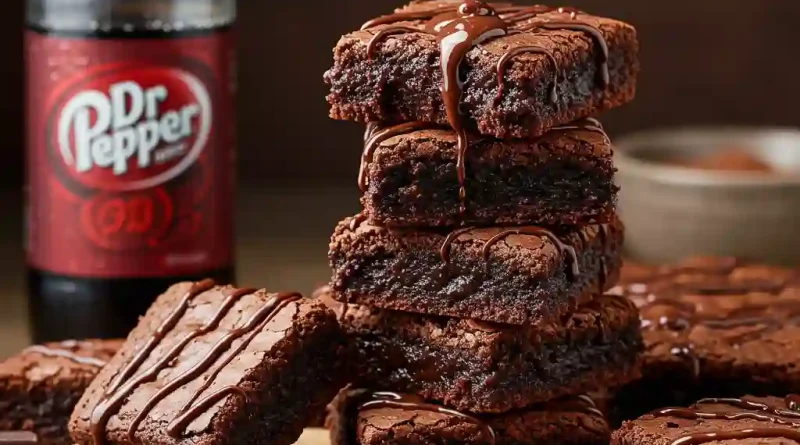
Dr Pepper Brownies
Dr Pepper Brownies: Your New Fudgy Obsession with a Secret Soda Twist
Remember sticky summer afternoons, the clink of ice in a frosty glass bottle, and that unique, almost cherry-cola-meets-spice aroma of Dr Pepper? That nostalgic magic isn’t just for sipping anymore. Imagine swirling that beloved soda into the richest, fudgiest brownie batter you’ve ever tasted. That’s the irresistible charm of these Dr Pepper Brownies. I stumbled upon this idea during a heatwave, craving something decadent but different. My usual brownie recipe felt predictable, and a half-empty bottle of Dr Pepper sat winking at me from the fridge. “Why not?” I thought. The result? Pure, crackly-topped, intensely chocolatey bliss with an elusive, intriguing depth that had everyone begging for the secret ingredient. It’s childhood nostalgia baked into every gooey square.
Why You’ll Love These Dr Pepper Brownies
-
Nostalgia Baked In: That familiar Dr Pepper flavor adds a unique, complex sweetness you just can’t replicate, sparking happy memories with every bite.
-
Unbelievably Fudgy & Moist: The soda works magic, creating an incredibly tender, melt-in-your-mouth texture that’s deeply satisfying.
-
The Ultimate Conversation Starter: Watch eyebrows raise and smiles spread when you reveal the secret ingredient – it’s pure kitchen alchemy!
-
Surprisingly Simple: Don’t be fooled by the wow factor; this is still a straightforward, one-bowl (mostly!) brownie recipe.
-
Crowd-Pleasing Power: These brownies disarm even the toughest critics, bridging generational gaps with their universally loved flavors.
An Unexpected Fan Club
The true test came when my notoriously picky uncle, who claims “fancy desserts” are never as good as plain chocolate cake, tried one. He took a tentative bite, chewed thoughtfully, then polished off the whole square in silence. Finally, he looked up, pointed at the plate, and gruffly declared, “Whatever you put in these… do it again.” High praise indeed! Even my friend’s teenager, who usually scoffs at anything “old-fashioned,” devoured two and asked if I could make them for her birthday. That’s the Dr Pepper magic at work.
What Makes These Dr Pepper Brownies Special
It’s not just the soda! These brownies are a symphony of carefully chosen ingredients:
-
Real Dr Pepper: The star! It adds moisture, a unique caramel-vanilla-cherry spice note, and helps create that signature tender crumb. Don’t substitute diet soda.
-
Quality Unsweetened Chocolate: The deep, intense chocolate foundation. Using a good brand makes a noticeable difference.
-
Rich Dutch-Process Cocoa Powder: Enhances the chocolate flavor and contributes to that beautiful dark color.
-
Espresso Powder (Secret Weapon!): A tiny amount doesn’t make it taste like coffee; it magnifies the chocolate flavor exponentially.
-
Pure Vanilla Extract: Balances and rounds out all the complex flavors.
-
Luscious Chocolate Frosting: A silky, not-too-sweet frosting infused with more Dr Pepper, taking the indulgence over the top.
Making It Happen: Your Dr Pepper Brownie Journey
Let’s transform that fizzy soda into fudgy heaven! Preheat your oven to 350°F (175°C). Generously grease an 8×8 inch metal baking pan and line it with parchment paper, leaving an overhang on two sides – this is your golden ticket for easy removal later.
First, we build our chocolate base. In a medium saucepan over low heat, combine the chopped unsweetened chocolate and butter. Stir gently and constantly until everything melts into a smooth, glossy pool. Remove it from the heat. Now, whisk in the granulated sugar – it might look grainy at first, but keep whisking until it starts to incorporate. Carefully pour in the Dr Pepper. It might fizz a little – that’s normal! Whisk enthusiastically until the mixture is mostly smooth again. Let this warm mixture cool for about 10 minutes – we don’t want to scramble the eggs!
While it cools, whisk together your dry team: the flour, Dutch-process cocoa powder, espresso powder, and salt in a small bowl. Back to the saucepan: whisk in the eggs, one at a time, beating well after each addition until the batter looks shiny. Stir in the vanilla extract. Now, gently fold the dry ingredients into the wet ingredients using a spatula. Stop just when no flour streaks remain – overmixing is the enemy of fudgy brownies! Pour this thick, velvety batter into your prepared pan, smoothing the top.
Slide the pan into your preheated oven and bake for 30-35 minutes. Start checking at 30 minutes. You want a toothpick inserted near the center to come out with a few moist crumbs clinging to it, not clean. That’s your fudgy sweet spot! Overbaking leads to cakey brownies. Transfer the pan to a wire rack and let the brownies cool completely in the pan – this is crucial for setting and developing flavor. Resist the urge to frost warm brownies!
While they cool, craft the Dr Pepper frosting. In a medium bowl using an electric mixer, beat the softened butter until it’s very smooth and creamy, about 2 minutes. Gradually sift in the powdered sugar, mixing on low speed until combined, then beat on medium-high for another minute until fluffy. Beat in the vanilla extract. Now, with the mixer on low, very gradually drizzle in the Dr Pepper, one tablespoon at a time, beating well after each addition. You might not need all 3 tablespoons – stop when you reach a beautifully spreadable, silky consistency. Once the brownies are completely cool, spread this luscious frosting evenly over the top.
You Must Know: Dr Pepper Brownie Success Secrets
-
Cooling is Non-Negotiable: Frosting warm brownies = melty, messy disaster. Patience yields perfect layers!
-
Sift the Powdered Sugar: For the silkiest, lump-free frosting, always sift your powdered sugar.
-
Use Room Temp Butter (for frosting): Soft, pliable butter whips up light and creamy. Cold butter makes grainy frosting.
-
Metal Pan Magic: Glass or ceramic pans bake differently. Stick to metal for the best results and edges.
-
Don’t Overmix the Batter: Fold just until combined. Overmixing incorporates too much air, leading to cakey texture.
Serving Ideas: The Perfect Pairing
These decadent Dr Pepper Brownies are stellar all on their own, but a few pairings elevate them:
-
Classic Comfort: A cold glass of milk or, naturally, an icy cold Dr Pepper!
-
Creamy Contrast: A scoop of high-quality vanilla bean ice cream melting over a slightly warm square.
-
Coffee Break Bliss: A hot cup of coffee or espresso complements the deep chocolate notes beautifully.
-
Grown-Up Indulgence: Try them with a glass of tawny port or a bourbon-laced milkshake.
Make It Different: Customize Your Creation
-
Nutty Crunch: Fold in 1/2 cup chopped toasted pecans or walnuts into the batter before baking.
-
Salted Caramel Swirl: Before baking, drizzle 1/4 cup thick salted caramel sauce over the batter and lightly swirl with a knife.
-
Minty Fresh: Add 1/2 teaspoon peppermint extract to the frosting instead of vanilla for a cool twist.
-
Gluten-Free: Substitute a 1:1 gluten-free all-purpose flour blend for the regular flour.
-
Dairy-Free/Vegan: Use plant-based butter sticks and your favorite unsweetened plant-based milk in the frosting (adjust consistency as needed). Ensure chocolate is dairy-free. Note: Texture might vary slightly.
Storing & Reheating Your Fudgy Treasures
-
Room Temperature: Store frosted brownies in an airtight container at room temperature for up to 3 days.
-
Refrigerator: For longer storage (up to 5 days), refrigerate in an airtight container. Let slices come to room temperature for 15-20 minutes before serving for best texture.
-
Freezer: Freeze unfrosted or frosted brownies tightly wrapped in plastic wrap and then foil, or in an airtight container, for up to 3 months. Thaw overnight in the fridge or at room temperature.
-
Reheating (Optional): For an extra-indulgent treat, microwave a single unfrosted brownie square for 10-15 seconds until just warm and slightly gooey. Do not microwave frosted brownies.
Brownie Success Tips: Beyond the Recipe
-
Oven Thermometer is Key: Ovens lie! An inexpensive oven thermometer ensures accurate temperature for perfect baking.
-
Quality Cocoa Matters: Splurge on a good Dutch-process cocoa powder (like Rodelle, Droste, or Cacao Barry) for the deepest flavor and color.
-
Chop Chocolate Evenly: Ensures it melts smoothly and consistently with the butter.
-
Don’t Skip the Parchment: Seriously, it makes removing and cutting clean brownies infinitely easier.
-
Cool Before Cutting: Use a sharp knife dipped in hot water and wiped dry for the cleanest slices.
Dr Pepper Brownies: Frequently Asked Questions (FAQ)
-
Can I use a different soda? While you can, the unique flavor profile of Dr Pepper is what makes these brownies special. Cola or root beer would work but give a different result. Avoid diet sodas.
-
Do they taste strongly like Dr Pepper? Not overwhelmingly! The soda enhances the chocolate, adds moisture, and provides a subtle, complex background note. Most people can’t pinpoint it until told.
-
My frosting seems too thin/too thick! Help! Too thin? Beat in a little more sifted powdered sugar. Too thick? Add more Dr Pepper, literally a teaspoon at a time, until spreadable. Climate affects consistency.
-
Why are my brownies cakey and not fudgy? Likely culprits: Overbaking (pull them out earlier!), overmixing the batter (fold gently just until combined), or possibly using a glass/ceramic pan which insulates differently.
-
Can I double this recipe? Absolutely! Double all ingredients and bake in a 9×13 inch metal pan. Baking time might increase by 5-10 minutes; rely on the toothpick test for doneness.
Dr Pepper Brownies Recipe Card
Yield: 16 rich brownies
Prep Time: 20 minutes
Cook Time: 30-35 minutes
Total Time: 1 hour 15 minutes (plus cooling)
Category: Dessert
Difficulty: Easy
Cuisine: American
Ingredients:
For the Brownies:
-
4 oz (113g) unsweetened chocolate, finely chopped
-
1/2 cup (1 stick / 113g) unsalted butter
-
1 cup (200g) granulated sugar
-
1/2 cup (120ml) Dr Pepper (NOT diet)
-
2 large eggs, room temperature
-
1 teaspoon pure vanilla extract
-
3/4 cup (94g) all-purpose flour
-
2 tablespoons (10g) Dutch-process cocoa powder
-
1/2 teaspoon instant espresso powder (optional but recommended)
-
1/4 teaspoon salt
For the Dr Pepper Chocolate Frosting:
-
1/4 cup (1/2 stick / 56g) unsalted butter, softened to room temperature
-
1 1/2 cups (180g) powdered sugar, sifted
-
2 tablespoons (10g) Dutch-process cocoa powder, sifted
-
1/2 teaspoon pure vanilla extract
-
2-3 tablespoons (30-45ml) Dr Pepper (NOT diet), room temperature
-
Pinch of salt
Instructions:
-
Prep: Preheat oven to 350°F (175°C). Grease an 8×8 inch metal baking pan. Line with parchment paper, leaving overhang on two opposite sides for easy lifting. Grease the parchment lightly.
-
Melt Chocolate & Butter: In a medium saucepan over low heat, melt the chopped unsweetened chocolate and butter, stirring constantly until smooth. Remove from heat.
-
Add Sugar & Soda: Whisk in the granulated sugar until combined. Carefully whisk in the 1/2 cup Dr Pepper (it may fizz slightly) until mostly smooth. Let cool for 10 minutes.
-
Whisk Dry Ingredients: While cooling, whisk together flour, 2 tbsp cocoa powder, espresso powder (if using), and salt in a small bowl.
-
Add Eggs & Vanilla: Whisk the eggs, one at a time, into the slightly cooled chocolate mixture until fully incorporated and the batter looks shiny. Whisk in the vanilla extract.
-
Combine Wet & Dry: Using a spatula, gently fold the dry ingredients into the wet ingredients until just combined and no flour streaks remain. Do not overmix.
-
Bake: Pour batter into the prepared pan, spreading evenly. Bake for 30-35 minutes, or until a toothpick inserted near the center comes out with a few moist crumbs attached (not wet batter, not clean). Avoid overbaking.
-
Cool Completely: Place the pan on a wire rack and let the brownies cool completely in the pan (at least 1 hour, preferably 2).
-
Make Frosting: While brownies cool, beat softened butter in a medium bowl with an electric mixer until creamy (about 2 mins). Gradually add sifted powdered sugar and 2 tbsp cocoa powder, beating on low until combined, then on medium-high until fluffy (about 1 min). Beat in vanilla and pinch of salt. With mixer on low, gradually add Dr Pepper, 1 tablespoon at a time, until a smooth, spreadable consistency is reached (you may not need all 3 tbsp).
-
Frost: Once brownies are completely cool, spread the frosting evenly over the top using an offset spatula or knife.
-
Cut & Serve: Use the parchment overhang to lift the brownies out of the pan. Place on a cutting board. Use a large sharp knife, dipped in hot water and wiped dry between cuts, to slice into 16 squares. Enjoy!
Notes:
-
Pan Size: An 8×8 metal pan is ideal. Using a 9×9 will yield thinner brownies; reduce baking time by 3-5 minutes.
-
Espresso Powder: This truly deepens the chocolate flavor without adding coffee taste. Highly recommended!
-
Cooling: This step is vital for the brownies to set properly and for the frosting not to melt. Don’t rush it!
-
Frosting Consistency: Adjust with extra powdered sugar (too thin) or extra Dr Pepper (too thick) by the teaspoon.
Tools You’ll Need:
-
8×8 inch metal baking pan
-
Parchment paper
-
Medium saucepan
-
Whisk
-
Spatula
-
Small bowl (for dry ingredients)
-
Medium bowl (for frosting)
-
Electric hand mixer or stand mixer (for frosting)
-
Wire rack
-
Measuring cups and spoons
-
Sharp knife
Allergy Info:
-
Contains: Wheat, Gluten, Eggs, Dairy, Soy (check chocolate labels).
-
Potential Allergens: None listed beyond the above. Check specific brands of chocolate and Dr Pepper for other potential allergens (e.g., nuts in chocolate manufacturing facilities).
Nutrition Disclaimer: Nutritional information is an estimate provided by an online calculator and will vary based on specific ingredients used and serving size. It has not been evaluated by a dietitian.
