Hawaiian Rolls with Garlic Butter Recipe
Easy Hawaiian Rolls with Garlic Butter Recipe: The Ultimate Crowd-Pleaser
There is something almost magnetic about the scent of garlic and butter mingling in a hot oven. When you pair that savory aroma with the signature sweetness of a Hawaiian roll, the result is nothing short of addictive. These rolls have become a staple in my kitchen for a simple reason: they bridge the gap between a quick weeknight side and a high-effort appetizer.
I first started making these because I wanted something more interesting than a plain dinner roll but didn’t have the time to proof dough from scratch. The first time the tray hit the table, the kitchen was filled with that warm, yeasty scent and the sight of golden, glistening tops. Watching the butter soak into the soft, pillowy centers makes it hard to wait for them to cool down.
Why You’ll Love This
-
The Perfect Contrast: You get the iconic sweetness of the Hawaiian rolls balanced against sharp, pungent garlic and a hit of sea salt.
-
Minimal Effort, High Reward: This recipe takes less than 10 minutes of active prep time, making it perfect for busy hosts.
-
The Texture Factor: By cutting into the rolls, the garlic butter doesn’t just sit on top; it creates a soft, custardy interior while the edges get slightly crisp.
The Skeptic’s Favorite
I have a friend who is notoriously picky about “semi-homemade” cooking. He usually insists on everything being made from scratch, especially bread. The first time I served these Hawaiian Rolls with Garlic Butter, I didn’t say a word about the store-bought package. He reached for one, then another, and by the end of the night, he was asking for the “brioche recipe” I used. When I told him it was a 15-minute trick using King’s Hawaiian rolls, he didn’t believe me until I showed him the empty bag in the recycling. Now, it’s the only thing he asks me to bring to his backyard BBQs.
What Makes It Special
-
King’s Hawaiian Rolls: These provide a unique, airy sweetness that standard dinner rolls just can’t match.
-
Fresh Garlic: Using four whole cloves of finely chopped garlic ensures a bold, authentic flavor that permeates the bread.
-
Maldon Sea Salt: These flaky crystals add a sophisticated crunch and a burst of salt that cuts through the richness of the butter.
-
Fresh Parsley: It adds a pop of color and a grassy brightness that prevents the garlic from feeling too heavy.
Making It Happen
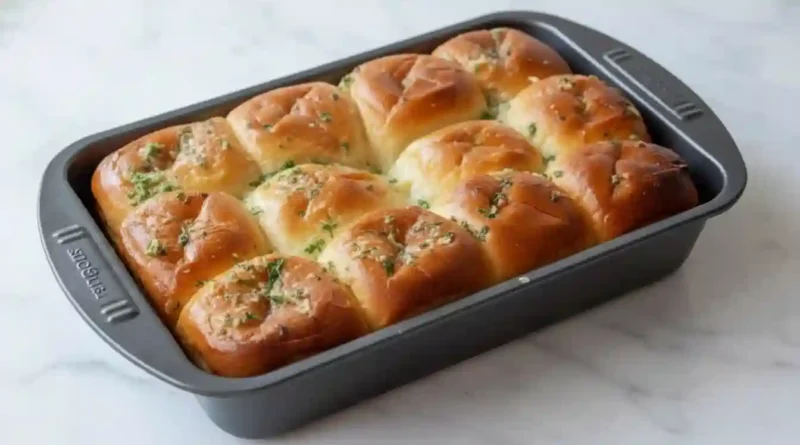
To get started, you’ll want to get your oven nice and hot at 400°F. While that’s heating up, melt your butter in a small bowl. You aren’t just looking for melted fat here; you’re creating a flavor base. Whisk in your finely chopped garlic and parsley until it’s a vibrant, aromatic green mixture.
Take your rolls and place them on a rimmed baking sheet. Rather than just brushing the tops, take a sharp knife and cut a deep “X” into the crown of each roll. This is the secret to the recipe. When you pour that herb garlic butter over them, don’t be shy. Make sure the garlic bits find their way into those crevices. Some butter will inevitably pool at the bottom, which is exactly what you want—it fries the bottom of the rolls slightly, giving them a golden, toasted base. Pop them in the oven for about 7 to 10 minutes. You’re looking for the edges to turn a deep golden brown and for the garlic to lose its raw bite without burning.
You Must Know
-
Don’t Skimp on the X: If you don’t cut deep enough, the butter will just slide off the top. Go about halfway down the roll.
-
Watch the Garlic: Garlic can turn from golden to bitter very quickly. Keep an eye on the oven during the last two minutes.
-
The Rimmed Sheet Matters: Use a pan with sides so the butter stays contained and bathes the bottom of the rolls.
Serving Ideas
These rolls are the perfect companion for a hearty Italian pasta dish like lasagna or a spicy arrabbiata. They also work beautifully alongside a grilled steak or a roast chicken.
For drinks, if you’re serving these as an appetizer, a crisp, cold Lager or a dry Sauvignon Blanc works best. The acidity in the wine or the carbonation in the beer helps cleanse the palate between buttery bites.
Make It Different
-
The Cheesy Version: Stuff a tiny cube of mozzarella or a sprinkle of parmesan into the “X” before baking for a gooey center.
-
Add Some Heat: Whisk in a teaspoon of red pepper flakes or a dash of hot honey for a sweet-and-spicy kick.
-
Make it Vegan: Use a high-quality plant-based butter and ensure your rolls are dairy-free (though traditional Hawaiian rolls often contain milk).
Storage and Reheating
If you happen to have leftovers, store them in an airtight container at room temperature for up to two days. To reheat, avoid the microwave, as it can make the bread chewy. Instead, wrap them loosely in foil and put them in a 350°F oven for 5 minutes. This restores the crispness of the crust and softens the butter again.
Success Tips
For the best results, use a high-quality European-style butter. It has a higher fat content and less water, which results in a richer flavor and a better “fry” on the bottom of the rolls. Also, try to chop your garlic by hand rather than using a press; the small chunks of garlic provide a much better texture and more controlled flavor than the paste a press creates.
FAQ
Can I make these ahead of time?
You can prep the garlic butter and cut the rolls a few hours in advance, but don’t pour the butter over them until you are ready to bake, or the bread might get soggy.
What if I don’t have fresh parsley?
You can use dried parsley (use about 2 teaspoons) or swap it for fresh chives or oregano for a different flavor profile.
Can I use garlic powder instead?
In a pinch, yes, but use about 1 teaspoon. However, fresh garlic is truly the star here and provides a much better depth of flavor.
Do I have to use King’s brand?
Any sweet slider-style roll will work, but the density and sweetness of the King’s brand are specifically what this recipe is designed for.
My rolls got too dark on top but were cold inside. What happened?
Your oven might run hot. Try moving the rack to the middle position and tenting the rolls with foil if they start browning too quickly.
Recipe: Hawaiian Rolls with Garlic Butter
-
Prep time: 5 minutes
-
Cook time: 10 minutes
-
Total time: 15 minutes
-
Servings: 12 rolls
-
Category: Side Dish / Appetizer
-
Difficulty: Easy
-
Cuisine: American
-
Yield: 12 rolls
-
Equipment: Rimmed baking sheet, small mixing bowl, whisk, sharp knife.
Ingredients
-
6 Tablespoons Butter, melted
-
2 Tablespoons Parsley, finely chopped (optional)
-
4 cloves Garlic, finely chopped
-
12 Hawaiian Rolls (like King’s brand)
-
Coarse Salt, like Maldon Sea Salt (optional)
Instructions
-
Preheat and Prep: Preheat your oven to 400°F. While the oven warms, finely chop your garlic and parsley.
-
Make the Butter: In a small bowl, whisk together the melted butter, chopped parsley, and garlic until well combined.
-
Prepare the Rolls: Place the Hawaiian rolls on a rimmed baking sheet. Do not pull them apart; keep them as a single block. Use a sharp knife to cut a deep “X” into the top of each individual roll.
-
Butter the Bread: Carefully pour the herb garlic butter over the rolls. Use a spoon or brush to ensure plenty of garlic and butter gets inside the “X” cuts and drips down the sides.
-
Bake: Place the sheet in the oven and bake for 7 to 10 minutes. The rolls should be warmed through and the tops should be a beautiful golden brown.
-
Finish and Serve: Remove from the oven, sprinkle with a pinch of coarse salt if desired, and serve immediately while warm.
Notes
If you prefer a softer roll, you can cover the baking sheet with foil for the first 5 minutes of baking, then remove it for the final 3-5 minutes to let the tops brown.
Nutrition
-
Calories: Approximately 160 kcal per roll
-
Fat: 9g
-
Carbohydrates: 16g
-
Protein: 3g
