Jellycat Birthday Cake
Jellycat Birthday Cake Recipe: The Cutest Creamy Celebration
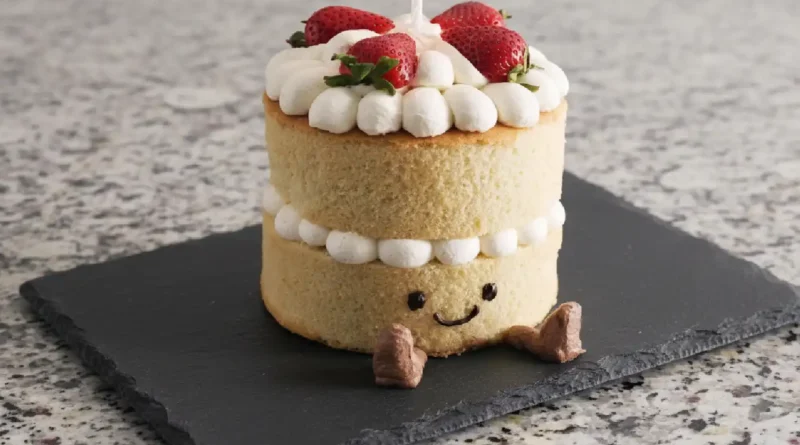
If you have ever wandered into a high-end toy store or scrolled through Instagram lately, you have probably fallen in love with those incredibly soft, smiling plush toys known as Jellycats. Specifically, the Amuseable Birthday Cake plush—a happy little wedge of cake with corduroy legs and a beaming smile—has captured hearts everywhere. This recipe is my edible tribute to that adorable character. It is a tender, hot milk sponge cake layered with clouds of whipped cream and sweet strawberry jam, decorated to look exactly like the friendly plushie. It is nostalgic, whimsical, and honestly, almost too cute to eat. The smell of vanilla and warm milk filling the kitchen while this bakes is pure comfort, promising a celebration that feels genuine and full of joy.
Why You’ll Love This
- Visually Adorable: It recreates the charm of the famous plush toy, making it the perfect centerpiece for kids and adults who are young at heart.
- Velvety Texture: The hot milk sponge technique creates a crumb that is significantly softer and more tender than a standard butter cake.
- Light Sweetness: Unlike heavy buttercream cakes, this uses fresh whipped cream and tart strawberry jam, keeping the palate refreshed rather than overwhelmed.
- Surprisingly Simple: Despite the cute decoration, the base is a straightforward one-bowl style mixing method that is very forgiving.
The Skeptic Who Smiled
I once made this for my uncle, a man who strictly believes cake should be dark chocolate and devoid of “faces.” He usually passes on anything that looks too novel or trendy. When I brought this smiling wedge out, he rolled his eyes at the little piped legs. But after one bite of the sponge—soaked up with that milky, vanilla richness—he went silent. He didn’t just finish his slice; he asked if he could take the “legs” home for his coffee the next morning. It turns out, the comfort of a really good homemade sponge cake bridges the gap between serious eaters and cute aesthetics perfectly.
What Makes It Special
- Hot Milk Sponge Base: By heating the milk and butter together before adding them to the batter, we get a unique, fine crumb that stays moist for days.
- Fresh Strawberry Jam: Using jam adds a concentrated burst of fruit flavor that cuts through the rich cream better than fresh fruit alone.
- Dark Chocolate Features: The slight bitterness of the dark chocolate used for the eyes and smile balances the sugar, ensuring the face isn’t just for show—it tastes good too.
- Real Whipped Cream: There is no shortening or heavy fondant here, just pure, airy cream that melts in your mouth.
Making It Happen
Getting this cake on the table is a smooth process that feels more like a craft project than a chore. You will start by getting your oven ready and prepping your pans. The magic begins with the dry ingredients—flour, baking powder, and salt—whisked together. Then, you gently heat milk, butter, oil, and vanilla until the butter melts into a golden, aromatic liquid.
The real volume comes from beating the eggs and sugar. You need to be patient here, letting the mixer run for a full six minutes until the mixture transforms into a thick, pale ribbon. It should look like clouds. Gently folding in the flour and that warm milk mixture is satisfying work; you watch the batter turn smooth and fluid. Once baked, the cakes need to cool completely—patience is key so your cream doesn’t melt!
While the cakes cool, you whip the cream with sugar and vanilla until it holds soft peaks. A little bit gets tinted with cocoa powder to create the signature “legs.” The assembly is the fun part: piping dollops of cream, hiding a treasure of strawberry jam in the center, and stacking the layers. Finally, you bring it to life by piping those little brown legs and drawing the iconic smile with melted dark chocolate.
You Must Know
- Room Temperature Eggs: Cold eggs will shock the hot milk mixture and can ruin the emulsion, so make sure your eggs are room temp.
- Don’t Skimp on Beating: The six-minute beating time for the eggs and sugar provides the structure. If you stop too early, the cake will be dense.
- Cool Completely: Because we are using real whipped cream, the cake layers must be 100% cool before you start assembling, or you will have a sliding disaster.
- Hot Milk Timing: Add the hot milk mixture slowly to the eggs so you don’t scramble them. Tempering it in gently ensures a smooth batter.
Serving Ideas
This cake is light and airy, making it perfect for an afternoon tea or a post-dinner treat. Serve it alongside a glass of cold milk or a hot cup of Earl Grey tea to complement the vanilla notes. If you are serving adults, a glass of Prosecco or a light Moscato pairs beautifully with the strawberries and cream.
Make It Different
- Gluten-Free: Swap the all-purpose flour for a high-quality 1-to-1 gluten-free baking flour blend. The hot milk method works surprisingly well with GF flours.
- Berry Swap: If you aren’t a fan of strawberry jam, raspberry or apricot jam works wonderfully and gives a different flavor profile.
- Chocolate Version: For a chocolate sponge, replace 30g of the flour with high-quality cocoa powder and fold it in with the dry ingredients.
- Dairy-Free: You can use almond or oat milk in the sponge and a coconut whipping cream or stable non-dairy whip for the filling.
Storage and Reheating Recipe Tips
Since this Jellycat Birthday Cake is covered in fresh whipped cream, it must be kept in the refrigerator. Store it in an airtight cake carrier to prevent the cream from absorbing fridge odors. It will stay fresh for up to 3 days. Freezing is not recommended because the whipped cream texture may become grainy upon thawing. Serve chilled or let it sit on the counter for 10 minutes to take the chill off the sponge.
Success Tips
To get the perfect “Jellycat” look, use a round piping tip for the cream dollops to make them look bubbly and plush-like. When melting the chocolate for the face, do it slowly in short bursts in the microwave so it doesn’t seize. Test your “drawing” skills on a piece of parchment paper before piping the face directly onto the cake to ensure your chocolate is the right temperature and consistency.
Frequently Asked Questions
Can I make the cake layers ahead of time?
Yes! You can bake the sponge layers a day in advance. Wrap them tightly in plastic wrap once cooled and store them at room temperature. Make the whipped cream fresh when you are ready to assemble.
Why did my sponge cake sink in the middle?
This usually happens if the oven door was opened too early during baking or if the eggs weren’t beaten long enough to create a strong structure. Trust the timer and the toothpick test!
Can I use store-bought frosting instead of whipped cream?
You can, but it will change the texture. Whipped cream is light and mimics the softness of the plush toy. If you use buttercream, the cake will be much sweeter and heavier.
How do I get the “legs” to stay put?
Use the cocoa-tinted whipped cream and pipe them directly onto the plate or board, touching the base of the cake. Whipped cream holds its shape well if whipped to firm peaks.
What size cake pans should I use?
This recipe is specifically designed for two 6-inch round cake pans to get that tall, cute proportion. If you use 8-inch pans, the layers will be very thin and you will need to reduce the baking time.
Recipe Card
Prep time: 40 minutes
Cook time: 40 minutes
Total time: 1 hour 20 minutes
Servings: 6-8 servings
Category: Dessert
Difficulty: Intermediate
Cuisine: American
Yield: 1 6-inch layer cake
Equipment
- Two 6-inch round cake pans
- Electric hand mixer or stand mixer
- Mixing bowls
- Parchment paper
- Piping bags
- Offset spatula
Ingredients
Cake Layers
- 225 g all-purpose flour
- 1 ½ teaspoons baking powder
- ½ teaspoon salt
- 3 large eggs, room temperature
- 225 g granulated sugar
- 85 g unsalted butter
- 190 g milk, dairy or non-dairy
- 2 tablespoons oil
- 1 ½ teaspoons vanilla extract
Filling
- 300 g whipping cream or heavy cream, cold
- 30 g powdered sugar
- 1 teaspoon vanilla extract
- 1-2 teaspoons cocoa powder
- 4 tablespoons strawberry jam, store-bought or homemade
Decoration
- 2-3 fresh strawberries, halved
- 1 birthday candle, with white and red stripes if possible
- 20 g dark chocolate, roughly chopped
Instructions
Cake Layers
- Preheat your oven to 350°F. Prepare two 6-inch round cake pans by lining the bottoms with parchment paper.
- In a small bowl, whisk together the flour, baking powder, and salt. Set this dry mixture aside.
- Combine the butter, milk, oil, and vanilla extract in a heatproof bowl or small pot. Heat gently on the stovetop or in the microwave until the butter is completely melted. Do not let it boil. Cover it to keep it warm.
- In a large bowl, combine the eggs and granulated sugar. Using an electric mixer with a whisk attachment, beat on medium speed for exactly 6 minutes. The mixture should triple in volume and turn very pale.
- Reduce the mixer speed to low. Add half of the flour mixture and mix until barely combined. Add the remaining flour and mix until mostly incorporated, being careful not to overmix.
- With the mixer still on low, slowly pour in the warm milk mixture. Mix until you have a smooth, fluid batter.
- Pour the batter evenly into the prepared pans, filling them about halfway.
- Bake for 35-40 minutes. The cakes are done when a toothpick inserted into the center comes out with just a few moist crumbs.
- Allow the cakes to cool in the pans for 15 minutes. Run an offset spatula around the edges, then turn them out onto a wire rack to cool completely.
Filling
- In a large chilled bowl, whip the heavy cream, powdered sugar, and vanilla extract until soft peaks form.
- Scoop a small amount of the cream into a separate bowl for the details. Continue whipping the main batch of cream until firm peaks form.
- To the small reserved bowl of cream, add the cocoa powder and mix until it turns a light brown color. Transfer this to a piping bag with the tip snipped off.
- Transfer the white whipped cream to a separate piping bag and snip the tip.
Assemble and Decorate
- Place the first cake layer on a serving plate. Pipe dollops of white cream around the edge, smoothing the tails toward the center.
- Spread the strawberry jam in the center of the layer, keeping it inside the ring of cream.
- Place the second cake layer on top. Pipe more dollops of cream over the top surface.
- Arrange the halved strawberries on the cream and insert the candle in the center.
- Using the brown cream, pipe two small legs extending from the bottom of the cake onto the plate. Pipe small dollops for feet.
- Melt the dark chocolate carefully. Transfer it to a small piping bag with a tiny opening. Pipe two eyes and a smile on the front of the bottom cake layer, positioned between the legs.
Nutrition
Calories: 450kcal | Carbohydrates: 55g | Protein: 6g | Fat: 24g | Saturated Fat: 14g | Cholesterol: 110mg | Sodium: 280mg | Potassium: 150mg | Fiber: 1g | Sugar: 38g | Vitamin A: 800IU | Vitamin C: 2mg | Calcium: 100mg | Iron: 1.5mg
