Mongolian Chicken
Mongolian Chicken Recipe (Better Than Takeout in 30 Minutes!)
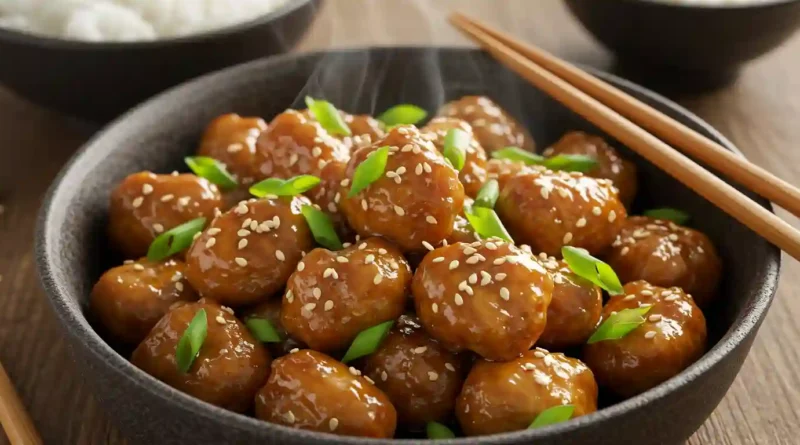
There’s a certain magic that happens when sweet, salty, and savory come together in a single bite. For me, that magic is called Mongolian Chicken. This isn’t a dish I grew up with, but one I discovered on a chilly evening at a bustling, no-frills restaurant. The steam rising from the plate, the deep, glossy brown sauce clinging to tender pieces of chicken, and that incredible aroma of garlic and ginger—it was love at first taste. I spent weeks in my own kitchen trying to recreate that experience, and this recipe is the happy result. It’s become my go-to for a weeknight dinner that feels anything but ordinary, a surefire way to bring everyone to the table with zero complaints.
Why You’ll Love This Mongolian Chicken
-
It’s Faster Than Takeout. From fridge to table in under 30 minutes, this recipe delivers incredible flavor without the wait or the price tag.
-
The Sauce is Everything. Sweet from brown sugar, salty from soy, and with a gentle kick of heat, this addictive sauce is what dreams are made of.
-
Surprisingly Simple. Don’t be intimidated by the deep flavor—it’s achieved with pantry staples you likely already have on hand.
-
A Crowd-Pleaser. This dish has a magical ability to win over even the most stubborn of palates, making it perfect for family dinners or impressing guests.
I’ll never forget the time I made this for my friend’s son, a legendary picky eater whose diet seemed to consist solely of plain pasta and chicken nuggets. He eyed the plate of Mongolian Chicken with deep suspicion. After some gentle coaxing, he tried a single, sauce-coated piece of chicken. There was a pause, then a quiet, “Can I have more?” His mother’s jaw nearly hit the floor. He now requests it every time he comes over. It’s proof that the right sauce can work miracles.
What Makes It Special
-
Chicken Thighs: Using boneless, skinless thighs instead of breasts guarantees juicy, tender bites that won’t dry out, even in a hot wok.
-
The Cornstarch Coating: This simple step is the secret to achieving that coveted, lightly crispy exterior on the chicken that soaks up the sauce perfectly.
-
The Flavor Trinity: The combination of fresh garlic, ginger, and soy sauce creates an authentic, umami-rich base that is utterly irresistible.
-
A Hint of Heat: Red pepper flakes add a subtle warmth that balances the sweetness of the sauce without being overpowering.
Making It Happen
Let’s get cooking. Start by tossing your bite-sized pieces of chicken thigh with cornstarch in a large bowl. You want each piece to have a light, even coating—this is what will give us that wonderful textural contrast later.
Now, heat most of your oil in a large skillet or wok over high heat. We want it nice and hot to get a good sear. Cook the chicken in two batches to avoid steaming it; you’re looking for a beautiful golden brown crust on each piece. This should only take about 4-5 minutes per batch. Remove the chicken to a plate.
In that same hot pan, toss in your onion chunks. They’ll soften and pick up all the delicious browned bits left behind by the chicken. After a few minutes, scoot them over to the chicken plate. Add that last tablespoon of oil and your minced garlic. The second that garlic becomes fragrant—we’re talking 30 seconds—you’re ready for the main event: the sauce.
Pour in your soy sauce, rice wine vinegar, and add the brown sugar, ground ginger, and red pepper flakes. Give your cornstarch a good mix with the water until it’s smooth, and whisk that in, too. Bring everything to a lively simmer and watch as it transforms from a thin liquid into a gloriously thick, glossy glaze in just 2-3 minutes.
Now, bring it all home. Add the cooked chicken and onions back into the skillet, along with most of your sliced green onions. Toss everything until every single piece is lovingly coated in that sticky, incredible sauce. Give it a taste and see if it needs a pinch of salt or pepper.
You Must Know
-
Don’t Crowd the Pan: Cooking the chicken in batches is non-negotiable for getting crispy edges instead of steamed chicken.
-
Have Everything Prepped: This recipe moves quickly once you start cooking. Have all your ingredients measured and within arm’s reach (this is called mise en place).
-
Fresh is Best: While ground ginger works in a pinch, using freshly minced ginger will elevate the flavor to a whole new level.
Serving Ideas
The classic and perfect pairing is a generous bed of fluffy white jasmine rice to soak up every drop of sauce. For a lower-carb option, try cauliflower rice or quinoa. To round out the meal, simple steamed broccoli or snap peas add a fresh, crisp contrast. For a drink, a cold, crisp lager or a slightly sweet Riesling pairs beautifully with the savory-sweet flavors.
Make It Different
-
Spice It Up: Love heat? Add a teaspoon of sriracha or a few dried chiles to the sauce.
-
Vegetable Lover: Feel free to add in sliced bell peppers, broccoli florets, or carrots with the onions.
-
Gluten-Free: Easily make this gluten-free by using tamari or a certified gluten-free soy sauce.
-
Protein Swap: This sauce is fantastic with thinly sliced beef sirloin, shrimp, or even firm tofu.
Storage and Reheating Tips
Leftovers can be stored in an airtight container in the refrigerator for 3–4 days. The best way to reheat Mongolian Chicken is in a skillet over medium heat, stirring occasionally, until warmed through. This helps maintain the texture better than a microwave, which can make the sauce separate and the chicken rubbery.
Success Tips
For the absolute best results, pat your chicken pieces completely dry with a paper towel before tossing them with the cornstarch. Any excess moisture will prevent you from getting a crispy sear. Also, resist the urge to constantly stir the chicken while it’s browning. Let it sit for a couple of minutes to develop that beautiful golden color.
Frequently Asked Questions (FAQ)
Can I use chicken breasts instead?
Absolutely! Chicken breasts will work just fine. Just be sure to reduce the cooking time by a minute or two per batch, as they cook faster and can dry out more easily than thighs.
My sauce didn’t thicken. What happened?
The cornstarch needs to be mixed with cold water first to create a slurry before adding it to the sauce. If you add it directly to the hot liquid, it will clump. If your sauce is still thin, let it simmer for another minute or two, or create a little more slurry and whisk it in.
Is this dish very spicy?
Not at all! The half teaspoon of red pepper flakes provides a very mild, background warmth. You can easily reduce it to ¼ teaspoon or omit it entirely for a completely mild dish.
What’s the best type of pan to use?
A large cast-iron skillet or a wok is ideal because they get very hot and promote great browning. A large stainless steel skillet will also work well.
Can I freeze Mongolian Chicken?
You can, but be aware that the texture of the chicken may change slightly upon thawing and reheating. Freeze in an airtight container for up to 2 months. Thaw overnight in the refrigerator before reheating.
Recipe Card: Mongolian Chicken
Prep time: 10 minutes
Cook time: 15 minutes
Total time: 25 minutes
Category: Main Course
Difficulty: Easy
Cuisine: Asian-Inspired
Yield: Serves 4
Ingredients
For the Chicken:
-
1 1/2 pounds boneless, skinless chicken thighs, cut into bite-sized pieces
-
1/3 cup cornstarch
-
1/4 cup vegetable or canola oil, divided
-
1 large onion, cut into chunks
-
4 garlic cloves, minced
For The Sauce:
-
1/2 cup soy sauce
-
1/2 teaspoon ground ginger (or 1 tbsp freshly minced)
-
1 tablespoon rice wine vinegar
-
1/2 cup brown sugar, packed
-
1 tablespoon cornstarch
-
1/2 cup water
-
1/2 teaspoon red pepper flakes
-
4-5 green onions, sliced
Instructions
-
In a large bowl, toss the diced chicken with the 1/3 cup of cornstarch until evenly coated.
-
Heat a large 12-inch skillet or wok over high heat and add 3 tablespoons of oil. Once hot, add half of the chicken and cook until golden brown and crispy, about 4-5 minutes, flipping halfway through. Remove to a plate and repeat with the remaining chicken.
-
Add the onion chunks to the skillet and cook for 2-3 minutes until slightly softened. Remove to the plate with the chicken.
-
Add the remaining 1 tablespoon of oil to the skillet. Add the minced garlic and cook just until fragrant, about 30 seconds.
-
In a small bowl, whisk the 1 tablespoon of cornstarch with the 1/2 cup of water until smooth to create a slurry.
-
To the skillet, whisk in the soy sauce, ginger, vinegar, brown sugar, and red pepper flakes. Whisk in the cornstarch slurry. Bring the sauce to a simmer for 2-3 minutes, until thick and glossy.
-
Reduce the heat to low. Add the cooked chicken and onions back into the skillet. Add most of the sliced green onions (save some for garnish). Toss everything until completely coated in the sauce.
-
Serve immediately over cooked rice, garnished with the remaining green onions.
Notes
-
For best results, pat the chicken pieces dry before coating with cornstarch.
-
Leftovers can be stored in an airtight container in the fridge for 3–4 days. Reheat in a skillet over medium heat for best texture.
Allergy Info: Contains soy. Can be made gluten-free using tamari.
Nutrition Estimate (per serving, without rice): Calories: 495kcal, Carbohydrates: 38g, Protein: 35g, Fat: 23g, Saturated Fat: 4g, Cholesterol: 161mg, Sodium: 1800mg, Sugar: 23g
