Pork Roast with Crispy Crackling
It’s your dream come true: The best ever Pork Roast with ultra-tender flesh and ultra-crispy pork crackling! This pork shoulder roast uses a simple but highly effective method to make pork crackle really crispy. Every. Single. Time. And without scoring the skin!
Served with a homemade gravy for pork, this is The Roast Recipe I pull out that’s a guaranteed hit, always.
The perfect Pork Roast
This perfect Pork Roast has:
Slow-cooked, tender, juicy, flavour-infused flesh;
Super-crispy, bubbly pork crackling all over – no rubbery or chewy patches at all; and
Served with it an incredible homemade gravy made with the pan drippings.
It’s made without fussing with blow dryers, boiling hot water, or leaving the pork to air dry in the fridge overnight.
It’s simple to make without any special equipment, and works – Every. Single. Time. (But you don’t need to take my word for it. Read the reviews!)
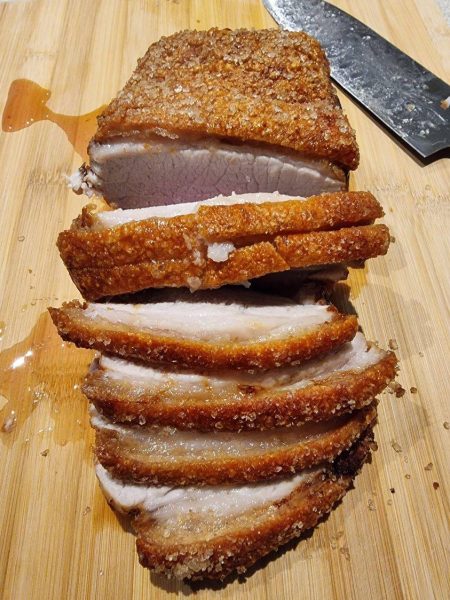
Pork Roast with Crispy Pork Crackling
This is how to make a pork roast with tender juicy flesh, with a crazy-crispy crackling! The crackle is bubbly and puffy from edge to edge as it should be, rather than an impenetratable rock hard flat sheet of skin or worse still, littered with rubbery patches.
And the gravy is to die for, thanks to the flavour loaded roasting pan juices!
KEY STEPS: Use pork shoulder, dry skin, no need to score (but if it’s already scored, that’s ok), salt the skin evenly, slow roast low uncovered, keep the skin surface level using foil balls, and blast it for crispy skin!
Read the post for extra tips, step photos, and why this recipe works!
Prep Time 15 mins
Cook Time 3 hrs 20 mins
Total Time 3 hrs 35 mins
Cuisine: Western
Keyword: best pork roast, crispy crackling, how to make crispy crackling, how to make pork crackle, Pork Roast, roast pork shoulder
Servings: 10 – 12
Calories: 746cal
Ingredients
3 kg/ 6 lb boneless skin on pork shoulder, NOT scored , unrolled / netting removed (Note 1 & 6)
3 tsp cooking / kosher salt (NOT salt flakes or table salt, Note 7)
1 1/4 tsp black pepper
2 tsp fennel seeds (or other herb/spice of choice)
1 tbsp+ 1 tsp olive oil
1 garlic bulb , halved horizontally
2 onions , halved (brown, white, red)
2 cups dry white wine, or alcoholic or non-alcoholic cider (Note 2)
Gravy:
1/4 cup flour (Note 5)
2 cups chicken broth/stock , low sodium
Salt and pepper
Instructions
Dry skin: Pat the skin dry with paper towels. If time permits, leave in the fridge uncovered overnight (even 1 hr helps). If not, pat extra well.
Preheat oven to 220°C/430°F (200°C fan).
Season flesh: Sprinkle pork flesh with 1 1/2 tsp salt, all the pepper and all fennel seeds and 1 tbsp olive oil. Rub into flesh, right into all the crevices and cracks.
Salt skin: Flip pork, drizzle skin with 1 tsp oil, then rub all over with fingers. Sprinkle all over with remaining 1 1/2 tsp salt, taking care to get even coverage. Un-salted patches will not become bubbly crackling, it will be a hard flat sheet.
Garlic & onion bed: Place halved garlic bulbs and onion in roasting pan. Place pork skin side up on top of them.
Wine: Carefully pour wine into the pan, being sure not to wet the skin. Transfer to oven.
Lower oven: Immediately turn oven down to 160°C/320°F (140°C fan).
Slow roast: Roast for 2 1/2 hours.
Level at 1 1/2 hours: Check pork after 1 1/2 hours to see if the pork is warped and the skin’s overall surface is significantly unlevelled. If so, adjust to make the skin surface as level as possible using balls of foil and moving large dislodged pork pieces to the side (key tip for crispy crackling, Note 3). Then return to oven for the remaining 1 hour.
Check pan & salt on skin: If pan is drying out, add some water. If there are bald patches on the skin without salt (eg it fell off), spray lightly with oil spray (or brush lightly with oil) then sprinkle with salt. (Remember, salt = bubbly skin!)
Increase heat: Turn oven up to 250°C/485°F (all oven types), or as high as it will go if your oven won’t go this high.
Make skin crisp: Return pork to oven for 30 minutes, rotating pan as needed, until skin is crisp and bubbly all over. If needed, use foil patches, secured with water soaked toothpicks, to cover parts that are done and keep crisping up remaining patches.
Rest: Transfer pork to serving platter, tent loosely with foil (don’t worry, crackling stays super-crisp) and rest for 20 minutes (stays warm up to 1 hour). Then slice using a serrated knife.
Serve with gravy. Don’t pour gravy over crackling – pour it off to the side! See note for reheating.
Gravy:
Transfer fat to saucepan: Skim off 3 tablespoons of fat from the roasting pan and put in a saucepan.
Strain pan juices: Place strainer over bowl and scrape in all the remaining pan juices (including onion and garlic). Press out juices, then discard onion & garlic. Skim off excess fat from surface and discard – no need to be exact here!
Gravy roux: Heat the saucepan with the fat over medium heat. Add flour and cook for 1 minute.
Add liquids: Pour stock in while whisking so it’s lump free. Then pour in strained pan juies.
Thicken: Simmer until thickened to syrup consistency – about 3 minutes – it will thicken more as it cools a little while serving. (Note 4 for colour tip)
Season: Adjust salt and pepper to taste. Pour into serving jug. Serve with pork.
Notes
1. Pork: For best crackling, use a flat, boneless pork shoulder that is not scored, preferably without a big “flappy” piece hanging off it. The perfect piece is a neat square or rectangle shape that is fairly even thickness all over with a flat, smooth skin.
Unrolled / netting removed – if your pork is tied or netted into a log shape, remove it. You want the skin to be laid out flat for crispy crackle, not in a log shape (the sides never go crispy, only the very top).
NOT scored – This recipe is specifically designed to work for pork that is NOT scored. But scored pork (ie. slashes across the skin) will work just fine too. Note, however, if pork is not scored properly and the slashes cut into the meat, the juices will bubble up onto skin and you’ll get rubbery patches. This is a notorious problem with pork purchased from grocery stores!
Fridge-drying HIGHLY recommended if your pork was purchased vac-packed (as most supermarket pork is).
2. Liquid – Any dry white wine or cider is fine. Even apple juice is great, which I have tried and loved. Chicken broth/stock (low sodium) can also be used but it you do, use half water and half broth for the gravy. Water can also be used (but stick with broth for gravy).
3. Levelling the skin = even heat distribution = better crackling. Read in post. Use scrunched up balls of foil tucked under the pork to level the skin before blasting with high heat to get the bubble.
4. Gravy colour is dependent on the browning in the pan juices. If your gravy is lighter than you want, a cheeky tip is to use DARK soy sauce instead of salt. It will darken your gravy whilst also seasoning it, but no one will ever taste the soy sauce!
5. GRAVY GLUTEN-FREE OPTION: Mix 2 tbsp cornflour / cornstarch with a splash of the broth. Then add it into the saucepan with the rest of the broth and the pan juices, per recipe. As it simmers, it will thicken into a gravy consistency.
6. DIFFERENT PORK SIZES – Use the recipe scaler (click on “Servings” figure and slide) to adjust ingredient quantities based on the size of pork you are using. The cook times below are based on pork that is around 5-8 cm / 2-3.2″ thick, including skin. I don’t recommend using this recipe for pork less than 1.5kg/3lb.
1.5kg / 3 lb: Reduce slow cook time by 30 minutes, and check at 1 hour to ensure it’s level*2 – 3kg / 4 – 6lb: Cook times per recipe3.5 – 4.5kg / 7 – 8lb: Add 30 – 45 minutes to the slow cook time and add 1 cup extra liquid (helps keep the flesh more moist + ensures pan doesn’t dry out)
* Smaller piece = more warping = less stable = risk of tipping over and skin getting wet.
7. Salt – must use cooking salt / kosher salt here, not table salt and not sea salt flakes. Table salt is too fine, flakes don’t work as well. Cooking salt / kosher salt are larger grains and make the best bubbly crispy crackling.
8. Reheating leftovers – Separate meat from crackling, cool crackling uncovered. Store separately. Reheat meat in microwave and crackling in oven at 160C/320F for 5 to 8 minutes.
9. Nutrition per serving, assuming 10 servings and that all the gravy is used. This does not take into account any fat skimmed off the pan juices before making the gravy so it’s higher than reality
