Red Velvet Cheesecake Brownies
The Best Red Velvet Cheesecake Brownies Recipe for Any Occasion
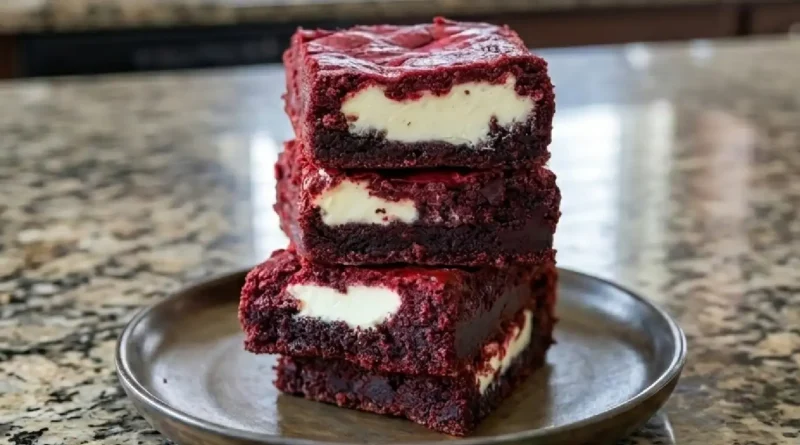
There is something magnetic about the contrast between a deep, crimson brownie and a stark white cream cheese swirl. I remember the first time I pulled a batch of these red velvet cheesecake brownies out of the oven; the kitchen smelled of rich cocoa and toasted sugar, but it was the visual that stopped me. The marble pattern looked like a piece of edible art. These aren’t just your standard chocolate squares. They offer a specific kind of indulgence—a heavy, fudgy base paired with the bright, tangy silkiness of cheesecake. Every bite is a balance of textures, moving from the dense, buttery crumb of the red velvet to the soft, melt-in-your-mouth topping.
Why You’ll Love This
-
The Perfect Texture: You get the best of both worlds—the chewy, fudgy bite of a brownie and the smooth, airy finish of a cheesecake.
-
Visual Appeal: The striking red and white marbling makes these a natural centerpiece for holiday parties, birthdays, or Valentine’s Day.
-
Balanced Flavor: The slight acidity of the buttermilk and cream cheese cuts through the sweetness of the sugar, ensuring they aren’t cloyingly sweet.
-
Simple Elegance: While they look like they came from a high-end bakery, the process is straightforward enough for a casual Sunday afternoon bake.
I once served these at a neighborhood gathering where a friend of mine, a self-proclaimed dessert skeptic who usually passes on anything “red velvet,” ended up asking for the recipe. He admitted he always thought red velvet was just “dyed chocolate,” but the combination of the tangy cheesecake layer and the hint of vinegar in the brownie batter changed his mind. He didn’t just have one; he wrapped two more in a napkin to take home. It’s the kind of dessert that wins over the people who claim they don’t have a sweet tooth.
What Makes It Special
-
Unsweetened Cocoa Powder: We use just enough to provide a foundational chocolate flavor without turning the batter completely brown, allowing that signature red hue to shine.
-
Tangy Cream Cheese: High-quality, full-fat cream cheese is essential for that signature cheesecake tang that contrasts so well with the fudgy base.
-
A Splash of Vinegar: A traditional red velvet secret, the vinegar reacts with the cocoa and buttermilk to keep the crumb tender and the color vibrant.
-
Pure Vanilla Extract: Used in both layers, it acts as the aromatic bridge that ties the cocoa and the cheese together.
Making It Happen
To begin, you will want to focus on the red velvet base. Melt your butter and whisk it together with the sugar until the mixture looks smooth and slightly glossy. One by one, beat in the eggs, followed by the vanilla, food coloring, and that tiny bit of vinegar. Once the liquid is a brilliant ruby red, gently fold in your dry ingredients—the flour and cocoa powder—until just combined. Be careful not to overmix here; you want a dense, fudgy result, not a cakey one. Set aside a small portion of this batter to use for your swirls later.
For the cheesecake layer, ensure your cream cheese is soft enough to whip into a cloud-like consistency. Mix it with sugar, an egg, and vanilla until there are no lumps left. Spread the main red velvet batter into your prepared pan, smoothing it into the corners. Gently pour the cream cheese mixture over the top, spreading it out evenly. Finally, take those reserved spoonfuls of red batter, dot them across the top, and use a thin knife or a skewer to draw figure-eights through the layers, creating that beautiful marbled effect.
You Must Know
-
Room Temperature is Key: Your cream cheese and eggs must be at room temperature to ensure the cheesecake layer is smooth and the batter doesn’t break.
-
Don’t Over-Swirl: If you drag your knife through the batter too many times, the colors will muddy together rather than staying in distinct, beautiful ribbons.
-
Use Gel Food Coloring: Gel provides a more intense red than liquid coloring without adding extra moisture to the batter.
-
Check the Bake Early: These brownies are better slightly underbaked than overbaked. They will continue to firm up as they cool in the pan.
These brownies are rich enough to stand on their own, but they are exceptional when served with a cold glass of whole milk or a bitter espresso to balance the sweetness. If you are feeling extra indulgent, a side of fresh raspberries adds a nice tartness that complements the cream cheese. For a late-night treat, serve them slightly chilled; the cheesecake layer takes on a fudge-like density when cold.
Make It Different
If you want to customize this recipe, you can easily swap the traditional red for a deep emerald green for St. Patrick’s Day or keep it natural by using beet powder for coloring. For those who need a gluten-free option, a 1:1 gluten-free baking flour works surprisingly well in this dense batter. If you love a bit of crunch, folding white chocolate chips into the red velvet batter before baking adds a lovely texture and an extra hit of vanilla.
Storage and Reheating Recipe Tips
Because of the cream cheese, these brownies should be stored in the refrigerator. Place them in an airtight container with parchment paper between layers to prevent sticking. They will stay fresh for up to five days. If you prefer the texture of a room-temperature brownie, simply take one out about twenty minutes before you plan to eat it. I don’t recommend reheating these in the microwave for long, as the cheesecake layer can become oily; ten seconds is usually more than enough to soften the chocolate.
Success Tips
Sifting your cocoa powder is a small step that makes a huge difference; it prevents those tiny bitter clumps of dry cocoa from hiding in your fudgy batter. Additionally, when lining your pan with parchment paper, leave an overhang on two sides. This creates a “sling” that allows you to lift the entire block of brownies out of the pan once they are cool, making it much easier to get clean, sharp squares when you cut them.
Frequently Asked Questions
Can I use a box brownie mix for the base?
While you can, you’ll lose that specific red velvet flavor profile that comes from the cocoa-vinegar-buttermilk combination. Homemade is definitely worth the extra few minutes here.
How do I know when they are done?
The edges should be set and pulling away slightly from the pan, but the center should still have a very slight jiggle. A toothpick inserted should come out with a few moist crumbs, not wet batter.
Why did my cheesecake layer crack?
Cracks usually happen from overbeating the egg in the cheesecake mixture or overbaking. Mix the cheesecake layer just until smooth and avoid high heat.
Can I freeze these?
Yes. Wrap individual squares tightly in plastic wrap and then foil. They can be frozen for up to three months. Thaw them in the fridge overnight before serving.
Do I have to use red food coloring?
The color is purely aesthetic. If you leave it out, you will have delicious cocoa-flavored brownies with a cheesecake swirl. They won’t be “red velvet” in name, but they will still taste incredible.
Red Velvet Cheesecake Brownies
Prep time: 20 minutes
Cook time: 35 minutes
Total time: 55 minutes
Servings: 16 squares
Category: Dessert
Difficulty: Intermediate
Cuisine: American
Yield: 1 8×8 inch pan
Equipment: 8×8 baking pan, parchment paper, electric hand mixer, mixing bowls, silicone spatula, skewer or butter knife.
Ingredients
For the Brownie Layer:
-
1/2 cup unsalted butter, melted and slightly cooled
-
1 cup granulated sugar
-
1 teaspoon vanilla extract
-
1/4 cup unsweetened cocoa powder
-
1/4 teaspoon salt
-
1 tablespoon liquid or gel red food coloring
-
1/2 teaspoon white distilled vinegar
-
2 large eggs, room temperature
-
3/4 cup all-purpose flour
For the Cheesecake Layer:
-
8 oz cream cheese, softened to room temperature
-
1/4 cup granulated sugar
-
1 large egg, room temperature
-
1/2 teaspoon vanilla extract
Instructions
-
Preheat your oven to 350°F (175°C). Line an 8×8 inch square baking pan with parchment paper, leaving a bit of overhang on the sides.
-
In a large bowl, whisk the melted butter and 1 cup of sugar together. Add the eggs, vanilla, food coloring, and vinegar, whisking until the color is uniform and the mixture is smooth.
-
Sift in the cocoa powder, salt, and flour. Use a spatula to fold the dry ingredients into the wet batter until just combined.
-
Remove about 3 or 4 tablespoons of the red batter and set it aside in a small bowl. Pour the remaining red batter into the prepared pan and spread it out evenly.
-
In a separate bowl, use an electric mixer to beat the softened cream cheese and 1/4 cup sugar until smooth. Add the egg and vanilla, beating on low speed until just incorporated.
-
Drop spoonfuls of the cream cheese mixture over the brownie batter in the pan. Use a spatula to gently spread it into an even layer.
-
Take the reserved red batter and drop small dollops on top of the cream cheese layer.
-
Use a skewer or a knife to swirl the red dollops into the white cream cheese.
-
Bake for 30–35 minutes, or until the center is set.
-
Allow the brownies to cool completely in the pan before lifting them out and slicing.
Notes
For the cleanest cuts, wipe your knife with a warm, damp cloth between every single slice. This prevents the cheesecake from smearing across the red brownie layers.
Nutrition
Serving: 1 brownie | Calories: 215kcal | Carbohydrates: 24g | Protein: 3g | Fat: 12g | Saturated Fat: 7g | Cholesterol: 60mg | Sodium: 85mg | Fiber: 1g | Sugar: 18g
