Red Velvet Cheesecake Cake
Red Velvet Cheesecake Cake: The Dessert That Tricks Two Cravings Into One Slice
There’s a particular kind of silence that happens at a dessert table when someone takes their first bite of this cake and realizes there’s a whole cheesecake hiding inside it. It’s not a polite silence. It’s the kind where forks pause mid-air and someone says “wait, what” with their mouth half full. I learned to expect that reaction the first time I made a red velvet cheesecake cake for a family birthday, and now I almost can’t make it any other way because the surprise is part of the fun.
This cake started as a compromise. My mother-in-law wanted red velvet. My husband wanted cheesecake. I didn’t want to make two desserts and wash twice the dishes, so I baked a dense, buttery layer of cheesecake and tucked it between two tender, cocoa-kissed red velvet layers, then wrapped the whole thing in tangy cream cheese frosting. It worked. It worked so well that it’s been the requested birthday cake in our house for years now, and it’s the one people ask me to bring to potlucks even when nobody specifically requested cake.
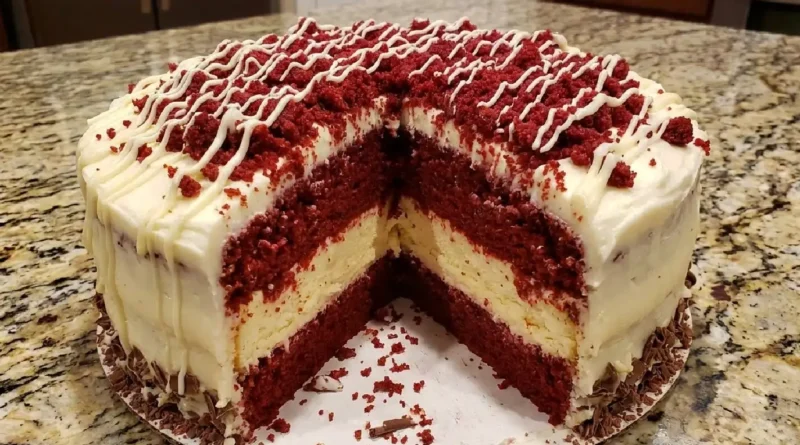
What you get is a dessert with real structure to it: a soft, faintly chocolatey crumb on the outside, a cool, dense, slightly sour cheesecake layer running through the center, and a smooth cream cheese frosting that ties the whole thing together so it doesn’t feel like two separate desserts stacked on top of each other. It tastes rich without being heavy, and it looks dramatic enough that nobody will guess how straightforward it actually is to put together.
Why You’ll Love This
- It solves the eternal “cake or cheesecake” argument by refusing to choose, so everyone at the table gets exactly what they wanted.
- The contrast between the dense cheesecake layer and the soft cake layers makes every bite feel more interesting than a regular slice of cake.
- It looks like something from a bakery case, but the steps are broken into manageable stages you can spread across two days if you want to.
- Cream cheese frosting does double duty here, echoing the cheesecake layer so the flavors feel intentional rather than just stacked together.
- It travels well and holds up beautifully in the fridge, which makes it a smart choice for anyone bringing dessert somewhere ahead of time.
The Backstory
My father-in-law is, by his own admission, not a cake person. He’ll eat pie, he’ll eat cobbler, but cake has always struck him as “too sweet for no reason,” which is a sentence he has said at more than one birthday party while quietly declining a slice. The first time I brought this cake to a family dinner, I didn’t tell him there was cheesecake involved. I just handed him a plate. He ate the whole slice without a word, then asked, somewhat suspiciously, what was in the middle. When I told him, he asked for a second piece, which had genuinely never happened before with anything I’d baked. He now requests it by name, calling it “the cheesecake one,” and has stopped pretending he doesn’t like cake when this particular cake is in the room.
What Makes It Special
- Cream cheese forms the backbone of both the cheesecake layer and the frosting, giving the whole dessert a consistent tangy richness instead of one-note sweetness.
- Cocoa powder and buttermilk in the cake layers keep things tender and give that classic red velvet flavor, slightly chocolatey but never overpowering.
- Sour cream in the cheesecake batter keeps that center layer creamy and dense without turning gummy or rubbery once it’s fully chilled.
- Vinegar and baking soda working together in the cake batter give the crumb its characteristic soft, almost velvety texture, which is where the cake gets its name.
- A touch of red food coloring isn’t just for looks; it makes the contrast between the vibrant cake layers and the pale cheesecake center part of the visual payoff when you cut into it.
Making It Happen
Start with the cheesecake layer first, since it needs time to bake and cool before anything else happens. You’ll beat softened cream cheese until it’s completely smooth, no lumps lurking anywhere, then bring in sugar, eggs, sour cream, and vanilla until the batter turns glossy and pourable. That goes into a parchment-lined springform pan and bakes low and slow in a water bath, which keeps it from cracking or puffing up too aggressively. Once it’s set but still has a slight wobble in the center, it comes out to cool completely, then heads into the freezer for at least a few hours. A frozen cheesecake layer is so much easier to handle later, and it won’t squish or tear when you’re assembling the final cake.
While that’s chilling, you’ll move on to the red velvet layers. This batter comes together quickly: butter and sugar creamed until fluffy, eggs added one at a time, then cocoa powder, vinegar, red food coloring, and buttermilk folded in alternately with the dry ingredients. The batter should look smooth and deeply red, almost like wine, before it goes into two prepared cake pans. They bake until a toothpick comes out clean and the centers spring back gently when pressed, then cool completely on a wire rack, because warm cake layers will tear or slide during assembly.
Assembly is where the magic actually happens. One cake layer goes down first, then a thin layer of frosting to act as glue, then your frozen cheesecake disc settles right on top, fitting like a puzzle piece if your pans were the same size. Another thin layer of frosting goes over the cheesecake, and the second cake layer caps everything off. From there, it’s a simple crumb coat to lock in any stray crumbs, a chill in the fridge, and then the final, generous layer of cream cheese frosting smoothed over the whole exterior. A quick chill before slicing keeps every layer distinct when you cut in, instead of everything sliding around on the plate.
You Must Know
- Freeze the cheesecake layer solid before assembling. A soft or even just chilled cheesecake layer will squish under the weight of the top cake layer and ruin your clean slices.
- Use a water bath for the cheesecake to prevent cracking and keep the texture dense and creamy rather than dry around the edges.
- Make sure your cake layers are completely cool, ideally room temperature, before you start stacking, or the frosting will slide and melt unevenly.
- A crumb coat isn’t optional here. It’s what keeps red cake crumbs from showing up as pink specks in your white frosting.
- Trim domed cake tops flat with a serrated knife before assembly so the layers sit level and the cheesecake doesn’t end up lopsided.
Serving Ideas & Pairings
This cake is rich enough that it doesn’t need much beside it, but a small handful of fresh raspberries or strawberries on the plate adds a bright, slightly tart contrast that cuts through the richness nicely. A cup of strong black coffee or espresso works well here, since the bitterness balances the sweetness of the frosting. If you’re serving it after a heavier meal, a glass of late-harvest dessert wine or even just sparkling water with a twist of lemon keeps things from feeling too indulgent all at once.
Make It Different
If you want a lighter version, you can swap the full-fat cream cheese in the frosting for a reduced-fat version, though the cheesecake layer itself does better with full-fat cream cheese for structure. Gluten-free baking blends work as a one-to-one substitute for the flour in the cake layers if you need this to be gluten-free, just watch your bake time since gluten-free batters can sometimes set a touch faster. For a different flavor angle, try adding orange zest to the cheesecake batter, which plays surprisingly well against the chocolate notes in red velvet. If you want individual portions instead of one large cake, the same components work beautifully as mini layered cakes or even as a trifle, layered in glass jars for parties.
Storage & Reheating
Because of the cheesecake layer, this cake needs to live in the refrigerator rather than on the counter. Wrapped well or stored in an airtight container, it stays fresh for about five days, and honestly tastes even better on day two once the layers have had time to settle together. There’s no reheating involved with this one, since it’s meant to be served cold or at a cool room temperature; just pull individual slices out about fifteen to twenty minutes before serving so the frosting softens slightly and the flavors come through more fully. For longer storage, you can freeze fully assembled slices wrapped tightly in plastic and foil for up to two months, then thaw them overnight in the fridge before serving.
Success Tips
Room temperature ingredients make a real difference in both the cake batter and the cheesecake filling, helping everything blend smoothly without lumps or curdling. If your kitchen runs warm, work in shorter bursts and chill components between steps rather than rushing straight through assembly. A cake turntable, while not required, makes frosting the sides so much easier and helps you get that smooth, bakery-style finish. And if your cheesecake layer turns out slightly smaller in diameter than your cake layers, don’t worry, the frosting will hide the gap and nobody will know once it’s sliced.
Frequently Asked Questions
Can I make this cake ahead of time? Yes, and honestly it’s easier if you do. The cheesecake layer can be made up to three days ahead and kept frozen, and the cake layers can be baked a day in advance and stored wrapped at room temperature. Assemble everything the day before serving for the best texture.
Why did my cheesecake layer crack? Cracking usually happens from baking at too high a temperature or skipping the water bath. It can also happen if the cheesecake cools too quickly after baking. A gentle bake and a slow cooldown in the turned-off oven with the door cracked open helps a lot.
Can I use a boxed red velvet cake mix instead of making it from scratch? You can, and it will save time without sacrificing too much in the way of result. Just bake according to the package instructions and let the layers cool completely before assembling, same as you would with a homemade version.
Do I need a springform pan for the cheesecake layer? A springform pan makes removal much easier and helps the cheesecake bake evenly, so it’s worth using if you have one. If you don’t, a regular round cake pan lined well with parchment can work, though removal takes a bit more patience.
Why is my frosting too thin to hold the layers together? This usually means your cream cheese or butter was too soft when you started, or the frosting needs more powdered sugar to firm up. Chilling the frosting briefly before using it can also help it hold its shape better during assembly.
Recipe Card Info
Prep time: 1 hour Cook time: 1 hour 10 minutes Total time: 6 hours (includes chilling and freezing time) Servings: 12 slices Category: Dessert Difficulty: Intermediate Cuisine: American Yield: One 8-inch double-layer cake with cheesecake center
Equipment: 8-inch springform pan, two 8-inch round cake pans, hand or stand mixer, roasting pan for water bath, offset spatula, wire cooling racks, serrated knife
Ingredients
For the cheesecake layer:
- 16 oz cream cheese, softened
- 2/3 cup granulated sugar
- 2 large eggs
- 1/3 cup sour cream
- 1 teaspoon vanilla extract
For the red velvet cake layers:
- 2 1/2 cups all-purpose flour
- 1 1/2 cups granulated sugar
- 1 teaspoon baking soda
- 1 teaspoon salt
- 1 tablespoon cocoa powder
- 1 1/2 cups vegetable oil
- 1 cup buttermilk, room temperature
- 2 large eggs, room temperature
- 2 tablespoons red food coloring
- 1 teaspoon vanilla extract
- 1 teaspoon white vinegar
For the cream cheese frosting:
- 16 oz cream cheese, softened
- 1 cup unsalted butter, softened
- 4 cups powdered sugar, sifted
- 1 teaspoon vanilla extract
- Pinch of salt
Instructions
- Preheat the oven to 325°F. Line an 8-inch springform pan with parchment and wrap the outside with foil to prepare for a water bath.
- Beat the cream cheese until smooth, then add sugar and beat until combined. Add eggs one at a time, then mix in sour cream and vanilla until just smooth.
- Pour the batter into the prepared pan, place in a larger roasting pan, and add hot water halfway up the sides. Bake for 40 to 45 minutes until set with a slight wobble in the center.
- Cool the cheesecake completely at room temperature, then refrigerate for at least 2 hours and freeze for at least 4 hours before assembly.
- Preheat the oven to 350°F and grease and line two 8-inch round cake pans.
- Whisk together flour, sugar, baking soda, salt, and cocoa powder in a large bowl.
- In a separate bowl, combine oil, buttermilk, eggs, food coloring, vanilla, and vinegar, then whisk until smooth.
- Combine wet and dry ingredients, mixing just until no streaks of flour remain. Divide batter evenly between the two pans.
- Bake for 28 to 32 minutes until a toothpick comes out clean. Cool in the pans for 10 minutes, then turn out onto wire racks to cool completely.
- For the frosting, beat cream cheese and butter together until smooth, then gradually add powdered sugar, vanilla, and salt, beating until light and fluffy.
- Trim the tops of the cooled cake layers flat. Place one layer on a serving plate and spread a thin layer of frosting on top.
- Remove the cheesecake layer from the freezer, release it from the springform pan, and center it on top of the frosted cake layer.
- Spread a thin layer of frosting over the cheesecake, then top with the second cake layer.
- Apply a thin crumb coat of frosting over the entire cake and refrigerate for 20 minutes.
- Frost the cake with the remaining frosting, smoothing the sides and top. Chill for at least 1 hour before slicing and serving.
Notes: For the cleanest slices, use a sharp knife wiped clean between cuts, and let the cake sit at room temperature for about 15 minutes before serving so the layers aren’t ice cold.
Nutrition (per slice, approximate): Calories 520, Total Fat 34g, Saturated Fat 18g, Carbohydrates 48g, Sugar 38g, Protein 7g, Sodium 320mg