Red Velvet Cheesecake Swirl Cake
The Best Red Velvet Cheesecake Swirl Cake Recipe for Any Occasion
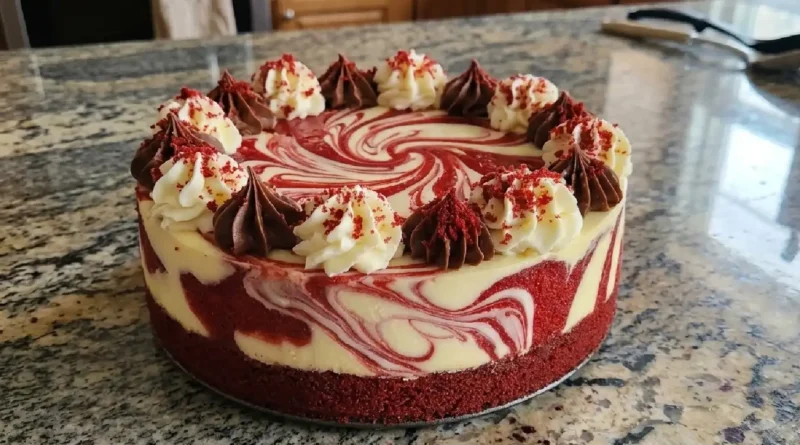
There is something inherently celebratory about the deep, crimson hue of a red velvet cake. It sits on a dessert table like a centerpiece, promising a flavor that is both nostalgic and sophisticated. But when you introduce thick, tangy ribbons of cream cheese directly into the batter, the experience changes entirely. The Red Velvet Cheesecake Swirl Cake is a marriage of two beloved classics, resulting in a crumb that is incredibly moist, cocoa-kissed, and balanced by the richness of a baked cheesecake. The aroma of vanilla and light cocoa filling the kitchen as this bakes is enough to make anyone linger a little longer near the oven.
Why You’ll Love This
-
The perfect balance of flavors: You get the mild cocoa and tang of the red velvet cake alongside the sweet, creamy richness of the cheesecake swirl.
-
Visual “wow” factor: The contrast between the bright red cake and the white cream cheese swirls makes every slice look like it came from a high-end bakery.
-
Incredible moisture: Thanks to the combination of vegetable oil and buttermilk, this cake stays tender and soft for days.
-
Effortless elegance: It looks complex, but the swirling technique is surprisingly simple to master, even for a beginner baker.
A Crowd-Pleaser for the Skeptics
I once brought this Red Velvet Cheesecake Swirl Cake to a small gathering where one guest was a self-proclaimed “red velvet hater.” To them, red velvet was often just dry, flavorless cake with too much food coloring. I watched as they hesitantly took a small forkful. The room went quiet for a second before they looked up, genuinely surprised. The tang of the real buttermilk and the dense, velvety texture of the cheesecake swirl changed their mind on the spot. By the end of the evening, they were the one asking for the recipe, proving that when done right, this combination is impossible to resist.
What Makes It Special
-
Real Buttermilk: This is the secret to that classic red velvet tang and a tender, light crumb.
-
High-Quality Cocoa Powder: Even though it’s a small amount, the cocoa provides the essential depth that defines the flavor profile.
-
Full-Fat Cream Cheese: Using room-temperature, full-fat cream cheese ensures the swirl is dense and creamy rather than watery or grainy.
-
The Vinegar Reaction: The combination of white vinegar and baking soda creates a light, airy lift that keeps the cake from feeling heavy.
Making It Happen
Success with this Red Velvet Cheesecake Swirl Cake starts with preparation. Begin by whisking your dry ingredients—flour, sugar, cocoa, baking soda, and salt—in a large bowl until the mixture is a uniform, pale sandy color. In a separate container, blend your wet ingredients. The buttermilk and oil provide the moisture, while the red food coloring transforms the liquid into a vibrant ruby shade. Once you stir the wet into the dry, you’ll see that signature red velvet batter come to life.
For the cheesecake portion, it is vital to beat the cream cheese on its own first until it is completely smooth. Adding the powdered sugar and vanilla afterward creates a fluffy, pipeable consistency. After pouring the red batter into your prepared pans, drop large spoonfuls of the cheesecake mixture on top. Using a thin knife or a skewer, gently drag the cream cheese through the red batter. The key is to use long, sweeping motions; you want distinct ribbons of white and red, not a pink, blended mess. Bake until the center is set and a toothpick comes out with just a few moist crumbs attached.
You Must Know
-
Room temperature is non-negotiable: Both your eggs and your cream cheese must be at room temperature to ensure a smooth, lump-free batter.
-
Don’t over-mix: Once you combine the wet and dry ingredients, stir only until the flour streaks disappear to keep the cake tender.
-
Watch the swirl: If you swirl too much, the cream cheese will disappear into the batter. Aim for 4 or 5 large “S” shapes with your knife.
-
Use parchment paper: Lining the bottom of your pans ensures the cheesecake sections don’t stick to the pan when you try to flip the cake out.
Serving Ideas and Pairings
This cake is rich enough to stand on its own, but a light dusting of cocoa powder or extra cake crumbs on top adds a professional touch. For a drink pairing, a strong cup of dark roast coffee or a shot of espresso perfectly cuts through the sweetness of the cream cheese. If you are serving this as an evening dessert, a glass of cold milk is the classic choice, or for something more festive, a glass of chilled Prosecco complements the tangy notes of the cake beautifully.
Make It Different
-
Natural Alternative: If you prefer to avoid artificial dyes, you can substitute the red food coloring with two tablespoons of beet powder, though the color will be a more muted earthy red.
-
Fruit Twist: Gently fold a half-cup of fresh raspberries into the cream cheese mixture before swirling for a fruity pop of flavor.
-
Gluten-Free: A high-quality 1-to-1 gluten-free flour blend works well in this recipe, as the oil and buttermilk provide plenty of structural moisture.
Storage and Reheating Tips
Because this recipe contains a significant amount of cream cheese, the cake should be stored in the refrigerator. Wrap it tightly in plastic wrap or place it in an airtight container to keep it from drying out; it will stay fresh for up to five days. If you prefer the texture of room-temperature cake, take a slice out about 20 minutes before serving. Avoid reheating in the microwave, as this can cause the cheesecake swirl to become rubbery.
Success Tips
To get the most vibrant color, use a gel-based food coloring rather than a liquid one, as it provides a deeper hue without thinning the batter. Always sift your cocoa powder before adding it to the flour, as cocoa is notorious for forming small, stubborn lumps that won’t disappear during mixing. Finally, let the cake cool completely before slicing; the cheesecake swirl needs time to fully set so you get those clean, beautiful layers in every piece.
Frequently Asked Questions
Can I use Greek yogurt instead of buttermilk?
Yes, you can substitute plain Greek yogurt or sour cream for buttermilk in a 1:1 ratio. The result will be a slightly denser but equally moist cake.
Why did my cheesecake swirl sink to the bottom?
This usually happens if the cheesecake mixture is too heavy or if the cake batter is too thin. Ensure you beat the cream cheese until it is light and fluffy, and don’t over-swirl, which can break down the structure of the batter.
Can I make these as cupcakes instead?
Absolutely. Line a muffin tin and fill the liners 3/4 full with red batter, then top with a teaspoon of cream cheese and swirl. Bake for 18–22 minutes at the same temperature.
Do I have to use white vinegar?
White vinegar is traditional because it reacts with the baking soda and cocoa to give the cake its classic texture and color. Apple cider vinegar can work in a pinch, but avoid balsamic or flavored vinegars.
What kind of frosting should I use?
Since the cake already has a cheesecake swirl, a light cream cheese frosting or a simple vanilla ermine frosting works best. You can even leave it unfrosted to showcase the beautiful swirls on top.
Recipe Details
Prep time: 20 minutes
Cook time: 35 minutes
Total time: 55 minutes
Servings: 12 servings
Category: Dessert
Difficulty: Intermediate
Cuisine: American
Yield: Two 9-inch round cakes
Equipment
-
Two 9-inch round cake pans
-
Parchment paper
-
Large mixing bowls
-
Electric hand mixer or stand mixer
-
Whisk
-
Silicone spatula
-
Skewer or butter knife (for swirling)
Ingredients
-
2 ½ cups all-purpose flour
-
1 ½ cups granulated sugar
-
2 tablespoons unsweetened cocoa powder
-
1 teaspoon baking soda
-
½ teaspoon salt
-
1 cup buttermilk
-
1 cup vegetable oil
-
2 large eggs
-
1 teaspoon white vinegar
-
1 tablespoon red food coloring
-
16 ounces cream cheese (room temperature)
-
1 ½ cups powdered sugar
-
2 teaspoons vanilla extract
Instructions
-
Grease and line two 9-inch round cake pans with parchment paper. Preheat your oven to 350°F (175°C) and ensure your oven rack is in the center position.
-
In a large bowl, whisk together the all-purpose flour, granulated sugar, cocoa powder, baking soda, and salt until no lumps remain.
-
In another bowl, combine the buttermilk, vegetable oil, eggs, white vinegar, vanilla extract, and red food coloring. Whisk until the color is uniform and the eggs are fully incorporated.
-
Gradually add the wet mixture into the dry ingredients. Stir gently with a spatula or whisk until the batter is smooth and a deep red color. Be careful not to over-mix.
-
In a separate clean bowl, beat the room-temperature cream cheese until it is completely smooth. Gradually add the powdered sugar and vanilla, beating until the mixture is light and fluffy.
-
Divide the red velvet batter evenly between the two prepared pans. Add large spoonfuls of the cheesecake mixture on top of the red batter in both pans. Using a knife or skewer, gently swirl the mixtures together to create a marbled effect.
-
Bake for 30–35 minutes, or until a toothpick inserted into the cake portion comes out clean.
-
Allow the cakes to cool in the pans for 10 minutes. Carefully transfer them to wire racks to cool completely before adding any additional frosting or decorations.
Nutrition
(Per serving)
Calories: 485 kcal | Fat: 28g | Carbohydrates: 54g | Protein: 6g | Sugar: 38g
