Strawberry Shortcake Cheesecake Cake
Strawberry Shortcake Cheesecake Cake Recipe | A Showstopping Dessert
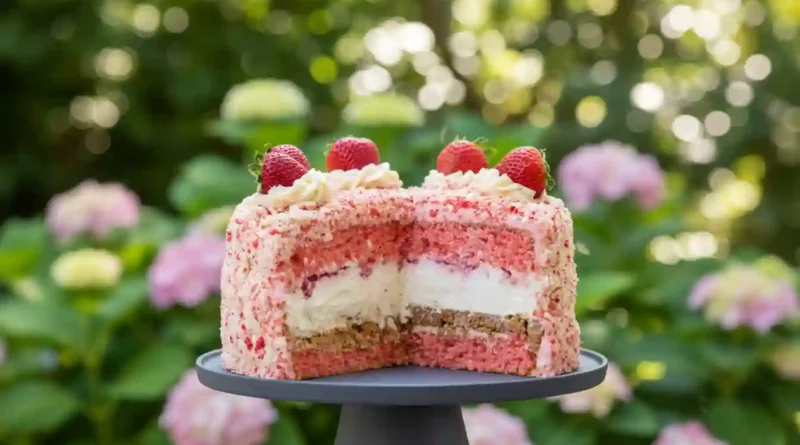
There’s a moment of pure, hushed anticipation just before you slice into a truly special cake. That’s the feeling this Strawberry Shortcake Cheesecake Cake was born to create. It started as a “what if” for a summer birthday celebration—what if we married the nostalgic, berry-kissed crumble of a strawberry shortcake with the luxurious, cool creaminess of cheesecake, all wrapped in a classic layer cake? The result was more than just a dessert; it was an experience. The first bite is a journey: the tender crumb of strawberry cake, the rich and tangy ribbon of no-bake cheesecake, the whisper of buttery crust, all enveloped in a cloud of cream cheese frosting and a playful, crunchy crumble. It’s not just a cake; it’s the centerpiece of your happiest gatherings.
Why You’ll Love This
-
It’s the Ultimate Celebration Dessert: This cake commands attention. Its stunning layers and festive appearance promise—and deliver—a memorable bite.
-
Satisfies Every Craving: It cleverly combines three beloved desserts into one, offering the perfect balance of fluffy, creamy, crunchy, and fruity in every slice.
-
Surprisingly Approachable: While it looks impressive, the process is broken down into manageable parts. You’re building layers of simple components, not performing culinary wizardry.
-
Make-Ahead Friendly: Every component can be prepared ahead of time, making assembly on the day of your event stress-free and enjoyable.
I made this for a family potluck where my uncle, a man whose dessert preferences begin and end with plain chocolate ice cream, eyed it skeptically. After some gentle coaxing, he took a modest slice. Ten minutes later, he was back at the table, quietly cutting himself a second, much larger piece. “It’s the crunch,” he finally admitted. “And the way the cheesecake bit cuts through the sweet.” Winning over the staunchest of traditionalists is the highest compliment a cake like this can receive.
What Makes It Special
This recipe works because each layer is designed for both flavor and texture.
-
The No-Bake Cheesecake Layer: A dreamy filling of cream cheese and whipped topping, stabilized with melted white chips, sets firmly without an oven, providing a cool, tangy contrast to the warm-flavored cake.
-
The Dual-Texture Crumble: Combining buttery wafer cookies with reserved strawberry cake scraps creates a crumble that’s both crisp and tender, adding essential texture and visual charm.
-
The Cream Cheese Buttercream: This isn’t an overly sweet frosting. The tang of cream cheese and butter creates a rich, luxurious coating that perfectly complements the sweet berries and cake.
-
Fresh Strawberry Pops: The chopped strawberries in the cheesecake and the fresh berry on top offer juicy, bright bursts of real fruit flavor.
Making It Happen
First, we’ll build our foundation. The graham cracker crust comes together quickly—just blitz the crackers into fine crumbs, mix with melted butter until it resembles wet sand, and press it into your pan. Let it chill in the fridge; the cold will help it set.
For the creamy heart of the cake, beat the softened cream cheese until it’s smooth, then gently fold in the whipped topping until the mixture is thick and billowy. Carefully stream in the melted white chips and beat until everything is seamlessly combined. Pour this luscious filling over your waiting crust, scatter the chopped strawberries on top, and let the whole cheesecake layer firm up in the refrigerator.
While it chills, bake your strawberry cake layers as directed on the box. Let them cool completely on a wire rack. Once cool, use a long serrated knife to carefully slice off the domed tops to create flat layers. Don’t discard these trimmings—they’re gold for our crumble later.
Now, for the frosting that brings it all together. In a large bowl, beat the softened butter and cream cheese together until perfectly smooth and lump-free. Gradually add the powdered sugar and vanilla, beating on low at first to avoid a snowstorm, then increasing the speed until the frosting is silky and spreadable.
The final prep step is the signature crumble. Gently crush the wafer cookies into small pieces. Take your reserved cake tops and crumble them into two separate bowls. Add a drop or two of red food coloring to one bowl and mix until you have pretty pink cake crumbs. Combine these with the white cake crumbs and the wafer pieces in a large bowl.
The Grand Assembly
Place your first strawberry cake layer on a serving plate and give it a thin swipe of plain, white frosting. This acts as delicious glue. Carefully release your set cheesecake from its springform pan, peel away the liner, and lovingly lower it onto the cake base. Top it with the second cake layer.
Now, take a moment. Reserve about a cup of your white frosting in a separate bowl. To the remaining frosting, add a few drops of red food coloring and beat until you achieve a soft, blushing pink hue. Use this to generously frost the entire outside of your towering creation.
Here comes the fun part: gently press handfuls of your prepared crumble mixture all over the sides and top of the frosted cake. It should adhere beautifully to the soft frosting. Finally, use your reserved white frosting to pipe elegant swirls or simple dollops on top. Crown each swirl with a fresh strawberry. Refrigerate until you’re ready to serve, allowing the layers to meld and making for clean, beautiful slices.
You Must Know
-
Room Temperature is Key: Ensure your cream cheese and butter for the frosting are truly softened. This is the secret to a lump-free, creamy frosting that spreads like a dream.
-
Chill to Set: Don’t rush the chilling times for the cheesecake layer. It needs to be firm to handle assembly without squishing.
-
Crumble with Care: For the wafer cookies, use your hands or pulse briefly in a food processor. You want a mix of fine pieces and some larger bits for varied texture, not uniform dust.
-
Slice with a Hot Knife: For pristine slices, run a sharp knife under very hot water, wipe it dry, and then cut. Repeat between each slice.
Serving Ideas
This cake is a celebration in itself, but it pairs beautifully with a cup of strong, hot coffee to balance the sweetness or a glass of cold milk for ultimate nostalgia. For a truly elegant dessert course, serve smaller slices alongside a flute of chilled prosecco or a sweet Moscato d’Asti, whose bubbles and fruit notes will highlight the strawberries.
Make It Different
-
Flavor Twist: Use a vanilla or lemon cake mix instead of strawberry for a different fruit-forward profile. Try raspberries or a mix of berries in place of strawberries.
-
Dietary Tweaks: Use gluten-free cake mix and gluten-free wafer cookies. For a slightly lighter version, use neufchâtel cheese and light whipped topping.
-
Shortcut Version: Use a high-quality store-bought cream cheese frosting and add a touch of vanilla extract to brighten it. You can also skip the homemade crumble and use crushed store-bought shortbread cookies.
Storage and Reheating Tips
Store the cake, covered or in a cake carrier, in the refrigerator for up to 4 days. The flavors will continue to meld beautifully. Due to the cream cheese and whipped components, this cake does not freeze well for extended periods, though you can freeze the unfrosted cake layers individually for up to a month if well-wrapped. Serve chilled directly from the fridge.
Success Tips
-
To ensure even cake layers, weigh your batter as you divide it between the pans.
-
If your kitchen is warm, pop the frosting bowl into the fridge for 10-15 minutes if it becomes too soft to work with during assembly.
-
For a neater crumble application, place a baking sheet underneath your cake stand to catch the excess as you press it onto the sides.
Frequently Asked Questions
Q: Can I make any part of this ahead of time?
A: Absolutely! The cheesecake layer can be made 1-2 days in advance. The cake layers can be baked, cooled, wrapped tightly, and stored at room temperature for a day or frozen for longer. The frosting can be made and refrigerated for up to 3 days; just let it come to room temperature and re-whip before using.
Q: My cheesecake layer is still soft. What should I do?
A: Give it more time in the fridge. It needs to be completely firm to the touch to support the weight of the top cake layer. You can speed this up by placing it in the freezer for 30-45 minutes.
Q: Can I use fresh whipped cream instead of the whipped topping in the cheesecake?
A: You can, but the stabilized whipped topping helps the no-bake cheesecake set more firmly. If using fresh cream, whip it to stiff peaks and consider adding a tablespoon of instant pudding powder (vanilla or white chocolate) to help stabilize it.
Q: I don’t have a springform pan. What can I use?
A: You can use a regular 9-inch cake pan lined with parchment paper. To remove the cheesecake, you’ll need to gently run a knife around the edge and invert it onto a plate, then flip it again onto your cake layer.
Q: How do I get clean slices without messing up the layers?
A: The hot knife trick is essential! Run your sharp knife under very hot water, wipe it completely dry, and slice in a gentle sawing motion. Clean the knife between each slice for picture-perfect results.
Strawberry Shortcake Cheesecake Cake
Prep Time: 1 hour 30 minutes
Cook Time: 25-30 minutes (for cake layers)
Total Time: 3 hours 30 minutes (includes chilling)
Servings: 12-16
Category: Dessert
Difficulty: Intermediate
Cuisine: American
Yield: One 9-inch layer cake
Ingredients
Cheesecake Ingredients:
-
2 (8 ounce) packages cream cheese, softened
-
18-20 full graham cracker sheets (about 2 packages)
-
½ cup unsalted butter, melted
-
1 (8 oz) tub whipped topping (like Cool Whip), thawed
-
1 cup white chocolate chips, melted
-
½ cup fresh strawberries, finely chopped
Cake Ingredients:
-
1 (15.25 oz) box strawberry cake mix
-
Oil, eggs, and water as called for on the cake mix box
Frosting and Crumble Ingredients:
-
2 (8 ounce) packages cream cheese, softened
-
1 cup unsalted butter, softened
-
8 cups powdered sugar
-
2 tablespoons pure vanilla extract
-
1 (10.6 oz) package white wafer cookies (vanilla or strawberry flavored)
-
Red food coloring (gel preferred)
-
Reserved cake tops (from leveling the layers)
-
Fresh whole strawberries, for garnish
Instructions
-
For the Cheesecake Layer: Crush graham crackers into fine crumbs. Mix with ½ cup melted butter. Press firmly into the bottom of a lined 9-inch springform pan. Chill.
-
Beat 2 packages of softened cream cheese until smooth. Fold in the whipped topping until combined. Beat in the melted white chocolate chips until uniform. Pour over chilled crust. Top with chopped strawberries. Return to refrigerator to set for at least 2 hours.
-
For the Cake Layers: Prepare and bake the strawberry cake mix according to package directions in two 9-inch round pans. Let cool completely. Level the tops of the cakes with a serrated knife; reserve the scraps for the crumble.
-
For the Frosting: Beat 2 packages of softened cream cheese and 1 cup softened butter until creamy. Gradually add powdered sugar and vanilla, beating until light and fluffy.
-
For the Crumble: Crush wafer cookies into small pieces. Crumble the reserved cake tops. Divide cake crumbs in half; tint one half with red food coloring. Combine tinted crumbs, plain crumbs, and crushed wafers in a large bowl.
-
Assembly: Place one cake layer on a stand. Spread with a thin layer of plain white frosting. Remove set cheesecake from pan, peel off liner, and place on cake layer. Top with second cake layer.
-
Reserve 1 cup of white frosting. Tint the remaining frosting light pink. Frost the entire outside of the cake with pink frosting.
-
Gently press the prepared crumble mixture onto the sides and top of the frosted cake.
-
Pipe reserved white frosting in swirls on top. Garnish each swirl with a fresh strawberry. Chill until ready to serve.
Notes
For best results, ensure all dairy ingredients are properly softened and allow adequate chilling time for the cheesecake layer. Store finished cake in the refrigerator.
