Stuffed Pepperoni Pizza Sticks
Stuffed Pepperoni Pizza Sticks: Crispy, Cheesy, Irresistible Bites
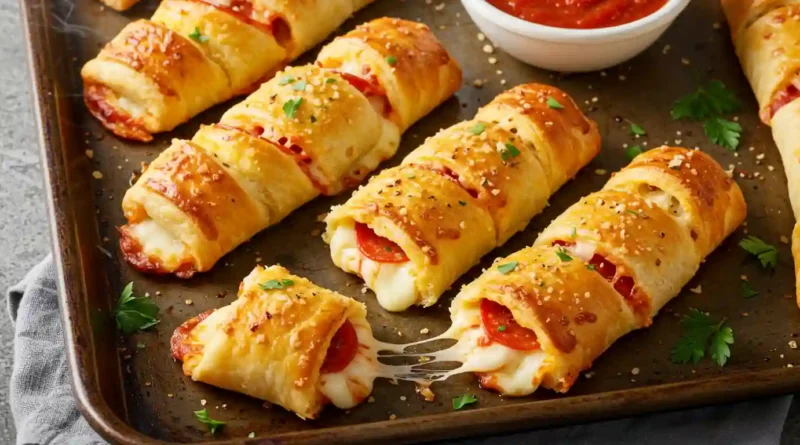
There’s something magical about the smell of garlic butter wafting through the kitchen, the sight of golden-brown dough crisping in the oven, and the ooze of melted mozzarella when you take that first bite. These Stuffed Pepperoni Pizza Sticks are my latest obsession—a perfect marriage of pizza rolls and cheesy breadsticks, with a crispy exterior and a gooey, pepperoni-packed center.
I first made these on a lazy game night, craving something indulgent but easy. One bite, and my family declared them an instant favorite. Now, they’re a regular request—whether for parties, quick snacks, or even a fun twist on pizza night.
Why You’ll Love This
-
Perfect for sharing—great for parties, game days, or after-school snacks.
-
Crispy outside, melty inside—each bite delivers buttery garlic crust and stretchy cheese.
-
Quick & easy—uses store-bought dough for minimal effort, maximum flavor.
-
Kid-approved—even picky eaters go crazy for these handheld pizza bites.
-
Customizable—swap fillings to suit your cravings (more on that later!).
The Unexpected Fan
My nephew, a notorious veggie-dodger, once eyed these suspiciously before taking a tiny bite. Five minutes later, he was begging for the recipe. His mom (my very health-conscious sister) even caved and asked for seconds. If that’s not a win, I don’t know what is!
What Makes It Special
-
Garlic butter glaze—infuses the crust with rich, savory flavor.
-
Pepperoni layers—adds a salty, smoky punch in every bite.
-
Mozzarella cheese sticks—ensure a perfect, stretchy cheese pull.
-
Parmesan sprinkle—gives a crispy, umami finish.
Making It Happen
Start by preheating your oven—450°F is the sweet spot for that golden crunch. Roll out your pizza dough on parchment paper (no sticking, no stress!) and slice it into 8 even rectangles.
Now, the fun part: layer 5 slices of pepperoni on each piece, then place a mozzarella stick right in the center. Roll it up snugly, pinching the seams tightly—this keeps all that cheesy goodness inside where it belongs.
Next, mix melted butter with minced garlic and parsley, then brush it generously over each roll. A sprinkle of Parmesan adds that final savory touch. Into the oven they go for 10–12 minutes, until the crust is crisp and the cheese is bubbling.
Serve them hot with a side of warm pizza sauce for dipping, and watch them disappear.
You Must Know
✔ Seal the seams well—prevents cheese leaks during baking.
✔ Don’t skip the garlic butter—it’s the flavor booster!
✔ Bake until deep golden—lighter means doughy, darker means crispier.
✔ Use block mozzarella sticks—shredded cheese won’t give the same gooey pull.
Serving Ideas
-
Pair with a fresh Caesar salad to balance the richness.
-
Dunk in marinara, ranch, or spicy Sriracha mayo.
-
Serve with a cold lager or sparkling lemonade for contrast.
Make It Different
-
Spicy kick—add jalapeños or red pepper flakes inside.
-
Veggie-loaded—stuff with sautéed mushrooms and spinach.
-
Meat lover’s—mix in cooked sausage or bacon bits.
-
Gluten-free—use GF pizza dough (check baking time).
Storage & Reheating
-
Fridge: Keep leftovers in an airtight container for up to 3 days.
-
Reheat: Warm in a 300°F oven for 10 minutes (microwaving makes them soggy).
-
Freeze: Wrap tightly and freeze for up to 1 month. Reheat from frozen, adding extra time.
Success Tips
-
Let dough sit at room temp for easier rolling.
-
If cheese oozes out, press the seam tighter next time.
-
For extra crispiness, brush with more butter halfway through baking.
Frequently Asked Questions
Q: Can I use homemade pizza dough?
A: Absolutely! Just roll it to a similar thickness as store-bought for even baking.
Q: Can I make these ahead?
A: Yes! Assemble, cover, and refrigerate for up to 24 hours before baking.
Q: Why is my cheese leaking?
A: The seam wasn’t sealed tightly enough. Pinch firmly or fold the ends under.
Q: Can I use shredded cheese?
A: It’ll taste good, but you won’t get the same stringy cheese pull.
Q: Are these freezer-friendly?
A: Yes! Freeze before baking, then bake straight from frozen (add 5 extra minutes).
Stuffed Pepperoni Pizza Sticks
Prep Time: 10 mins | Cook Time: 12 mins | Total Time: 22 mins
Category: Appetizer/Snack | Cuisine: Italian-American | Difficulty: Easy
Yield: 8 pizza sticks
Ingredients
-
1 tube store-bought pizza dough
-
8 mozzarella cheese sticks
-
40 slices pepperoni
-
2 tbsp butter, melted
-
2 garlic cloves, minced
-
2 tbsp grated Parmesan cheese
-
1 tsp fresh parsley, chopped
-
Pizza sauce (for dipping, optional)
Instructions
-
Preheat oven to 450°F. Line a baking sheet with parchment paper.
-
Roll out dough onto parchment and cut into 8 equal rectangles.
-
Layer each piece with 5 pepperoni slices, then place a cheese stick on top.
-
Roll tightly, pinching seams to seal. Place seam-side down on the tray.
-
Mix melted butter, garlic, and parsley. Brush over rolls, then sprinkle with Parmesan.
-
Bake 10–12 minutes until golden and crispy. Serve warm with pizza sauce.
Notes
-
Store leftovers in the fridge; reheat in the oven for best texture.
-
For extra crispiness, broil for the last 1–2 minutes.
There you have it—crispy, cheesy, irresistible pizza sticks that’ll steal the show at any gathering. Make them once, and they’ll become a regular in your snack rotation. Happy baking!
