The Best Homemade Cheesecake
The Ultimate Guide to a Perfectly Creamy Homemade Cheesecake
There’s a certain magic to a classic homemade cheesecake. It’s not just a dessert; it’s a promise of something decadent, a celebration in a pan. I remember the first time I successfully pulled a creamy, crack-free cheesecake from my oven. The golden crust smelled of buttery graham crackers, and the center had that gentle, perfect jiggle. After it chilled, that first slice was a revelation—incredibly rich, luxuriously smooth, and tangy-sweet. It was a far cry from the dry, crumbly versions I’d known before. This recipe, perfected over years and countless batches, is my foolproof path to that creamy dream. It’s the one I make for birthdays, holidays, and any day that needs a little extra sweetness.
Why You’ll Love This Homemade Cheesecake
-
Unbeatable Creamy Texture: The combination of full-fat cream cheese, sour cream, and a gentle water bath creates a melt-in-your-mouth texture that is simply divine.
-
The Perfect Make-Ahead Dessert: This cheesecake needs time to chill, making it the ideal dessert to prepare a day ahead, freeing you up for your guests.
-
A Crowd-Pleasing Classic: Its timeless flavor appeals to everyone, from kids to grandparents, making it the perfect centerpiece for any gathering.
-
A Blank Canvas for Creativity: While sublime on its own, this creamy base is the perfect partner for an endless array of toppings and swirl-ins.
An Unexpected Rave Review
I once brought this homemade cheesecake to a large family potluck, where my notoriously picky uncle, who usually declines dessert with a wave of his hand, eyed it suspiciously. To my amazement, he took a small sliver. Then, he went back for a full slice. He later cornered me and said, “I don’t usually like cheesecake. It’s always too dense or too bland. But this… this is different. It’s actually good.” That quiet, unexpected compliment from the toughest critic in the room is the highest praise this recipe has ever received.
What Makes It Special
The magic of this homemade cheesecake isn’t just in the method—it’s in the ingredients.
-
Full-Fat Cream Cheese: Using brick-style, full-fat cream cheese is non-negotiable. It provides the structure and rich, tangy flavor that low-fat versions simply can’t match.
-
Graham Cracker Crust: That sweet, slightly spiced, and wonderfully crispy crust provides the perfect textural contrast to the creamy filling.
-
Sour Cream & Lemon Juice: These are the secret weapons. Sour cream enhances the creamy texture and adds a subtle tang, while a hint of fresh lemon juice brightens all the flavors without making it taste lemony.
-
The Water Bath: Baking the cheesecake in a water bath (or with steam) creates a humid oven environment. This gentle heat is the key to preventing cracks and ensuring an ultra-smooth, creamy consistency from edge to edge.
Making It Happen: Your Cheesecake Journey
Let’s walk through the steps to creamy perfection. First, bring your cream cheese, eggs, and sour cream to room temperature. This is the golden rule! Cold ingredients will lead to a lumpy batter, and over-mixing to fix it will incorporate too much air, causing cracks later.
Now, for the crust. Pulse your graham crackers into fine, sandy crumbs in a food processor. Stir in the sugar, then pour in the glorious melted butter. The mixture should hold together when you pinch it. Press it firmly into your springform pan, working it about halfway up the sides. A flat-bottomed cup helps create a neat, compact base. Pop it in the oven for a quick 10-minute pre-bake—this step ensures a crisp, sturdy crust that won’t get soggy.
For the filling, beat the softened cream cheese and sugar together until it’s completely smooth and silky, with no lumps in sight. Scrape down the bowl often. Beat in the sour cream, vanilla, and that optional-but-recommended teaspoon of lemon juice. Now, with the mixer on low, add the eggs one at a time, mixing just until the yolk disappears into the batter. Over-mixing at this stage incorporates air, which is the enemy of a crack-free surface.
Here comes the crucial part: the water bath. Tightly wrap the bottom and sides of your springform pan in heavy-duty aluminum foil to create a waterproof seal. Place the foil-wrapped pan into a large roasting pan, pour in your beautiful batter, and smooth the top. Carefully place the whole setup in the oven, then pour hot water into the roasting pan until it comes about halfway up the side of the springform pan.
Bake until the edges are set but the center still has a slight jiggle—like Jell-O—when you gently nudge the pan. Turn off the oven, crack the door open, and let the cheesecake cool gradually inside for one hour. This slow cooling prevents sudden temperature changes that cause shrinking and cracking. After its steamy nap, let it cool completely on the counter before tucking it into the fridge to chill for at least 4 hours, or ideally, overnight. This patience is rewarded with the perfect firm-yet-creamy texture.
You Must Know
-
Room Temperature is Key: This cannot be stressed enough. Room temperature ingredients blend smoothly and evenly, preventing a lumpy batter and reducing the need to over-mix.
-
Don’t Over-Mix the Eggs: Once you add the eggs, mix on low speed and only until they are incorporated. Over-beating incorporates air and can lead to a puffy, cracked cheesecake that falls as it cools.
-
Embrace the Water Bath: Don’t skip it! It’s the single most important step for achieving that professional, crack-free, creamy texture.
-
Patience is a Virtue: Rushing the cooling process is a common mistake. Let it cool slowly in the oven, then on the counter, then thoroughly in the fridge. Your reward will be a perfectly set slice.
Serving Your Masterpiece
Run a thin knife under hot water, wipe it dry, and then gently slide it around the edge of the cheesecake before unclasping the springform ring for a clean release. For pristine slices, dip your sharp knife in hot water and wipe it clean between each cut.
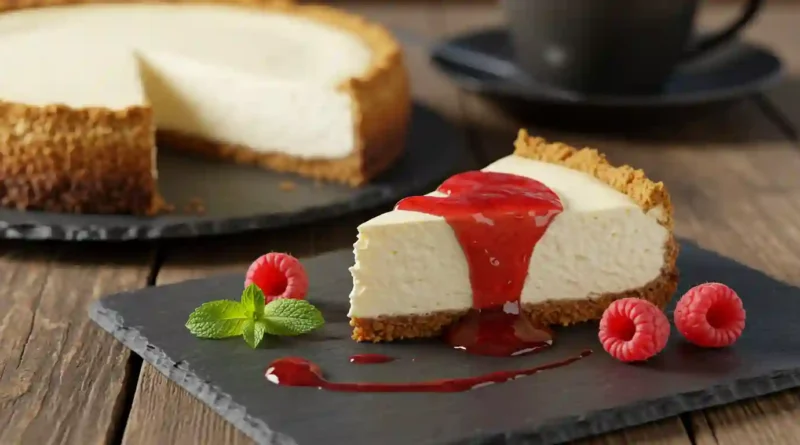
This classic homemade cheesecake is sublime all on its own, but it also loves to be dressed up. Top it with a vibrant raspberry or strawberry sauce, a drizzle of salted caramel or rich chocolate ganache, or simply a cloud of freshly whipped cream and seasonal berries. For a drink pairing, a cup of strong black coffee cuts through the richness beautifully, a sweet dessert wine like Moscato d’Asti complements its sweetness, or a glass of milk is always a nostalgic favorite.
Make It Different
-
Crust Swap: Replace graham crackers with an equal amount of crushed Oreos (filling included) for a chocolatey twist.
-
Flavor Infusions: Add the zest of one lemon or orange to the batter for a citrus kick. For a chocolate swirl, fold in ½ cup of melted and cooled chocolate at the very end.
-
Dietary Tweaks: For a gluten-free version, use certified gluten-free graham crackers or gluten-free cookies for the crust. While I don’t recommend low-fat dairy for the best texture, it can be used with the understanding the final product may be less rich and more prone to cracking.
Storing Your Homemade Cheesecake
Cover any leftover cheesecake tightly with plastic wrap or store it in an airtight container in the refrigerator for up to 4 days. You can also freeze the cheesecake for longer storage. Place the cooled cheesecake (without toppings) on a baking sheet and freeze until solid, about 2-3 hours. Then, wrap it tightly in a layer of plastic wrap and a layer of aluminum foil. Freeze for up to 3 months. To thaw, place it in the refrigerator overnight.
Success Tips
-
Foiling the Pan: Use two large sheets of heavy-duty foil to wrap the springform pan. Overlap them in a cross pattern and carefully fold the foil up the sides to create a secure seal against leaks.
-
The No-Leak Method: If you’re nervous about water seeping in, place the springform pan into the roasting pan, place both in the oven, then pour the hot water into the roasting pan. This avoids moving a heavy, water-filled pan.
-
Testing for Doneness: The cheesecake is done when the edges are puffed and set but the center—about a 3-inch circle—still jiggles slightly when you gently shake the pan. It will firm up as it cools.
Frequently Asked Questions (FAQ)
Q: Can I use low-fat cream cheese?
A: I strongly advise against it for this recipe. Full-fat brick cream cheese provides the necessary structure, richness, and stability. Low-fat versions have more water and additives, which can alter the texture and make the cheesecake more likely to crack or become watery.
Q: My cheesecake cracked! What did I do wrong?
A: Don’t despair! Cracks are usually caused by one of three things: over-mixing the batter (incorporating too much air), a rapid temperature change (cooling too quickly), or over-baking. The water bath and slow cooling in the oven are designed to prevent this. Even if it cracks, it will still taste incredible—just cover it with a delicious topping!
Q: Do I really have to bake the crust first?
A: Yes, pre-baking (or “blind baking”) the crust for 10 minutes is crucial. It helps the crust set and become crisp, preventing it from turning soggy once the wet filling is added.
Q: Can I make this without a springform pan?
A: A springform pan is highly recommended because its removable ring allows for easy release without damaging the cheesecake. In a pinch, you can use a 9-inch cake pan lined with parchment paper slings for lifting, but it’s much trickier.
Q: Why is my cheesecake batter lumpy?
A: Lumpy batter is almost always due to cold ingredients. Ensure your cream cheese, eggs, and sour cream are truly at room temperature before you begin. If you have small lumps, you can try pressing the finished batter through a fine-mesh sieve before pouring it into the crust.
Homemade Cheesecake
This is the only homemade cheesecake recipe you’ll ever need. With its rich, creamy filling and crisp graham cracker crust, baked to perfection in a water bath for a flawless finish.
Prep Time: 30 minutes
Cook Time: 1 hour 10 minutes
Total Time: 5 hours 40 minutes (plus chilling)
Category: Dessert
Cuisine: American
Difficulty: Intermediate
Yield: 12 servings
Ingredients
Graham Cracker Crust
-
1 and 1/2 cups (180g) graham cracker crumbs (about 12 full-sheet graham crackers)
-
1/4 cup (50g) granulated sugar
-
5 Tablespoons (71g) unsalted butter, melted
Cheesecake Filling
-
32 ounces (904g) full-fat brick cream cheese, softened to room temperature
-
1 cup (200g) granulated sugar
-
1 cup (240g) full-fat sour cream, at room temperature
-
1 teaspoon pure vanilla extract
-
2 teaspoons fresh lemon juice (optional, but recommended)
-
3 large eggs, at room temperature
Instructions
-
Adjust oven rack to lower-middle position and preheat oven to 350°F (177°C).
-
Make the crust: In a medium bowl, stir together graham cracker crumbs and sugar. Add melted butter and mix until combined and the texture is sandy. Press mixture firmly and evenly into the bottom and about halfway up the sides of a 9-inch springform pan. Bake for 10 minutes. Remove from oven and set aside.
-
Make the filling: Using a handheld or stand mixer fitted with a paddle attachment, beat the cream cheese and sugar on medium-high speed until smooth and creamy, about 2 minutes. Scrape down the sides and bottom of the bowl. Add the sour cream, vanilla extract, and lemon juice. Beat until fully combined.
-
Reduce mixer speed to low. Add the eggs one at a time, beating until just incorporated after each addition. Do not over-mix. Stop mixing as soon as the final egg is blended in.
-
Wrap the outside of the springform pan tightly with one or two sheets of heavy-duty aluminum foil. Pour filling into the warm crust.
-
Place the foil-wrapped pan into a large roasting pan. Place in the oven and carefully pour enough hot water into the roasting pan to come about halfway up the sides of the springform pan.
-
Bake for 55-70 minutes, or until the edges are set and the center still jiggles slightly when gently shaken. Turn the oven off, crack the door open, and let the cheesecake sit in the oven for 1 hour.
-
Remove the cheesecake from the oven and water bath, discard the foil, and place on a wire rack to cool completely at room temperature. Once cool, cover and refrigerate for at least 4 hours, or overnight.
-
Before serving, run a thin knife around the edge of the pan to loosen. Release the clasp of the springform pan. Slice with a clean, sharp knife, wiping the blade between cuts for neat slices.
