The Best Moist Vanilla Cake with Caramel
The Best Moist Vanilla Cake with Caramel Frosting Recipe
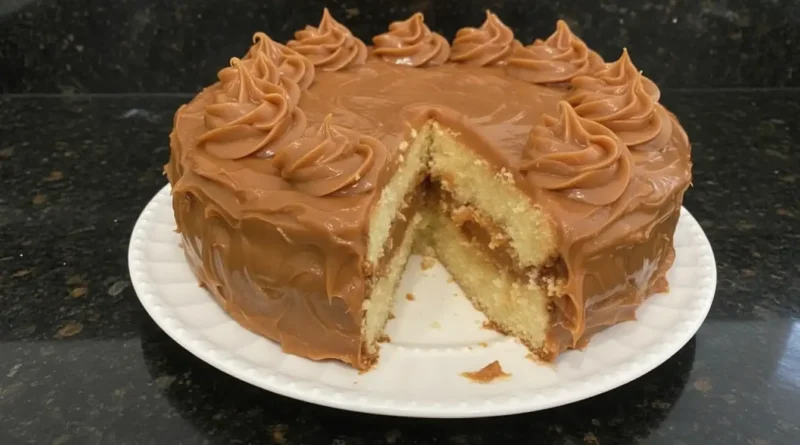
There is a specific kind of magic that happens in a kitchen when the scent of warm vanilla meets the deep, toasted aroma of bubbling sugar. For many, a vanilla cake is seen as a simple base, but when done correctly, it is the height of comfort. This vanilla cake with caramel frosting recipe was born out of a desire for a dessert that felt sophisticated yet grounded. It reminds me of slow Sunday afternoons where the only goal is to share a slice of something sweet with a cup of strong coffee. The cake itself is soft and tight-grained, while the frosting is a rich, buttery caramel that sets into a fudge-like consistency. It is a pairing that feels like a warm hug in dessert form.
Why You’ll Love This
-
The Perfect Texture: This isn’t a crumbly box-mix texture; it is a dense, velvety crumb that holds up beautifully under the weight of the frosting.
-
Balance of Flavors: The natural floral notes of the vanilla bean paste perfectly offset the salty, deep sweetness of the cooked caramel.
-
Pantry Staples, Elevated: You likely have most of these ingredients in your kitchen right now, but the technique turns them into something extraordinary.
-
Crowd-Pleasing Nostalgia: It tastes like an old-fashioned bakery cake—the kind that makes people close their eyes after the first bite.
The Skeptic’s Favorite
I once served this to a close friend who claimed they “weren’t really a cake person” and usually found vanilla too plain. They watched skeptically as I spread the thick, golden caramel frosting over the layers. After much persuasion, they took one small bite. That small bite turned into a full slice, and then a request for a container to take a piece home. They admitted that the combination of the moist, buttery sponge and the slightly salted caramel topping changed their entire perspective on what a “simple” cake could be. It is now the only cake they request for their birthday every year.
What Makes It Special
-
High-Quality Vanilla: Using vanilla bean paste or a high-quality extract ensures the flavor is prominent rather than an afterthought.
-
Room Temperature Ingredients: Taking the time to let your eggs and butter soften ensures a smooth emulsion and a superior rise.
-
The “Cooked” Frosting: This isn’t a simple powdered sugar frosting. We cook the butter and brown sugar together to create a true caramel base.
-
A Pinch of Sea Salt: A tiny addition of salt in the frosting cuts through the sugar and highlights the complexity of the cooked butter.
Making It Happen
The journey to a perfect vanilla cake begins with the creaming process. You want to beat your butter and sugar together until the mixture looks pale and almost fluffy, which incorporates the air needed for a light crumb. Once the eggs are added one by one, the batter becomes glossy. When you fold in your dry ingredients, alternating with whole milk, do it gently. Over-mixing at this stage is the enemy of a tender cake; you want to stop just as the last streaks of flour disappear.
While the cakes are cooling and filling the house with an incredible aroma, you move on to the frosting. This is the soulful part of the recipe. You’ll melt butter and brown sugar in a saucepan, letting them bubble together until they form a cohesive, dark amber liquid. Whisking in the heavy cream turns it into a smooth sauce. The real trick is letting this mixture cool slightly before beating in the powdered sugar. It transforms from a liquid gold into a spreadable, satiny frosting that cloaks the cake in a rich, indulgent layer.
You Must Know
-
Don’t Rush the Cooling: If the cake is even slightly warm, the caramel frosting will slide right off. Patience is your best ingredient here.
-
The Sift is Key: Sift your powdered sugar for the frosting to avoid any tiny white lumps in your beautiful golden caramel.
-
Watch the Heat: When cooking the caramel base, keep the heat on medium-low to prevent the sugar from burning and becoming bitter.
Serving and Pairings
This cake is a star on its own, but it pairs beautifully with a dollop of unsweetened whipped cream or a handful of fresh raspberries to add a bit of tartness. For drinks, a dark roast coffee or a cold glass of whole milk is the classic choice. If you are serving this at a dinner party, a glass of tawny port or a nutty dessert wine complements the caramel notes perfectly.
Make It Different
-
The Salted Version: Sprinkle a little flaky sea salt over the top of the frosted cake for a true salted caramel experience.
-
Nutty Crunch: Add toasted pecans or walnuts between the layers or pressed into the sides of the frosting.
-
Gluten-Free: A high-quality 1:1 gluten-free flour blend works surprisingly well with this recipe because the caramel frosting provides so much moisture.
-
Spice it Up: Add a half-teaspoon of cinnamon to the cake batter for a warm, autumnal twist.
Storage and Reheating
This cake keeps exceptionally well. Because of the sugar content in the caramel, it stays moist for days. Store it under a cake dome or in an airtight container at room temperature for up to three days. If you prefer to refrigerate it, just make sure to let it sit at room temperature for about thirty minutes before serving so the frosting softens back to its buttery state.
Success Tips
To get those perfectly flat cake layers, you can use cake strips or simply wrap the outside of your pans with damp towels before baking. This ensures the edges don’t cook faster than the center, preventing a domed top. Also, when frosting, do a thin “crumb coat” first and chill it for fifteen minutes. This anchors the crumbs so your final layer of caramel frosting looks smooth and professional.
Frequently Asked Questions
Can I use granulated sugar instead of brown sugar for the frosting?
It is best to stick with brown sugar. The molasses in the brown sugar is what gives the frosting its characteristic caramel flavor and deep color.
Why did my frosting turn out grainy?
Graininess usually happens if the sugar hasn’t fully dissolved or if the powdered sugar wasn’t sifted. Make sure the butter and brown sugar mixture is smooth before adding the cream.
Can I make the cake layers in advance?
Absolutely. You can bake the layers, wrap them tightly in plastic wrap, and freeze them for up to two weeks. Frosting a slightly chilled cake is actually much easier.
Do I need a stand mixer for this?
While a stand mixer makes creaming the butter easier, a hand mixer works perfectly fine for both the cake and the frosting.
What if my frosting is too thick?
If the frosting feels too stiff to spread, simply add a teaspoon of heavy cream at a time until it reaches a spreadable consistency.
Prep time: 20 minutes
Cook time: 30 minutes
Total time: 50 minutes
Servings: 12 servings
Category: Dessert
Difficulty: Medium
Cuisine: American
Yield: One 2-layer 8-inch cake
Equipment: Two 8-inch round cake pans, mixing bowls, whisk, medium saucepan, hand or stand mixer.
Ingredients :
For the Vanilla Cake:
-
2 ½ cups all-purpose flour
-
1 ½ teaspoons baking powder
-
½ teaspoon baking soda
-
1 teaspoon salt
-
¾ cup unsalted butter, softened
-
1 ¾ cups granulated sugar
-
2 large eggs, room temperature
-
1 tablespoon vanilla bean paste or extract
-
1 cup whole milk, room temperature
For the Caramel Frosting:
-
½ cup unsalted butter
-
1 cup light brown sugar, packed
-
1/3 cup heavy cream
-
¼ teaspoon salt
-
2 ½ cups powdered sugar, sifted
Directions :
-
Preheat your oven to 350°F (175°C). Grease and flour two 8-inch round cake pans, or line the bottoms with parchment paper.
-
In a medium bowl, whisk together the flour, baking powder, baking soda, and salt. Set this aside.
-
In a large bowl or stand mixer, beat the softened butter and granulated sugar together on medium-high speed until light and fluffy, about 3 to 4 minutes.
-
Add the eggs one at a time, beating well after each addition. Stir in the vanilla bean paste.
-
Reduce the mixer speed to low. Add the dry ingredients in three parts, alternating with the milk, beginning and ending with the flour mixture. Mix until just combined.
-
Divide the batter evenly between the prepared pans. Bake for 28 to 32 minutes, or until a toothpick inserted into the center comes out clean.
-
Let the cakes cool in the pans for 10 minutes before turning them out onto a wire rack to cool completely.
-
To make the frosting, melt the butter in a medium saucepan over medium heat. Stir in the brown sugar and salt. Let the mixture boil for 2 minutes, stirring constantly.
-
Pour in the heavy cream and whisk until smooth. Bring to a boil again, then remove from heat and let it cool for about 15 minutes.
-
Gradualy beat in the sifted powdered sugar using a hand mixer until the frosting is thick and smooth.
-
Place one cake layer on a serving plate. Spread a layer of frosting over the top. Place the second layer on top and frost the top and sides of the cake.
Notes
If the frosting hardens too quickly while you are working, you can place the saucepan over very low heat for a few seconds to soften it back up.
Nutrition
Calories: 480 kcal | Carbohydrates: 72g | Protein: 4g | Fat: 21g | Saturated Fat: 13g | Cholesterol: 75mg | Sodium: 310mg | Fiber: 1g | Sugar: 54g
