Strawberry Crunch Cheesecake Cones
Nostalgic Strawberry Cheesecake Cones in 25 Minutes
A Sweet Trip Down Memory Lane
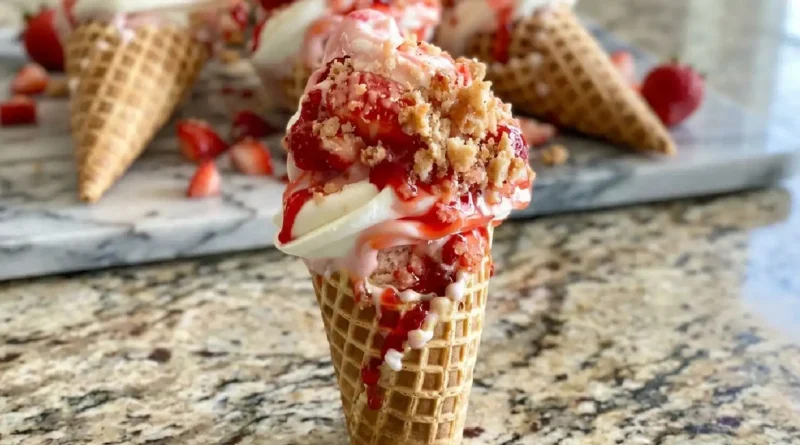
I’ve always believed the best desserts aren’t just tasted; they’re remembered. They’re the ones that transport you. For me, it’s the iconic strawberry shortcake ice cream bars from childhood—that perfect marriage of creamy, fruity, and crunchy. I wanted to capture that magic, that pure joy, but in a form that felt a little more elegant and a lot more fun to make at home. That’s how these Strawberry Crunch Cheesecake Cones were born. Imagine a crisp, golden waffle cone, dipped in sweet white chocolate and rolled in a nostalgic strawberry crunch, then filled to the brim with a luscious, no-bake cheesecake filling, vibrant strawberry glaze, and fresh berry chunks. It’s a handheld dessert that’s not just a treat for the taste buds, but a full-on sensory experience.
Why You’ll Love This Recipe
-
Effortless Elegance: There’s no baking required and no fancy equipment needed. This recipe delivers a stunning, impressive dessert with surprisingly simple steps.
-
The Ultimate Crowd-Pleaser: From kids to adults, these cones are pure, irresistible fun. They’re the perfect centerpiece for birthday parties, summer barbecues, or bridal showers.
-
A Nostalgic Flavor Bomb: That strawberry crunch topping is a direct love letter to a classic frozen treat, evoking warm memories with every single bite.
-
Completely Customizable: Easily adapt the flavors, use store-bought shortcuts, or tailor them to dietary needs (see our “Make It Different” section below).
The Ultimate Seal of Approval
I brought a batch of these to a family gathering, fully expecting the kids to be the biggest fans. But the most surprising review came from my uncle, a man whose dessert preferences have been limited to apple pie and vanilla ice cream for decades. He took one tentative bite, then another, and his eyes lit up. “Now this,” he declared, holding the cone aloft, “is what a dessert should be.” He marveled at the contrast of the creamy filling and the crispy cone, and asked if I could save him a second one for later. Winning over a lifelong traditionalist confirmed it: this recipe is something special.
What Makes It Special
-
The Strawberry Crunch Topping: This isn’t just a garnish; it’s the star. Its sweet, slightly tart, and sandy texture provides the signature crunch that makes every bite exciting.
-
No-Bake Cheesecake Filling: Luxuriously creamy and tangy, this filling provides a cool, rich contrast to the other components without ever needing to turn on your oven.
-
Fresh Strawberry Chunks: They add little bursts of juicy, fresh fruitiness that cut through the richness and make the dessert feel bright and balanced.
-
The White Chocolate Dip: This does double duty. It acts as the “glue” for the crunchy topping while also creating a protective, sweet shell that helps keep the cone from getting soggy too quickly.
Making It Happen: Crafting Your Cones
First, get your station ready. Line a baking sheet with parchment paper and have all your ingredients within reach. Melt your white chocolate gently, either in short bursts in the microwave or over a double boiler, until it’s smooth and fluid.
Now, for the fun part: building the foundation. Take a waffle cone and dip the top inch or so into the melted white chocolate, swirling it to get an even coat. Gently tap off the excess, then immediately roll the chocolate-dipped portion in the strawberry crunch topping, coating it generously. Set it upright on your prepared baking sheet and repeat with the remaining cones. Let them stand for 5-10 minutes until the chocolate shell is firm to the touch.
While they set, spoon your creamy cheesecake filling into a piping bag fitted with a large tip, or simply a sturdy zip-top bag with a corner snipped off. This is your tool for a neat and easy fill.
To assemble, it’s all about the layers. First, pipe the cheesecake filling into the cone until it’s about halfway full. Now, add a small spoonful of that glossy strawberry glaze and a few of your fresh, diced strawberries. This creates a hidden pocket of fruity goodness. Continue piping more cheesecake filling to nearly the top, then add another dollop of glaze and a few more berry pieces. For the grand finale, sprinkle a little more of that strawberry crunch right on top.
Place your nearly-finished cone back on the tray and artfully drizzle the remaining melted white chocolate over everything. While the chocolate is still wet, give it one last shower of crunch topping for maximum texture and visual appeal. Repeat the process with all your cones, then pop the entire baking sheet into the refrigerator to chill for at least 10-20 minutes. This brief rest allows everything to set up perfectly for serving.
You Must Know
-
Work Quickly with the Chocolate: The melted white chocolate will start to set as it cools, so have your crunch topping ready and coat your cones promptly.
-
Don’t Overfill the Bag: To avoid a mess, only fill your piping or zip-top bag about two-thirds full with the cheesecake filling.
-
The Soggy Cone Rule: These cones are truly at their peak when served shortly after assembly. The longer they sit, the more the moisture from the filling will soften the cone.
Serving Ideas
These cones are a complete delight on their own, but for a truly spectacular dessert spread, consider serving them alongside a small glass of chilled prosecco or a sparkling rosé. The bubbles cut through the richness beautifully. For a non-alcoholic option, a tall glass of ice-cold milk or a strawberry lemonade is a perfect match.
Make It Different
-
Flavor Twist: Substitute the strawberry elements for blueberry or raspberry pie filling and use vanilla or chocolate sandwich cookies for the crunch.
-
Chocolate Lover’s Dream: Use a chocolate cheesecake filling, dip the cones in melted milk or dark chocolate, and roll them in crushed Oreos or chocolate graham crackers.
-
Dairy-Free/Vegan: Use a store-bought vegan cream cheese and whipped topping for the filling, and ensure your white chocolate and cones are vegan-friendly.
-
Gluten-Free: Simply use your favorite gluten-free waffle cones and gluten-free cookies or shortbread for the crunch topping.
Storage and Reheating Recipe Tips
These Strawberry Crunch Cheesecake Cones are best enjoyed the day they are made. However, you can prepare all components up to one day in advance. Store the cheesecake filling and strawberry glaze separately in airtight containers in the refrigerator. Keep the strawberry crunch topping and waffle cones in a sealed container at room temperature. Assemble just before serving for the best texture. We do not recommend freezing the assembled cones.
Success Tips
For the cleanest presentation when piping, use a large star tip. It creates beautiful swirls and gives you more control. If your cheesecake filling is too thick to pipe easily, let it sit at room temperature for 5-10 minutes to soften slightly. When drizzling the final white chocolate, don’t worry about perfection—a casual, artistic drizzle looks most appealing.
Frequently Asked Questions (FAQ)
1. Can I make these completely from scratch?
Absolutely! You can use your favorite homemade no-bake cheesecake recipe and make your own strawberry crunch by pulsing freeze-dried strawberries with golden Oreos or shortbread cookies.
2. My white chocolate is too thick. What can I do?
You can thin it out with a tiny amount of coconut oil or vegetable shortening (about 1/2 teaspoon at a time) as you melt it. This will make it more dippable and help it set with a nice snap.
3. How far in advance can I assemble them?
We recommend assembling no more than 2-3 hours before serving for the optimal crispy cone experience. The cones will gradually soften, but they will still be delicious.
4. What can I use instead of a piping bag?
A zip-top bag with a corner snipped off works perfectly well. For even more control, you can spoon the filling in carefully, though it might be a bit messier.
5. Where can I find strawberry crunch topping?
Some well-stocked grocery stores carry it in the baking aisle. If you can’t find it, it’s very easy to make by pulsing 6-8 golden Oreos (cream removed) with 1/4 cup of freeze-dried strawberries until you have sandy crumbs.
Recipe Card
Prep time: 25 minutes
Cook time: 0 minutes
Total time: 25 minutes (plus chilling time)
Category: Dessert
Difficulty: Easy
Cuisine: American
Yield: 6 cones
Ingredients
-
6 waffle or sugar cones
-
5 oz white chocolate, melted
-
1 cup strawberry crunch topping
-
1 (24 oz) container no-bake cheesecake filling, or equivalent homemade
-
1/4 cup strawberry glaze or sauce
-
6-8 fresh strawberries, diced
Instructions
-
Line a baking sheet with parchment paper. Melt the white chocolate according to package directions until smooth.
-
Dip the top inch of a waffle cone into the melted white chocolate, tapping gently to remove excess. Immediately roll the dipped portion in the strawberry crunch topping to coat. Place upright on the prepared baking sheet. Repeat with remaining cones. Let set for 5-10 minutes until firm.
-
Transfer the cheesecake filling to a piping bag or a large zip-top bag with a corner snipped off.
-
Pipe cheesecake filling into a cone until halfway full. Add a small spoonful of strawberry glaze and a few diced strawberries.
-
Continue piping more cheesecake filling to nearly the top. Add another small dollop of glaze and a few more strawberries. Sprinkle with a little strawberry crunch topping.
-
Place the cone back on the baking sheet. Drizzle with the remaining melted white chocolate and immediately sprinkle with more crunch topping. Repeat with all cones.
-
Refrigerate for at least 10-20 minutes to set. Serve immediately.
Notes
Allergy Info: Contains dairy, wheat, and eggs (depending on cheesecake filling used). Always check labels of pre-made ingredients if serving to those with allergies.
Nutrition: Nutritional values are an estimate and will vary based on specific ingredients and portion sizes. These are indulgent dessert treats.
