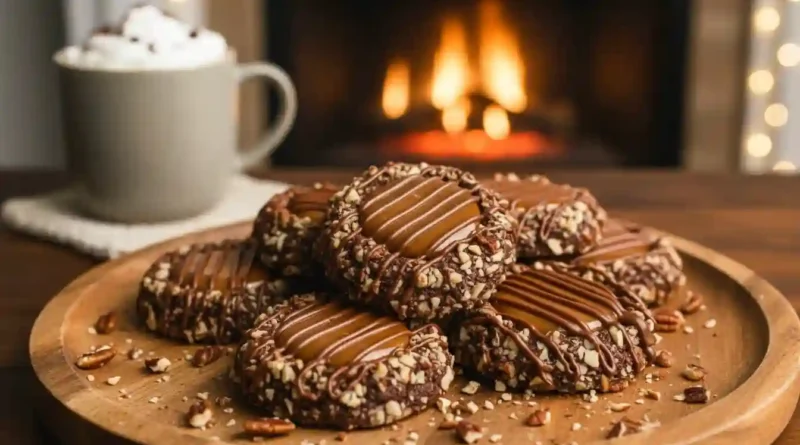
Turtle Cookies
Indulgent Chocolate Turtle Cookies: The Ultimate Chewy Caramel Dream
Introduction
There are some cookies that just do more. They don’t just satisfy a sweet tooth; they stop conversation, demand a cup of coffee, and transport you straight to that cozy, fireside feeling. These Chocolate Turtle Cookies are exactly that kind of magic. They’re a beautiful mash-up of rich, dark chocolate, crunchy toasted pecans, and a molten, buttery caramel filling, all finished with a delicate chocolate drizzle.
I first developed this turtle cookie recipe because I was obsessed with the classic turtle candy—that perfect ratio of nuts, chocolate, and caramel—but wanted it in a soft, chewy cookie form. The key was to make the chocolate base deep and fudgy, give it a substantial, crunchy pecan “shell,” and then create a little well for that glorious, golden caramel. The moment that first tray came out of the oven, filling my kitchen with the scent of warm cocoa and melting sugar, I knew I had a winner. They are truly an unforgettable, two-bite piece of heaven.
Why You’ll Love This
This isn’t just another cookie; it’s an experience. Here’s why this Chocolate Turtle Cookies recipe will become your new favorite:
-
The Texture Trifecta: You get the chewiness of a perfect chocolate thumbprint cookie, the satisfying crunch of toasted pecans, and the gooey melt of warm caramel.
-
Deep Chocolate Flavor: Thanks to the quality unsweetened cocoa powder, the cookie base is rich, dark, and not overly sweet, which perfectly balances the sugary caramel.
-
Impressive, Yet Simple: They look intricate and professional, making them perfect for gifting or holiday platters, but the steps are surprisingly straightforward.
-
Make-Ahead Friendly: The dough can be prepared and chilled a day ahead, meaning you can have fresh-baked goodness on demand.
The Unlikely Convert
I’ll never forget the holiday party where I debuted these. My notoriously picky cousin, Michael, who usually just sniffs at homemade desserts and then asks for the store-bought vanilla wafers, sauntered over. He picked up a cookie, scrutinized the caramel center, and took a bite. The look on his face changed instantly—his eyes widened, and he immediately reached for a second one, completely silent. Later, he cornered me to ask for the “secrets to that magnificent chocolate pecan cookie.” If these Chocolate Turtle Cookies can win over Michael, they can win over anyone.
What Makes It Special
The key to a truly decadent treat lies in the details of the ingredients.
-
Quality Cocoa Powder: Using a good quality, unsweetened cocoa powder is crucial for achieving that deep, fudgy color and intense chocolate flavor in the cookie base.
-
Real Butter: Half a cup of real, creamy butter provides the essential moisture and rich, melt-in-your-mouth texture that makes the cookies tender.
-
Finely Chopped Pecans: Coating the dough balls in finely chopped pecans ensures that every single bite has a beautiful, crunchy, nutty texture, mimicking the “shell” of a turtle.
-
Soft Caramel: Using pre-made Kraft Caramel Bits makes the filling process incredibly simple while delivering that signature smooth, buttery, and slightly salty caramel taste.
Making It Happen
Making these beautiful Turtle Cookies is a fun and rewarding process that comes together in a few easy stages.
We start by bringing the cookie dough to life. In one bowl, gently whisk together your flour, cocoa powder, and salt. Then, in your stand mixer or a separate bowl, cream together the softened butter and granulated sugar until the mixture is beautifully light and fluffy—this should take a good two to three minutes and is essential for a tender cookie. Into that buttery sweetness, mix in the egg yolk, milk, and a splash of vanilla extract. Finally, gently fold in the dry ingredients until they are just combined. Overmixing here is the enemy of a soft cookie! Once done, wrap the dough and let it chill in the fridge for at least an hour. This chilling time is non-negotiable for perfectly shaped, non-spreading cookies.
Now for the coating. Once the dough is firm, whisk that leftover egg white until it’s light and frothy. Have your finely chopped pecans ready in a separate shallow dish. Roll the chilled dough into 20 small, uniform balls. Dip each ball entirely in the frothy egg white, letting the excess drip off, and then roll and press it firmly into the chopped pecans. Place these pecan-encrusted orbs onto a parchment-lined baking sheet. Before they go in the oven, use the back of a small measuring spoon—a half-teaspoon works perfectly—to create a small, shallow indentation right in the center of each dough ball.
Bake the cookies at $350^\circ\text{F}$ for about 10 to 12 minutes. Remember, you want them just set. They will firm up as they cool, and over-baking results in a hard cookie. The second they come out, gently re-press those indentations with your spoon to make sure they are deep enough for the caramel filling.
While they cool, make the luscious caramel. In a microwave-safe bowl, combine your caramel bits and the touch of water. Microwave this mixture in short, 30-second bursts, stirring thoroughly after each one, until you have a smooth, flowing, golden caramel. Spoon a generous dollop of this melted caramel into the center of each cookie.
For the final flourish, melt your semi-sweet chocolate until it is silky smooth, and then drizzle it artistically over the tops of the cookies. A tiny sprinkle of flake salt at this stage adds a perfect professional touch and flavor boost.
You Must Know: Tips for Success
-
Don’t Skip the Chill: The hour of refrigeration for the chocolate cookie dough is vital for the balls to hold their shape and not spread into flat pancakes.
-
Egg White is the Glue: The frothy egg white helps the pecans adhere completely and keeps them crunchy and toasted during baking.
-
Mind the Oven Time: Pull the cookies out when they look slightly underdone in the center. They should still be soft. This guarantees a tender, chewy cookie once cooled.
-
Re-Indent Immediately: As soon as the cookies exit the hot oven, gently press the centers again. The edges puff up a bit during baking, and you need to deepen that well for the caramel.
-
Caramel Consistency: If the melted caramel seems too thick, add water just a few drops at a time until it reaches a pourable, but still thick, consistency.
Serving Ideas and Pairings
These rich pecan chocolate cookies are best enjoyed slightly warm, just after the caramel has set but is still soft.
-
The Perfect Pairing: A mug of dark-roast coffee, a hot cup of spiced chai tea, or a tall glass of cold, whole milk provides the perfect counterpoint to the sweetness.
-
Dessert Platter: Pair them with lighter, citrus-based cookies (like lemon shortbread) or simple sugar cookies to offer a variety of flavor profiles on a holiday tray.
-
Ice Cream Topper: Crumble one or two over a bowl of vanilla or butter pecan ice cream for an incredibly decadent sundae.
Make It Different: Customization
-
Nut-Free Option: For an equally delicious treat, substitute the pecans with shredded coconut or simply coat the balls in granulated sugar instead of nuts.
-
Easy Flavor Change: Swap out the pecans for walnuts or even chopped hazelnuts for a slightly different nutty profile in your turtle cookies.
-
Dairy-Free Caramel: If you need a vegan option, use a store-bought vegan caramel sauce for the filling instead of the Kraft bits.
-
Flaked Sea Salt: A tiny sprinkle of flaky sea salt over the finished caramel and chocolate drizzle truly elevates the flavor, making the chocolate and caramel sing.
Storage and Reheating Recipe Tips
To keep your Chocolate Turtle Cookies tasting fresh:
-
Room Temperature: Store baked cookies in an airtight container at room temperature for up to 4 days.
-
Freezing Baked Cookies: You can freeze the baked turtle cookies in a freezer-safe container for up to 3 months. Thaw them overnight in the refrigerator or for a few hours at room temperature.
-
Reheating: To enjoy that warm, gooey caramel center, microwave a cookie for 5–10 seconds. Be careful not to overheat, or the caramel can seize or become too hot.
-
Freezing Dough: You can roll the dough into balls and freeze them (uncoated) on a baking sheet, then transfer them to a freezer bag. When ready to bake, thaw slightly, coat in pecans, and add a few minutes to the baking time.
Success Tips for the Perfect Turtle Cookie
Achieving that bakery-quality look and taste for your turtle cookies requires attention to detail:
-
Uniform Size: Use a small cookie scoop or weigh your dough balls to ensure they are all the same size. This guarantees even baking and a beautiful, professional presentation.
-
Soften Your Butter: Start with perfectly softened butter for the creaming stage. It should yield easily to pressure, but not be greasy or melted.
-
Chill Time is Key: The flavor of the dough actually deepens during the hour of chilling, resulting in a more complex, fudgy chocolate cookie.
-
Use Parchment: Always line your baking sheet with parchment paper. This prevents sticking and ensures the delicate caramel doesn’t fuse to the pan.
-
Steady Hand for Drizzle: For the optional chocolate drizzle, transfer the melted chocolate to a small zip-top bag, snip a very tiny corner, and use that for a delicate, professional stream.
Frequently Asked Questions (FAQ)
Q: Can I use different nuts instead of pecans?
A: Absolutely! Walnuts and hazelnuts are wonderful substitutes that still offer that classic nutty crunch. Just make sure they are finely chopped.
Q: Why did my cookies spread too much?
A: The most common causes are not chilling the dough long enough or not properly measuring the flour. Make sure to spoon and level your flour, and don’t skip the one-hour chill time!
Q: Do I need to use Kraft Caramel Bits?
A: They make the process very easy, but you can certainly use regular individually wrapped caramels. Just follow the same melting instructions, combining them with a touch of water or heavy cream.
Q: How do I get my caramel to be perfectly smooth?
A: The key is low heat and patience. Microwave in short bursts (30 seconds maximum) and stir thoroughly between each interval. If it looks too thick, add just a teaspoon of water or cream at a time.
Q: Can I skip the chocolate drizzle?
A: Yes, the cookies are perfectly delicious without the drizzle. The chocolate is primarily for aesthetic appeal and an extra layer of flavor, but the caramel and pecan coating provide all the main “turtle” elements.
| Detail | Information |
| Prep Time | 20 minutes |
| Chill Time | 60 minutes |
| Cook Time | 12 minutes |
| Total Time | 1 hour 32 minutes |
| Servings | 20 cookies |
| Category | Dessert |
| Difficulty | Medium |
| Cuisine | American |
| Yield | 20 cookies |
Ingredients
Chocolate Cookies:
-
1 cup all-purpose flour (125 grams)
-
$1/3$ cup unsweetened cocoa powder (28 grams)
-
$1/4$ teaspoon salt
-
$1/2$ cup butter (113 grams), softened
-
$2/3$ cup granulated sugar (134 grams)
-
1 large egg, separated (yolk for dough, white for coating)
-
2 Tablespoons milk
-
1 teaspoon vanilla extract
-
1 cup pecans, finely chopped (for coating)
Caramel:
-
$2/3$ cup Kraft Caramel Bits or regular caramels, melted
-
$1/2$ teaspoon water
Optional Melted chocolate drizzle:
-
2 oz Semi-sweet chocolate (for melting)
Instructions
-
Cookie Dough: In a medium bowl, whisk together the flour, cocoa powder, and salt. In a separate, large bowl, use a hand mixer or stand mixer to mix the butter and sugar until light and fluffy, about 2-3 minutes. Mix in the egg yolk, milk, and vanilla. Gradually stir in the flour mixture, just until the ingredients are combined and no dry streaks remain.
-
Chill: Form the dough into a disk, wrap it, and chill it in the refrigerator for one hour.
-
Preheat and Prep: Preheat your oven to $350^\circ\text{F}$ and line a baking sheet with parchment paper.
-
Pecan Coating: Whisk the reserved egg white in a small bowl until it is frothy. Place the finely chopped pecans in another shallow bowl. Remove the chilled cookie dough from the fridge and roll it into 20 small, uniform balls.
-
Coat and Indent: Roll each dough ball entirely in the frothy egg whites, letting excess drip off, and then roll and press firmly into the chopped pecans to coat completely. Place them on the prepared baking sheet. Use the back of a small measuring spoon (like a $1/2$ teaspoon) to make a shallow indentation in the center of each dough ball.
-
Bake: Bake at $350^\circ\text{F}$ for about 10-12 minutes, or just until the edges are set. Do not over-bake (cookies will harden as they cool). As the cookies come out of the oven, gently re-press the indentations with a small spoon to deepen the wells. Let the cookies cool completely on the baking sheet.
-
Caramel: In a microwavable bowl, mix the caramel bits and water. Microwave at 30-second intervals, stirring after each interval, until the caramel is melted and smooth (1-2 minutes total). Pour small spoonfuls of the warm caramel into the indented centers of the cooled cookies.
-
Optional Chocolate Drizzle: Melt the semi-sweet chocolate in a double boiler or in the microwave until smooth. Drizzle the cookies with the melted chocolate. Sprinkle with flake salt, if desired. Let the caramel and chocolate set before serving.