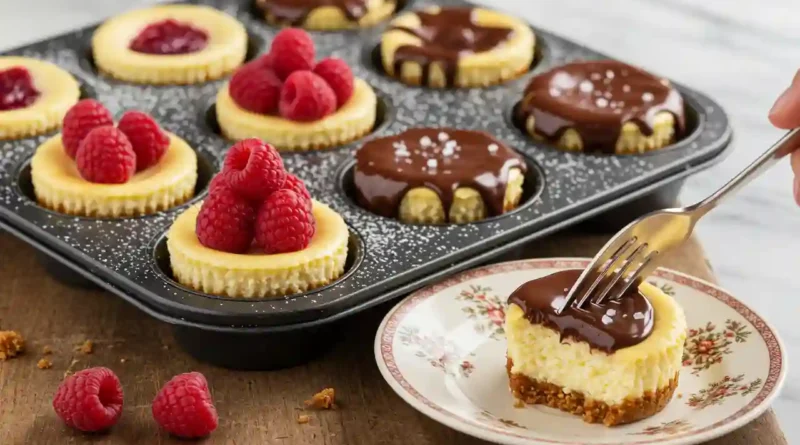
Mini Cheesecakes
The Easiest Mini Cheesecakes Recipe: Perfect, Portable, and No Water Bath!
A Sweet Solution for Any Occasion
I’ll never forget the first time I brought a full-sized cheesecake to a family potluck. It was a beautiful, towering thing, but it cracked right down the middle on the car ride over, and slicing it neatly on a picnic table was a comical disaster. I spent more time apologizing than enjoying the company. That’s when I fell in love with the magic of Mini Cheesecakes. These little gems are the ultimate solution. They’re perfectly portioned, incredibly portable, and each one boasts that flawless, creamy center and crispy, buttery crust you crave, without any of the stress. Baking them feels less like a science project and more like a joyful, guaranteed win.
Why You’ll Love This
-
Effortless Elegance: Impress guests with a stunning dessert that looks like it came from a bakery, but requires a fraction of the skill and time.
-
No Fuss, No Cracks: Forget about the dreaded water bath! This simplified method delivers a perfectly set, velvety texture every single time.
-
The Ultimate Make-Ahead Dessert: Prepare these days in advance, freeing up your precious time on the day of your event.
-
A Canvas for Creativity: Leave them classic and pristine, or top each one with a different fruit, sauce, or chocolate for a customizable dessert bar.
I once made a batch for my nephew’s birthday, a known skeptic of anything that isn’t chocolate cake. He eyed the mini cheesecakes with suspicion, finally taking one to be polite. Ten minutes later, he was quietly sneaking a second, then a third. His ultimate verdict? “These are way better than I thought they’d be.” It’s the highest praise from a ten-year-old, and proof that this simple dessert can win over even the toughest critics.
What Makes It Special
The magic of these mini cheesecakes lies in the careful balance of a few key ingredients.
-
Brick-Style Cream Cheese: Using full-fat, brick-style cream cheese (not the spreadable kind from a tub) is non-negotiable. It provides the stable, rich, and tangy foundation that makes a cheesecake truly exceptional.
-
Sour Cream: This is the secret weapon for a luxuriously creamy texture and a subtle tang that cuts through the sweetness, elevating the entire flavor profile.
-
Graham Cracker Crust: The combination of sweet, toasty crumbs and melted butter creates a crisp, sturdy base that complements the creamy filling without getting soggy.
-
Room Temperature Ingredients: This is the culinary key to a smooth, lump-free filling. Cold ingredients are the enemy of a seamless blend.
Making It Happen
First, let’s create that golden, buttery foundation. Preheat your oven and line your muffin pan with liners—this makes removal a breeze. In a bowl, you’ll stir together the graham cracker crumbs and sugar until they smell like sweet hay. Pour in the melted butter, and as you mix, you’ll watch the crumbs transform from dusty to decadently moist. Press this mixture firmly into the bottom of each liner; a small glass or measuring cup helps create a compact, even layer. A quick five-minute bake in the oven is all it needs to set its structure and deepen its flavor.
While the crusts are cooling slightly, it’s time for the main event: the filling. In your mixer bowl, beat the softened cream cheese and sour cream together until they become one perfectly smooth, pale canvas. Scrape down the bowl thoroughly—this is a crucial step for avoiding lumps. Now, mix in the sugar and vanilla, and finally, the eggs. Add them one at a time, mixing on low speed only until the yolk disappears into the batter. Overmixing at this stage incorporates too much air, which can lead to cracks.
Now, pour that lusciously smooth, creamy batter over the waiting crusts, filling each cup almost to the top. Slide the pan into the oven and bake until the tops are set and have just lost their shine. The real patience comes next: let them cool completely in the pan for a full hour. This gradual temperature change is what keeps them happy and crack-free. Then, the final, transformative step is a few hours of chilling in the refrigerator, which firms them up to that perfect, sliceable, creamy consistency.
You Must Know
-
Patience is a Virtue: Do not skip the cooling and chilling steps. Rushing this process is the most common mistake and can lead to a gummy texture.
-
Scrape That Bowl: Halfway through mixing the filling, stop the mixer and use a spatula to scrape down the sides and bottom of the bowl. This ensures every bit of cream cheese is incorporated smoothly.
-
Room Temp is Key: Taking the chill off your cream cheese, sour cream, and eggs is the single best way to guarantee a silky, lump-free filling.
Serving Ideas
These mini cheesecakes are stunning all on their own, but a few simple additions can make them spectacular. Top them with a vibrant, fresh berry compote, a drizzle of rich salted caramel, or a dusting of cocoa powder. For a dinner party, serve them alongside a strong cup of coffee or a glass of dessert wine like a Moscato d’Asti. For a casual treat, a tall glass of cold milk is the perfect partner.
Make It Different
-
Gluten-Free: Use gluten-free graham crackers for the crust.
-
Lemon Zest: Add the zest of one lemon to the filling for a bright, citrusy twist.
-
Chocolate Lover’s: Replace the graham cracker crumbs with crushed Oreo cookies (filling included) for a chocolate crust.
-
Peanut Butter Cup: Swirl 1/4 cup of peanut butter into the filling before baking.
Storage and Reheating
Store these mini cheesecakes in an airtight container in the refrigerator for up to 4 days. They are best served cold. For longer storage, they freeze beautifully for up to 3 months. Freeze them solid on a baking sheet first, then transfer to a freezer bag. Thaw overnight in the refrigerator.
Success Tips
For the smoothest filling, make sure your cream cheese is truly at room temperature. It should feel soft and pliable when you press it. When pressing the crust, really pack it in firmly; this prevents it from crumbling when you take a bite. And finally, resist the urge to open the oven door during baking, as a sudden temperature drop can cause the cheesecakes to fall.
Frequently Asked Questions (FAQ)
1. Can I use low-fat cream cheese and sour cream?
While you can, I don’t recommend it for the best results. Full-fat ingredients provide the classic rich, creamy texture and flavor that makes cheesecake so indulgent. Low-fat versions can result in a less firm and slightly gummy texture.
2. My cheesecakes puffed up in the oven. Is that normal?
Yes, this is completely normal! They will puff up slightly while baking and then settle back down as they cool. This settling is part of what gives them that dense, creamy texture.
3. How do I know when they are done baking?
The cheesecakes are done when the edges are set and the centers just lose their glossy shine. They should still have a slight jiggle in the very center when you gently shake the pan. They will continue to set as they cool.
4. Can I make these without a stand mixer?
Absolutely! A handheld electric mixer works perfectly well. Just be sure to mix thoroughly at each stage to ensure a smooth batter.
5. Why do my ingredients need to be at room temperature?
Room-temperature ingredients blend together much more easily and evenly. Cold cream cheese will leave little lumps in your batter, and cold eggs can cause the mixture to seize up, leading to an overmixed, aerated filling that is more prone to cracking.
Mini Cheesecakes Recipe Card
Prep time: 20 minutes
Cook time: 20 minutes
Total time: 4 hours 40 minutes (includes chilling)
Category: Dessert
Difficulty: Easy
Cuisine: American
Yield: 12 mini cheesecakes
Ingredients
For the graham cracker crust:
-
1 cup (120 grams) graham cracker crumbs
-
3 tablespoons (40 grams) granulated sugar
-
3 and 1/2 tablespoons (50 grams) unsalted butter, melted
For the cheesecake filling:
-
16 ounces (452 grams) brick-style cream cheese, softened
-
1/3 cup (80 grams) sour cream, room temperature
-
1/2 cup (100 grams) granulated sugar
-
1 teaspoon pure vanilla extract
-
2 large eggs, room temperature
Instructions
-
Preheat oven to 325°F (163°C). Line a 12-count muffin pan with cupcake liners.
-
For the crust: In a medium bowl, mix graham cracker crumbs and sugar. Add melted butter and stir until crumbs are fully moistened. Divide mixture evenly among liners and press down firmly into a compact layer.
-
Bake crust for 5 minutes. Remove from oven and set aside. Keep oven on.
-
For the filling: In a large bowl using a hand mixer or stand mixer with paddle attachment, beat cream cheese and sour cream on medium speed until smooth and creamy, about 2 minutes.
-
Beat in sugar and vanilla extract until combined. Scrape down the sides and bottom of the bowl.
-
On low speed, add eggs one at a time, mixing until just combined after each addition. Do not overmix.
-
Divide the filling evenly among the prepared crusts, filling almost to the top.
-
Bake for 17-20 minutes, until the edges are set and the centers are no longer shiny.
-
Let cool in the pan for 1 hour, then transfer to the refrigerator to chill for at least 3-4 hours, or overnight, before serving.
Notes: Store in an airtight container in the refrigerator. See article for detailed freezing instructions and ingredient substitution ideas.
