Grilled Porterhouse Steak
The Ultimate Guide to Grilling a Perfect Porterhouse Steak
There’s a certain kind of magic that happens when a thick, beautiful Porterhouse steak meets the searing heat of a grill. It’s a ritual in my house, one that signals a celebration, a long weekend, or simply the fact that it’s Tuesday and we deserve something extraordinary. I can still remember the first time I grilled one for my father, a man whose grilling philosophy was once “char it until it’s quiet.” The look on his face when he cut into that perfectly medium-rare, juicy steak—a crisp, peppery crust giving way to a tender, buttery interior—was a quiet admission that maybe, just maybe, there was a better way. That moment cemented this recipe as more than just a method; it’s a gateway to creating your own memorable moments.
Why You’ll Love This
-
It’s a Showstopper: This isn’t just dinner; it’s an event. Presenting a sizzling, gorgeously seared Porterhouse is guaranteed to draw a crowd.
-
Two Steaks in One: You get the best of both worlds—the robust, beefy flavor of the strip steak on one side and the melt-in-your-mouth tenderness of the filet mignon on the other.
-
Simple, Honest Ingredients: The magic comes from the quality of the steak and the fire, not a long list of complicated ingredients. It’s pure, unadulterated beef perfection.
-
Master a Fundamental Skill: Learning to grill a perfect steak is a culinary rite of passage that will serve you for a lifetime.
My friend’s daughter, a notoriously picky eater whose diet seemed to consist solely of “beige” foods, was our most unexpected convert. She watched the entire process with skepticism, declaring she would “just have a roll.” But the aroma was irresistible. After some coaxing, she tried a tiny piece of the filet side. Her eyes widened. “It’s like… really soft meat,” she whispered. She ended up eating a whole small portion, and now every time she visits, she asks, “Are we having the special steak?”
What Makes It Special
-
The Porterhouse Cut: This is the king of T-bone steaks, defined by its substantial size and a generous, tenderloin filet that must be at least 1.25 inches wide.
-
Kosher Salt: Its clean, sharp salinity penetrates the meat deeply, enhancing the natural beef flavor far better than table salt.
-
High-Heat Grill: A screaming hot grill is non-negotiable. It creates a flavorful, crispy, caramelized crust that locks in all the precious juices.
Making It Happen
Your journey to the perfect Porterhouse begins not at the grill, but on your kitchen counter. About two hours before you plan to cook, take the steaks out of the refrigerator. Pat them dry thoroughly with paper towels—this is the secret to a superior sear. Let them sit, coming gracefully to room temperature. This simple, patient step is what ensures your steak cooks evenly from edge to edge, preventing a cold, grey center.
When you’re almost ready, fire up your grill. You’re aiming for a fierce, high heat—somewhere between 450 and 500 degrees Fahrenheit. While it heats up, brush your steaks lightly with olive oil; this helps the seasoning stick and promotes browning. Now, be generous. Coat every surface with a heavy snowfall of kosher salt and a hearty crack of fresh black pepper.
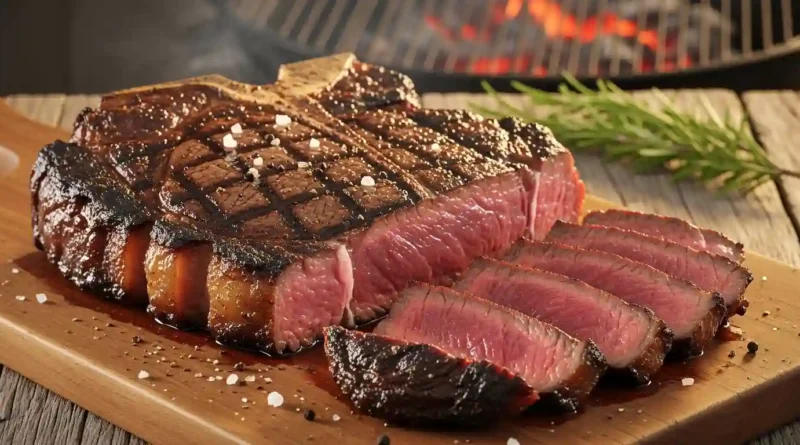
Once the grill is ripping hot and the grates are clean and oiled, lay the steaks down with confidence. You should be greeted by an immediate, satisfying sizzle. Let them sear, undisturbed, for a solid two and a half minutes to build a beautiful crust. Then, using tongs, give them a confident 45-degree rotation. You’re not flipping yet; you’re creating those classic, professional cross-hatch grill marks. Grill for another two and a half minutes.
Now, flip the steaks. You should see a gorgeous, dark brown crust. Repeat the process on this second side: sear, rotate, sear. For a perfect medium-rare, the final internal temperature should read 130-135°F on an instant-read thermometer inserted into the thickest part, near the bone but not touching it.
The most critical step of all comes next: the rest. Transfer your masterpiece to a cutting board and walk away for five to ten minutes. This allows the frantic, tense muscle fibers to relax and reabsorb all their juices, guaranteeing every single bite is tender and succulent.
You Must Know
-
Patience is a Virtue: Never skip the step of bringing the steak to room temperature. A cold steak straight from the fridge will steam and overcook before a good sear can form.
-
Dry is Good: A dry surface creates a phenomenal crust. Always pat your steaks dry before oiling and seasoning.
-
Trust the Thermometer: Guessing doneness is a gamble. An instant-read thermometer is your most reliable partner for a perfectly cooked steak.
-
Respect the Rest: Slicing into a steak immediately after grilling will cause all the flavorful juices to pool on the cutting board, not stay in the meat.
Serving It Up
Slice the steak against the grain for maximum tenderness, serving the strip and filet sections separately. This is a rich, centerpiece dish that needs simple, vibrant sides to complement it. Think classic:
-
Sides: A crisp wedge salad with blue cheese dressing, creamy mashed potatoes, grilled asparagus, or a bright, acidic arugula and cherry tomato salad.
-
Drink Pairings: A bold Cabernet Sauvignon is the classic choice, cutting through the richness of the beef. A hoppy IPA or a smoky bourbon on the rocks are also fantastic companions.
Make It Different
-
Flavor Twist: Add two crushed garlic cloves and a few fresh rosemary sprigs to the olive oil before brushing. Or, create a simple herb butter with chives and tarragon to melt over the top after resting.
-
Dietary Note: This recipe is naturally gluten-free and low-carb. For a Whole30 or paleo approach, ensure your salt and other seasonings are compliant.
Storing and Reheating Leftovers
While best enjoyed fresh, leftover steak can be stored in an airtight container in the refrigerator for up to 3 days.
-
To Reheat: Avoid the microwave at all costs, as it will turn the steak rubbery. For the best results, reheat slices gently in a dry skillet over low heat until just warm, or let them come to room temperature and enjoy them cold on a salad.
Your Final Success Tips
-
Invest in Thickness: Choose steaks that are at least 1.5 inches thick. This gives you a larger window to develop a dark crust without overcooking the center.
-
Tongs Only: Never pierce your steak with a fork to flip it. You’ll puncture the meat and let all the precious juices escape.
-
Carryover Cooking: Remember that the steak’s temperature will continue to rise by about 5 degrees as it rests. Pull it from the grill just before it hits your desired final temperature.
Frequently Asked Questions (FAQ)
1. Can I cook this on a charcoal grill vs. a gas grill?
Absolutely! Both work wonderfully. A charcoal grill will impart a deeper, smokier flavor, while a gas grill offers precise, easy temperature control. The cooking method remains the same.
2. How can I tell the doneness without a thermometer?
The “finger test” is a common method, but it’s less reliable. Compare the firmness of the meat to the fleshy part of your palm. For medium-rare, it should feel like the resistance when you touch your thumb to your middle finger. We highly recommend using a thermometer for accuracy.
3. My steak is much thinner than 1.5 inches. How do I adjust the time?
For a thinner steak, you will need to significantly reduce the cooking time. Sear for only 1-2 minutes per side, and rely heavily on your instant-read thermometer to avoid overcooking.
4. Why is there a bone, and should I remove it before cooking?
The bone acts as a heat conductor, helping the steak cook more evenly, and many believe it adds incredible flavor. Always leave the bone in during the cooking process.
5. What’s the difference between a Porterhouse and a T-Bone?
It’s all about the size of the tenderloin (filet mignon) section. A Porterhouse is a larger T-bone with a tenderloin that must be at least 1.25 inches wide. A T-bone has a smaller tenderloin.
Perfect Porterhouse Steak on the Grill
| Prep Time | 2 hours 5 minutes |
| Cook Time | 10 minutes |
| Total Time | 2 hours 15 minutes |
| Category | Main Course |
| Difficulty | Medium |
| Cuisine | American |
| Yield | 2-4 servings |
Ingredients
-
2 24-ounce Porterhouse Steaks, ROOM TEMPERATURE
-
1-2 tablespoons Olive Oil
-
Kosher Salt
-
Freshly ground black pepper
Instructions
-
Remove the steaks from the refrigerator 2 hours before grilling. Pat them completely dry with paper towels and let them sit on the counter to come to room temperature.
-
Heat your gas or charcoal grill to high (450-500°F). Brush and oil the grating grates thoroughly.
-
Brush the steaks lightly with olive oil and season all over generously with kosher salt and freshly ground black pepper.
-
Place the steaks on the hot grill and sear for 2 ½ minutes (3 minutes for medium doneness).
-
Rotate the steaks 45 degrees and grill for another 2 ½ minutes to create cross-hatch marks.
-
Flip the steaks with tongs and sear the other side for 2 ½ minutes.
-
Rotate 45 degrees again and grill for a final 2 ½ minutes.
-
Check the internal temperature with an instant-read thermometer. For medium-rare, aim for 130-135°F.
-
Remove the steaks from the grill, transfer to a cutting board, and let them rest for 5-10 minutes before slicing against the grain and serving.
Notes
Starting with room-temperature steaks is crucial for even cooking. Always use an instant-read thermometer for perfect results.
Allergy Info: None
Nutrition: (Approximate per serving) Calories: 700 | Protein: 70g | Fat: 45g | Saturated Fat: 18g | Iron: 7mg
