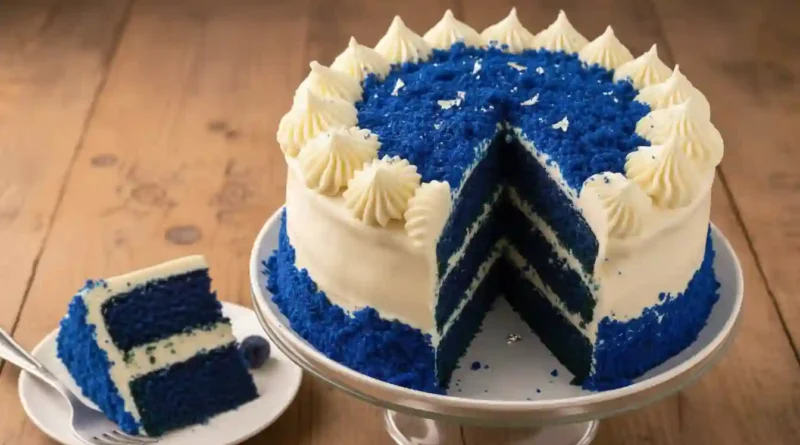
Blue Velvet Cake
The Ultimate Blue Velvet Cake Recipe with Cream Cheese Frosting
A Slice of Sapphire Magic
I’ll never forget the first time I saw a Blue Velvet Cake. It wasn’t in a bakery, but at a friend’s birthday party, a stunning, almost unbelievable splash of sapphire against a sea of beige and chocolate desserts. It was magnetic. I had to have a slice. The first bite was a revelation—the same impossibly tender, buttery crumb as its red cousin, but with a sense of playful wonder that made everyone at the table smile. That’s the magic of this cake. It’s not just a dessert; it’s an experience. It turns a simple gathering into a celebration and brings a little bit of joyful artistry to your kitchen. After years of tweaking, I’ve landed on this recipe, which delivers that signature velvety texture and a stunning, vibrant blue that’s sure to be the star of any table.
Why You’ll Love This Blue Velvet Cake
-
It’s a Showstopper: This cake is pure, unadulterated joy on a plate. Its breathtaking color is a natural conversation starter and guarantees impressed guests.
-
Perfectly Balanced Flavor: The subtle cocoa and buttermilk tang create a sophisticated flavor that isn’t overly sweet, which pairs perfectly with the rich cream cheese frosting.
-
Surprisingly Simple to Make: While it looks like it came from a professional patisserie, the steps are straightforward and use common baking ingredients.
-
A Textural Dream: The combination of oil and butter ensures an incredibly moist and tender crumb that stays that way for days.
The Ultimate Test: A Picky Eater’s Seal of Approval
I was a little nervous to serve this to my nephew, a dedicated chocolate-chip-cookie-only kind of kid. He eyed the brilliant blue slice with deep suspicion. After some gentle coaxing, he took a tiny bite. Then a bigger one. His eyes widened. “This is the best cake ever,” he declared, immediately asking for a second piece. It was a powerful reminder that this cake’s whimsical appearance and incredible flavor can win over even the toughest critics.
What Makes It Special
This isn’t just a red velvet recipe with different food coloring. The ingredient list is carefully calibrated for a specific result.
-
Cake Flour: Using cake flour is non-negotiable for achieving that delicate, soft-as-velvet crumb that gives the cake its name.
-
The Butter & Oil Combo: Butter provides rich flavor, while oil guarantees exceptional moisture, giving you the best of both worlds.
-
Sour Cream & Buttermilk: This dynamic duo introduces a subtle tanginess and works to tenderize the gluten, resulting in an incredibly tender texture.
-
A Touch of Cocoa: Unlike a chocolate cake, the small amount of cocoa powder deepens the flavor without overpowering it, allowing the vanilla and buttery notes to shine.
-
Two-Tone Food Coloring: Using a combination of royal blue and a touch of violet food coloring creates a deeper, more vibrant and less artificial-looking blue hue.
Making It Happen: Crafting Your Masterpiece
Creating this cake is a rewarding process. Start by whisking your sifted cake flour, salt, and cocoa powder together in a bowl. This aerates the dry ingredients and ensures everything is evenly distributed. As that rests, get your pans ready. Greasing and lining three 9-inch rounds might feel like a fussy step, but it’s your insurance policy for flawless, easy release later.
Now, for the heart of the cake: the creaming. In your mixer, beat the room-temperature butter and sugar on high until the mixture is pale, fluffy, and almost white. This incorporates essential air into the batter. Next, blend in the sour cream, followed by the oil. The mixture will become beautifully smooth and glossy. Add your eggs one at a time, letting each one fully incorporate before adding the next.
It’s time for the liquid team. Pour in the buttermilk, vinegar, and vanilla, mixing just until combined. Now, for the magic—stream in the blue and violet food coloring until you achieve that deep, mesmerizing sapphire shade.
With the mixer on low, gradually add the flour mixture, mixing only until the streaks of flour disappear. In a small separate dish, stir the baking soda and baking powder with the two teaspoons of water to create a paste. Gently fold this into the batter; this final burst of leavening power ensures a light, perfect rise.
Divide the stunning blue batter evenly between your prepared pans and give them a few firm taps on the counter to release any large air bubbles. Slide them into a preheated oven and bake until the centers spring back to a light touch. Let the layers cool in their pans for a bit before turning them out onto a wire rack to cool completely. For the best frosting experience, wrap these cooled layers in plastic wrap and chill them in the refrigerator for at least an hour, or even overnight. A cold cake is a stable cake, and it won’t shed crumbs into your pristine frosting.
While the cakes chill, make the frosting. Using an electric mixer, whip the room-temperature cream cheese and butter together with the vanilla until it’s completely smooth and creamy. Gradually sift in the powdered sugar, mixing on low at first to avoid a sugar cloud, then increasing the speed until the frosting is luxuriously smooth and spreadable.
To assemble, use a serrated knife to level the tops of your chilled cake layers if they have domed. Place the first layer on your cake stand or plate. Spread a generous, even cup of frosting over the top. Repeat with the second layer. Place the final layer upside-down for an perfectly flat top, then apply a thin “crumb coat” of frosting over the entire cake. Pop it back in the fridge for 20 minutes to set, then finish with the remaining frosting, swirling it artfully over the top and sides.
You Must Know
-
Room Temperature is Key: Your butter, eggs, and cream cheese must be at room temperature to emulsify properly and create a smooth, non-lumpy batter and frosting.
-
Don’t Overmix: Once you add the flour, mix only until the ingredients are combined. Overmixing develops gluten and leads to a tough, dense cake.
-
Chill Your Cakes: This is the secret to easy frosting. A cold cake is firm and will not crumble when you apply the frosting.
-
Sift Your Powdered Sugar: This prevents lumps in your otherwise silky cream cheese frosting.
Serving It Up
This cake is a celebration in itself, but it pairs beautifully with a cup of strong black coffee to cut through the richness or a cold glass of milk. For a truly decadent dessert experience, serve it alongside a scoop of vanilla bean ice cream or a handful of fresh, tart raspberries to complement the sweet, creamy frosting.
Make It Different
-
Flavor Twist: Add a teaspoon of lemon or orange zest to the batter for a bright, citrusy note.
-
Nutty Crunch: Fold a half-cup of finely chopped toasted pecans or walnuts into the batter for added texture.
-
Color Fun: For a holiday-themed cake, use green or red food coloring instead.
-
Cupcakes: This recipe translates perfectly into cupcakes. Line a muffin tin with papers, fill them 2/3 full, and bake for 18-22 minutes.
Storing Your Creation
This cake must be stored in the refrigerator due to the cream cheese frosting. Cover it with a cake dome or place it in an airtight container. It will stay fresh and moist for up to 5 days. You can also freeze the unfrosted cake layers for up to 3 months. Wrap them tightly in plastic wrap and then aluminum foil. Thaw overnight in the refrigerator before frosting.
Success Tips
-
For the most accurate results, use a kitchen scale to measure your flour. If using cups, spoon the flour into the cup and level it off without tapping or packing it down.
-
If your oven runs hot, start checking the cakes for doneness at the 25-minute mark. An overbaked cake will be dry.
-
If your frosting seems too soft after adding all the sugar, just chill it in the refrigerator for 20-30 minutes before using it to frost the cake.
Frequently Asked Questions
1. Can I use all-purpose flour instead of cake flour?
Yes, but the texture will be slightly denser. To make a cake flour substitute, take 2 ½ cups of all-purpose flour, remove 5 tablespoons, and replace them with 5 tablespoons of cornstarch. Sift this mixture together several times before using.
2. My food coloring turned the batter greenish! What happened?
This is usually due to the type of cocoa powder. Natural cocoa powder is more acidic and can react with the food coloring. For a truer, deeper blue, use Dutch-processed cocoa powder which is neutral.
3. Can I make this cake ahead of time?
Absolutely. You can bake the layers, wrap them tightly, and freeze them for up to 3 months. The frosted cake also keeps beautifully in the fridge for several days.
4. Why do I need to use both vinegar and baking soda?
The vinegar reacts with the baking soda, creating bubbles that give the cake an extra lift and contribute to its signature tender, fine crumb.
5. My frosting is runny. How can I fix it?
Runny frosting is often caused by the cream cheese or butter being too warm. Immediately pop the bowl of frosting into the refrigerator for 20-30 minutes to firm up, then re-whip it before using.
Blue Velvet Cake with Cream Cheese Frosting
| Prep Time: 45 minutes | Cook Time: 30 minutes |
| Total Time: 1 hour 15 minutes (plus chilling) | Servings: 12 slices |
| Category: Dessert | Cuisine: American |
| Difficulty: Intermediate | Yield: One 3-layer 9-inch cake |
Ingredients
For the Cake:
-
2½ cups (300g) sifted cake flour
-
½ teaspoon (3.5g) salt
-
2 tablespoons (15g) cocoa powder
-
½ cup (113g) unsalted butter, at room temperature
-
1½ cups (300g) granulated sugar
-
½ cup (120g) sour cream, at room temperature
-
¾ cup (180g) neutral oil (like canola or vegetable)
-
3 large eggs, at room temperature
-
½ cup (120ml) buttermilk, at room temperature
-
1 tablespoon (15ml) white vinegar
-
2 teaspoons (10ml) vanilla extract
-
2 tablespoons (30ml) royal blue food coloring
-
½ teaspoon (2.5ml) violet food coloring
-
1 teaspoon (5g) baking powder
-
1 teaspoon (6g) baking soda
-
2 teaspoons (10ml) water
For the Cream Cheese Frosting:
-
10 tablespoons (142g) unsalted butter, at room temperature
-
10 ounces (285g) full-fat cream cheese, at room temperature
-
1½ teaspoons (7ml) vanilla extract
-
6 cups (720g) powdered sugar, sifted
Instructions
-
Prepare Dry Ingredients: In a medium bowl, whisk together the sifted cake flour, salt, and cocoa powder. Set aside.
-
Prepare Pans & Oven: Preheat oven to 350°F (177°C). Grease three 9-inch round cake pans and line the bottoms with parchment paper rounds.
-
Cream Butter & Sugar: In the bowl of a stand mixer fitted with the paddle attachment, cream the butter and granulated sugar together on high speed for 4-5 minutes, until light, fluffy, and pale in color.
-
Add Wet Ingredients: Mix in the sour cream until combined. With the mixer on medium, slowly stream in the oil. Add the eggs one at a time, beating well after each addition and scraping down the bowl as needed.
-
Combine Liquids & Color: Reduce mixer speed to low. Add the buttermilk, vinegar, and vanilla extract. Then, add the blue and violet food colorings until the desired vibrant color is achieved.
-
Incorporate Dry Ingredients: Gradually add the dry flour mixture to the wet ingredients, mixing on low until just combined. Do not overmix.
-
Add Leavening Paste: In a small dish, stir the baking soda and baking powder with the 2 teaspoons of water to form a paste. Gently fold this into the batter by hand until fully incorporated.
-
Bake: Divide the batter evenly between the three prepared pans. Tap the pans firmly on the counter a few times to release air bubbles. Bake for 25-30 minutes, or until a toothpick inserted into the center comes out clean.
-
Cool & Chill: Let the cakes cool in their pans for 10-15 minutes. Then, invert them onto a wire rack to cool completely. Once cool, wrap tightly in plastic wrap and refrigerate for at least 1 hour, or preferably overnight.
-
Make Frosting: Using an electric mixer, beat the room-temperature butter and cream cheese together until completely smooth. Beat in the vanilla extract. With the mixer on low, gradually add the sifted powdered sugar until incorporated, then increase speed to high and whip until smooth and fluffy.
-
Assemble: Level the chilled cake layers if needed. Place one layer on a cake stand. Spread with ¾ to 1 cup of frosting. Repeat with the second layer. Top with the final layer. Apply a thin crumb coat over the entire cake, chill for 20 minutes, then frost with the remaining frosting.
The Final Touches: Frosting and Assembly
This is where your masterpiece comes together. Take your chilled, firm cake layers from the refrigerator. If any of them have a slight dome, use a long, serrated knife to gently slice off the very top to create a perfectly flat surface. This step is what gives a professional, stable finish.
Place the first layer, cut-side up, on your cake stand or serving plate. An even base is crucial. Using an offset spatula, spread a generous and even layer of frosting—about ¾ to 1 cup—all the way to the edges. The chill on the cake will help it hold firm against the pressure. Carefully place the second layer on top, pressing down gently, and repeat the process with another layer of frosting.
For the final layer, place it top-side down. This ensures the bottom of the cake, which is naturally the flattest, becomes your new top, giving you a perfectly level canvas. At this point, many bakers apply a “crumb coat”—a very thin layer of frosting that seals in any loose crumbs. Don’t worry about how it looks; this is just the foundation. Once the entire cake has this thin seal, pop it back into the refrigerator for about 20 minutes to let the frosting set.
After the crumb coat is firm, take it out and apply the final, lavish layer of your remaining cream cheese frosting. Use your spatula to create beautiful swirls and swoops on the top and sides. For an elegant finish, you can pipe simple rosettes or shells around the top edge. If you have any cake trimmings from leveling the layers, you can pulse them into crumbs in a food processor and press them gently onto the sides for a stunning, textured effect.
A Labor of Love, Worth Every Second
There’s a special kind of pride that comes from placing a homemade layer cake on the table. This Blue Velvet Cake, with its breathtaking color and sublime texture, is the ultimate expression of that pride. It’s a recipe that asks for a little patience—especially with chilling the layers—but rewards you tenfold with a dessert that is as unforgettable in flavor as it is in appearance. It’s more than just a treat; it’s a creation, a centerpiece, and a guaranteed memory-maker. So preheat your oven, and get ready to bake a little magic.
Notes
-
No Cake Flour? Make a substitute: take 2½ cups of all-purpose flour, remove 5 tablespoons, and add 5 tablespoons of cornstarch. Sift together several times before using.
-
Oven Variances: If your oven runs hot, check the cakes for doneness at the 25-minute mark.
-
Chilling is Vital: Refrigerating the cooled cakes (overnight is best) is the key to easy, crumb-free frosting.
-
Nutritional information is a rough estimate and will vary based on specific ingredients used.