Coconut Cake with Seven-minute Frosting
Table of Contents
ToggleCoconut Cake with Seven-minute Frosting Recipe: A Light, Cloud-Like Classic
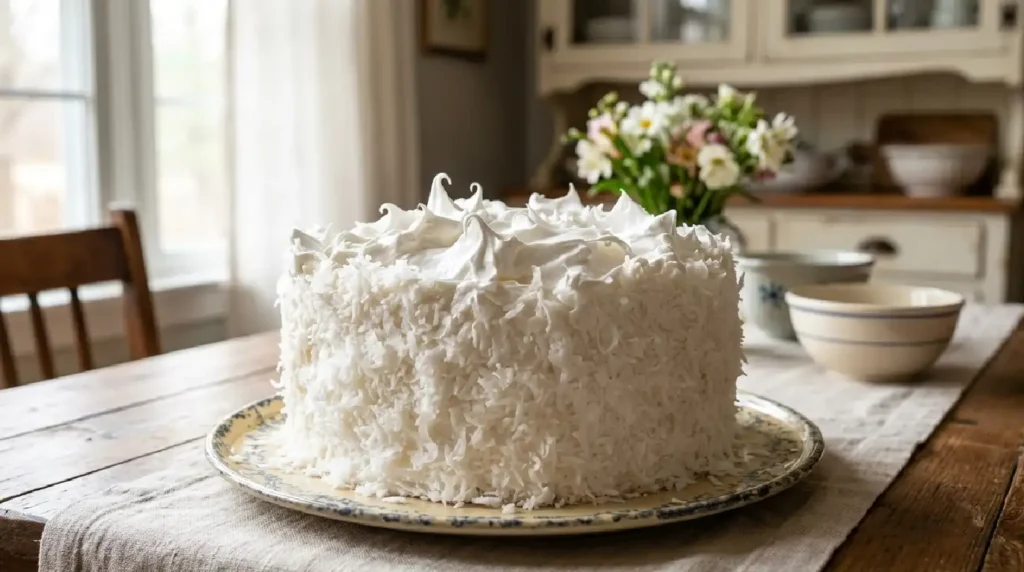
There’s something magical about the combination of tender coconut cake layers topped with billowing seven-minute frosting. This isn’t just another dessert—it’s the kind of cake that transports you to Sunday dinners at your grandmother’s house, with its delicate crumb, subtle coconut flavor, and that distinctive marshmallow-like frosting that seems to defy gravity. The seven-minute frosting has a particular charm: it’s whipped to glossy perfection over gentle heat, creating peaks and valleys that catch the light. One bite and you’ll understand why this vintage classic never really goes out of style.
This coconut cake with seven-minute frosting appeals to those who appreciate gentle flavors and beautiful presentation. It’s approachable enough for a weeknight bake but impressive enough to anchor your dessert table.
Why You’ll Love This
- The frosting whips up in minutes and needs no powdered sugar or butter, making it surprisingly light and less sweet than traditional icings
- Moist, tender crumb that stays soft for days, thanks to the coconut milk and sweetened coconut in the batter
- A showstopper presentation with that signature seven-minute frosting peak and shredded coconut coating
- No special equipment needed beyond a mixer—everything you likely have in your kitchen works perfectly
- Nostalgic flavor that appeals to nearly every palate, from coconut lovers to those who just appreciate good, honest cake
The Backstory
I’ll never forget bringing this cake to a family gathering where my brother-in-law—notorious for picking at desserts and leaving most on his plate—came back for a second slice. He stood in the kitchen, fork in hand, genuinely surprised by how light and not-overly-sweet it was. “This is nothing like those dense, coconutty things I usually avoid,” he said. That moment crystallized why I keep making this recipe. It’s proof that sometimes the most elegant solutions come from simplicity. The delicate coconut flavor and that marshmallow frosting don’t compete; they exist in quiet harmony.
What Makes It Special
- Coconut milk in the batter: Creates inherent moisture and a subtle, rounded coconut note that doesn’t overpower
- Sweetened shredded coconut: Folded into the dry ingredients for texture and flavor distribution throughout each bite
- The seven-minute frosting: Whipped egg whites, sugar, and cream of tartar create a frosting that’s fluffy, stable, and only slightly sweet
- The technique: Unlike buttercream, this frosting relies on the emulsion of whipped egg whites to achieve its cloud-like texture, making it less heavy than alternatives
- Coconut flake toasting: Toasting coconut flakes for the exterior adds a golden, nutty dimension that fresh coconut can’t quite deliver
Making It Happen
Start by preparing your pans. Grease two nine-inch round cake pans and line the bottoms with parchment paper. Set your oven to 350°F and let it come to temperature while you gather your ingredients.
In a small bowl, whisk together your flour, baking powder, baking soda, and salt. This combination ensures an even rise without any metallic taste from excess baking soda. Set this aside.
In a large mixing bowl, cream your softened butter and sugar together until the mixture turns pale and fluffy, about three to four minutes. This step is non-negotiable; don’t rush it. The air pockets you’re creating become the structure of your cake. Add your eggs one at a time, beating well after each addition. Once all the eggs are incorporated, add your vanilla extract and a splash of your coconut milk to keep the mixture loose.
Alternate adding your dry ingredients and the remaining coconut milk to your wet mixture, starting and ending with the dry ingredients. Begin with a third of the flour mixture, then half the coconut milk, then another third of the flour, the remaining coconut milk, and finally the last of the flour mixture. Mix on low speed, just until combined after each addition. The moment everything is incorporated, stop. Overmixing toughens the crumb.
Fold in your sweetened shredded coconut gently by hand with a rubber spatula. Divide the batter evenly between your prepared pans, smooth the tops with an offset spatula, and slide them into the oven.
The cakes will bake for thirty-five to forty minutes, until the tops are golden and a toothpick inserted into the center comes out with just a few moist crumbs. They should spring back lightly when touched. Remove them from the oven and let them rest in their pans for about ten minutes, then turn them out onto cooling racks to cool completely. This step matters—if your cakes are still warm when you frost them, the frosting will melt and slide right off.
While your cakes cool, prepare the frosting. In a heatproof bowl, combine your egg whites, sugar, cream of tartar, and a pinch of salt. Set this bowl over a pot of gently simmering water, making sure the bottom doesn’t touch the water. Whisk constantly for about seven minutes—yes, that’s the actual origin of the name. You’re looking for the sugar to dissolve completely and the mixture to feel warm to the touch (around 160°F if you have a thermometer).
Once warmed, transfer the bowl to your mixer fitted with the whip attachment. Beat on high speed for about five minutes, until stiff peaks form and the mixture is glossy and white. This frosting should look like it could hold a shape all on its own—because it can.
Frost your cake once both layers have cooled to room temperature. Place one layer on your cake plate or stand, spread a generous amount of frosting over the top, then carefully place your second layer on top. Frost the entire cake, swirling the frosting into peaks and valleys as you go. This isn’t the place for a perfectly smooth finish; those rustic peaks are part of the charm.
Toast your coconut flakes in a dry skillet over medium heat, stirring often, until golden and fragrant, about three to five minutes. Once cooled slightly, press the toasted coconut onto the sides and top of your frosted cake. It’ll stick beautifully to the frosting and adds both texture and visual appeal.
You Must Know
- The frosting is stability-dependent on the sugar being completely dissolved during the warming stage; if you skip the heat step, you’ll end up with grainy frosting
- Egg whites must be impeccably clean and free of any yolk—even a tiny speck will prevent proper whipping
- Room temperature ingredients are essential for the cake batter; cold eggs won’t incorporate smoothly and can result in a separated mixture
- The cake tastes even better on the second day once the crumb has had time to set and the flavors have melded
- Don’t attempt this frosting on a humid day; the moisture in the air can prevent it from reaching stiff peaks
Serving Ideas & Pairings
Serve generous slices with a cup of strong black coffee or a delicate white tea. The contrast between the coconut’s subtle sweetness and the beverage’s slight bitterness is perfect. For a more festive occasion, pour a splash of champagne alongside, or offer a simple vanilla ice cream on the side to play up the frosting’s marshmallow-like quality. Fresh fruit—berries, sliced pineapple, or even poached pears—can add brightness without overwhelming the cake’s gentle flavor.
Make It Different
For a chocolate version: Replace half a cup of flour with unsweetened cocoa powder to create a chocolate-coconut layer cake. The seven-minute frosting pairs beautifully with this adaptation.
For dairy-free: Use a quality plant-based butter in the cake batter and increase the coconut milk slightly to maintain moisture. The frosting itself is naturally dairy-free but does require eggs.
For extra coconut intensity: Toast the coconut flakes before folding them into the batter, or add a teaspoon of coconut extract to the batter alongside the vanilla.
For a smaller cake: Halve the recipe and bake in two six-inch rounds, reducing bake time to twenty-five to thirty minutes.
For cupcakes: This batter divides perfectly among two dozen cupcake liners. Reduce baking time to eighteen to twenty-two minutes, then frost each cake individually for impressive individual servings.
Storage & Reheating
Store your finished cake in an airtight container at room temperature for up to three days. The frosting holds up well and the cake crumb stays moist thanks to the coconut milk and shredded coconut in the batter. For longer storage, wrap the unfrosted cake layers tightly in plastic wrap and freeze for up to three months. Thaw at room temperature before frosting.
If you prefer to freeze the frosted cake, do so carefully; the seven-minute frosting can be delicate. Place the whole cake on a plate in the freezer for two hours, then wrap it well in plastic wrap and freeze for up to two weeks. Thaw overnight in the refrigerator before serving.
To refresh a slice of cake that’s a day old, you don’t need to reheat it—simply serve it cold or at room temperature. If you prefer it warmed slightly, wrap it loosely in foil and place in a 250°F oven for about five minutes to take the chill off without drying it out.
Success Tips
The seven-minute frosting deserves particular attention. Some recipes call for the entire process to happen over direct heat; this approach risks scrambling the egg whites if you’re not careful. The gentle steam bath method I’ve outlined gives you better control and a creamier final product.
When folding the coconut into the cake batter, use a gentle hand. A rubber spatula and deliberate folding motions preserve the air you worked so hard to incorporate. A rough stirring motion with a wooden spoon can deflate your carefully whipped batter.
The frosting is best applied when both the frosting and cake are at room temperature. Cold frosting becomes stiff and tears the tender crumb; warm frosting slides around without holding its peaks.
If your frosting breaks or becomes grainy after a few minutes, don’t panic. Place the bowl back over the warm water bath and whisk gently for a minute, then return to the mixer. This usually restores the frosting to its glossy state.
Frequently Asked Questions
Can I make this cake without eggs?
Unfortunately, this particular recipe relies on eggs for both structure in the cake and as the base of the frosting. If you need an egg-free version, you could create a coconut cake using applesauce or flax eggs as a binder, but you’d need to use a different frosting—perhaps a simple powdered sugar buttercream or dairy-free whipped frosting.
How long does the seven-minute frosting actually last?
Despite its name, you won’t spend a full seven minutes whipping the frosting at the end—that time refers to the heating phase. Once whipped and applied to the cake, the frosting is best eaten the day it’s made or the following day. It’s stable enough for a few hours at room temperature and doesn’t require refrigeration, but the texture becomes slightly denser over time as the air slowly escapes.
What can I use instead of fresh egg whites?
Pasteurized egg whites from a carton work fine and remove any food safety concerns. Avoid meringue powder or powdered egg whites; they won’t whip to the same fluffy consistency. If using pasteurized liquid egg whites, you may need slightly less liquid since the carton versions are sometimes watered down.
Can I add lemon zest or pineapple to this recipe?
Absolutely. A tablespoon of lemon zest added to the batter brightens the coconut flavor beautifully, or you could add half a cup of crushed fresh pineapple (drained well to avoid excess moisture) for a tropical twist. Both of these additions pair naturally with coconut.
What if my frosting is grainy or won’t form peaks?
Graininess usually means the sugar didn’t fully dissolve during the heating phase. Ensure you’re whisking constantly over the gentle heat for the full time until no sugar crystals remain. If peaks won’t form, your bowl or whip attachment may have a trace of oil or grease; wash them thoroughly and try again with a clean bowl and beaters. Even the smallest amount of fat prevents egg whites from whipping properly.
Recipe Card Info
Prep time: 20 minutes
Cook time: 38 minutes
Total time: 2 hours 30 minutes (includes cooling and frosting assembly)
Servings: 10-12 servings
Category: Dessert
Difficulty: Intermediate
Cuisine: American
Yield: One 9-inch two-layer cake
Equipment:
- Two 9-inch round cake pans
- Parchment paper
- Measuring cups and spoons
- Mixing bowls
- Electric mixer with whip attachment
- Rubber spatulas
- Offset spatula
- Cooling racks
- Heatproof bowl
- Pot for water bath
- Skillet for toasting coconut
Ingredients
For the Cake:
- 2 and 1/4 cups all-purpose flour
- 1 and 1/2 teaspoons baking powder
- 1/2 teaspoon baking soda
- 1/2 teaspoon salt
- 1/2 cup unsalted butter, softened to room temperature
- 1 and 1/2 cups granulated sugar
- 3 large eggs, room temperature
- 1 teaspoon vanilla extract
- 3/4 cup unsweetened coconut milk
- 3/4 cup sweetened shredded coconut
- 1 cup unsweetened shredded coconut (for toasting and coating)
For the Seven-Minute Frosting:
- 3 large egg whites, room temperature
- 3/4 cup granulated sugar
- 1/4 teaspoon cream of tartar
- Pinch of salt
- 1/2 teaspoon vanilla extract
Directions
Step 1: Prepare Your Pans
Preheat your oven to 350°F. Grease two nine-inch round cake pans with butter or cooking spray, then line the bottoms with parchment paper. Set the pans aside.
Step 2: Mix Your Dry Ingredients
In a small mixing bowl, whisk together the flour, baking powder, baking soda, and salt. Set this mixture aside; it’s important that these ingredients are evenly distributed before combining with the wet mixture.
Step 3: Cream Butter and Sugar
In a large mixing bowl, beat the softened butter and granulated sugar together until the mixture is pale and fluffy, approximately three to four minutes. This creates the air pockets that give your cake its tender crumb. Scrape down the sides of the bowl as needed.
Step 4: Incorporate Eggs
Add your room temperature eggs one at a time to the butter mixture, beating well after each addition. This process takes about a minute per egg. Once all eggs are incorporated, add the vanilla extract and mix until combined.
Step 5: Alternate Wet and Dry Ingredients
Add half of your coconut milk to the butter mixture and stir on low speed until just combined. Add one-third of the flour mixture and mix gently. Continue alternating, ending with the flour mixture. The final sequence goes: half the coconut milk, half the remaining flour, the last of the coconut milk, then the final flour. Mix only until just combined after each addition; overmixing develops gluten and toughens the cake.
Step 6: Fold in Coconut
Using a rubber spatula, gently fold the sweetened shredded coconut into the batter by hand. This preserves the air in the batter better than machine mixing.
Step 7: Divide and Bake
Divide the batter evenly between your prepared pans. Smooth the tops with an offset spatula. Place the pans in your preheated oven and bake for thirty-five to forty minutes, until the tops are golden brown and a toothpick inserted in the center comes out with just a few moist crumbs.
Step 8: Cool the Cakes
Remove the pans from the oven and let them rest for ten minutes. Turn the cakes out onto cooling racks and allow them to cool completely before frosting, about one to one and a half hours.
Step 9: Prepare the Frosting Base
While the cakes cool, combine the egg whites, sugar, cream of tartar, and salt in a heatproof bowl. Set this bowl over a pot of gently simmering water, making sure the bottom doesn’t touch the water.
Step 10: Heat the Frosting
Whisk the frosting base constantly over the gentle heat for approximately seven minutes. You’re dissolving the sugar and gently warming the egg whites. The mixture should feel warm to the touch; if you have a thermometer, it should register around 160°F. Once warmed, remove from the heat.
Step 11: Whip the Frosting
Transfer the warm frosting mixture to your mixer fitted with the whip attachment. Beat on high speed for about five minutes, until stiff peaks form and the frosting is glossy, white, and thick. Add the vanilla extract in the final minute of whipping.
Step 12: Toast the Coconut
While the frosting whips, place the unsweetened shredded coconut in a dry skillet over medium heat. Toast, stirring frequently, until golden and fragrant, about three to five minutes. Be careful not to let it burn. Pour onto a plate to cool.
Step 13: Frost the Cake
Place one cooled cake layer on your cake plate or stand. Spread a generous amount of frosting over the top with an offset spatula. Carefully place the second cake layer on top, then frost the top and sides of the entire cake. Swirl and create peaks in the frosting for visual interest.
Step 14: Coat with Coconut
Press the toasted coconut onto the sides of the cake, then sprinkle it over the top. The frosting is tacky enough to hold the coconut in place.
Step 15: Serve
Allow the frosted cake to sit at room temperature for at least thirty minutes before slicing to allow the frosting to set. Serve with coffee or tea.
Notes
The seven-minute frosting is best enjoyed the day it’s made or the day after. While it won’t spoil, the texture becomes denser as the air slowly escapes over a few days.
If you don’t have unsweetened coconut milk, use full-fat canned coconut milk or a quality carton version. Avoid light coconut milk, which won’t provide enough richness or moisture.
The frosting contains raw or pasteurized egg whites. Use only pasteurized eggs or liquid pasteurized egg whites if you have concerns about food safety with raw eggs.
For a more pronounced coconut flavor, toast the sweetened shredded coconut before folding it into the batter. This adds a subtle nuttiness that complements the seven-minute frosting beautifully.
Nutrition
Per serving (based on 12 servings):
- Calories: 385
- Protein: 4g
- Carbohydrates: 52g
- Fat: 18g
- Saturated Fat: 12g
- Unsaturated Fat: 6g
- Cholesterol: 78mg
- Sodium: 280mg
- Fiber: 1g
- Sugar: 42g
Note: Nutrition information is estimated based on standard ingredients and does not account for variations or substitutions.