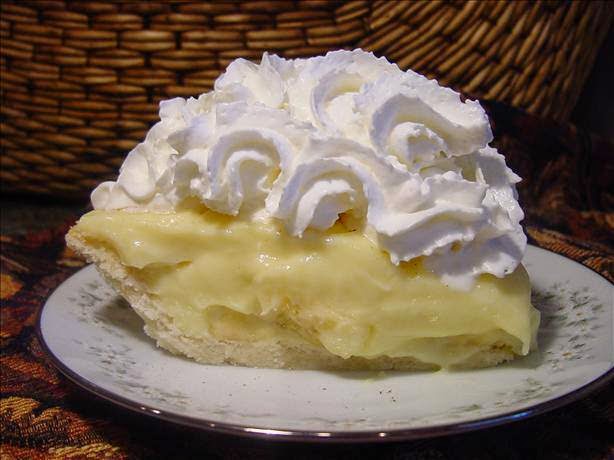
Banana Cream Pie
Ultimate Banana Cream Pie: A Creamy, Dreamy Dessert
There’s something magical about a well-made Banana Cream Pie—the velvety custard, the sweet bananas, the flaky crust, and the billowy whipped cream on top. It’s the kind of dessert that makes you close your eyes with the first bite, savoring the creamy, buttery-smooth filling against the crisp, golden crust.
I first fell in love with this pie at a small-town diner years ago. The waitress, a no-nonsense woman with a knowing smile, slid a slice across the counter and said, “You’ll dream about this one.” She was right. After many attempts (and a few custard disasters), I perfected this recipe—rich, luscious, and just sweet enough—with layers of fresh bananas and a touch of toasted almonds for crunch.
Why You’ll Love This Banana Cream Pie
✔ Creamy, dreamy texture—The custard is silky-smooth, with just the right amount of sweetness.
✔ Perfect balance—Fresh bananas cut through the richness, while the flaky crust adds contrast.
✔ Impressive but easy—Looks like a bakery masterpiece but is surprisingly simple.
✔ Crowd-pleaser—A nostalgic dessert that wins over everyone, from kids to grandparents.
✔ Versatile—Dress it up with toppings or keep it classic.
The Picky Eater Who Fell in Love
My nephew, a self-proclaimed “dessert skeptic”, once turned his nose up at anything that wasn’t chocolate. But when I set a slice of this pie in front of him, he took one bite… then another… and finally asked for seconds. “It’s like banana pudding but fancier,” he declared. Now, it’s the only dessert he requests.
What Makes It Special
✨ Homemade custard—No instant pudding here! A rich, from-scratch filling makes all the difference.
✨ Fresh bananas—Layered in for natural sweetness and a fresh, fruity contrast.
✨ Toasted almonds—Adds a nutty crunch that elevates every bite.
✨ Real whipped cream—Light, airy, and infinitely better than store-bought.
Making It Happen
Step 1: The Perfect Crust
Start with a pre-baked, flaky pie crust (I love Marie Callender’s for convenience). Let it cool completely so it stays crisp under the custard.
Step 2: The Luscious Custard
In a saucepan, whisk together sugar, cornstarch, and salt. Slowly pour in the half-and-half and egg yolks, whisking until smooth. Cook over medium-low heat, stirring constantly, until it thickens into a glossy, pudding-like consistency. Off the heat, stir in butter and vanilla for extra richness.
Step 3: Layering Magic
Pour a thin layer of custard into the crust, then add a single layer of banana slices. Repeat, finishing with custard on top. This ensures every bite has creamy custard and fresh banana.
Step 4: Chill & Top
Refrigerate for at least 4 hours (patience is key!). Before serving, whip the cream with powdered sugar and vanilla until soft peaks form, then spread it generously over the pie. A sprinkle of toasted almonds adds the perfect crunch.
You Must Know
✔ Prevent banana browning—Toss slices in a little lemon juice or Fruit-Fresh before layering.
✔ Chill thoroughly—This ensures clean slices and perfect texture.
✔ Use cold cream—For the fluffiest whipped topping, chill your bowl and beaters first.
Serving Ideas
🍽 Pair with: A hot cup of coffee, cold milk, or a drizzle of caramel sauce.
🎉 Great for: Potlucks, birthdays, or a comforting weekend treat.
Make It Different
🌱 Dairy-free? Use coconut milk and vegan butter.
🍫 Chocolate twist—Add a layer of chocolate ganache under the custard.
🍌 Extra banana flavor—Brush the crust with melted banana liqueur before filling.
Storage & Reheating Tips
❄ Fridge: Store covered for up to 2 days (bananas may darken slightly).
✋ Freezing: Not recommended—the custard can become watery.
Success Tips
🔹 Whisk constantly while cooking the custard to avoid lumps.
🔹 Cool custard slightly before pouring into the crust to prevent sogginess.
🔹 Slice bananas thick so they hold up in the layers.
FAQs
Q: Can I use store-bought whipped cream?
A: Yes! Swap in 2-3 cups of pre-made whipped topping if short on time.
Q: Why did my custard turn lumpy?
A: It may have cooked too fast. Strain it through a sieve before using.
Q: Can I make this ahead?
A: Yes, but add whipped cream just before serving for the best texture.
Q: How do I prevent a soggy crust?
A: Ensure the crust is fully cooled before filling.
Q: Can I use frozen bananas?
A: Fresh is best—frozen bananas can make the pie watery.
Banana Cream Pie Recipe Card
Prep Time: 20 mins
Cook Time: 15 mins
Total Time: 4 hrs 35 mins (includes chilling)
Category: Dessert
Difficulty: Intermediate
Cuisine: American
Yield: 8 servings
Ingredients
For the Pie:
-
1 pre-made pie crust (I use Marie Callender’s)
-
½ cup + 2 tbsp granulated sugar
-
¼ cup cornstarch
-
¼ tsp salt
-
2½ cups half-and-half
-
5 egg yolks
-
2 tbsp butter
-
2 tsp vanilla
-
3 bananas, sliced
-
Sliced almonds (for garnish)
Whipped Topping:
-
1 cup heavy cream
-
2 tbsp powdered sugar
-
1 tsp vanilla
Instructions
-
Bake pie crust according to package directions; let cool.
-
In a saucepan, whisk sugar, cornstarch, and salt. Gradually whisk in half-and-half and egg yolks until smooth.
-
Cook over medium-low heat, stirring constantly, until thickened (5-6 mins). Remove from heat; stir in butter and vanilla. Cool 10 mins.
-
Layer ¼ custard in crust, then bananas. Repeat, ending with custard.
-
Chill 4 hours.
-
Whip cream, powdered sugar, and vanilla to soft peaks. Spread over pie; garnish with almonds.
-
Serve same day for best texture.
Notes
-
Substitute: Use store-bought whipped cream if needed.
-
Prevent browning: Toss bananas in lemon juice before layering.
Tools You’ll Need
-
Mixing bowls
-
Whisk
-
Saucepan
-
Stand mixer or hand mixer
Allergy Info
Contains: Dairy, eggs, gluten, tree nuts (almonds).
Nutrition (per serving)
Calories: 380 | Fat: 22g | Carbs: 42g | Protein: 5g