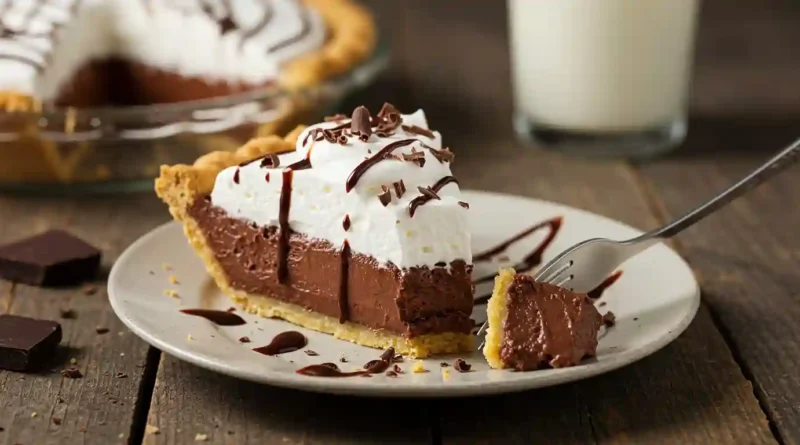
Chocolate Cream Pie
Decadent Chocolate Cream Pie: A Silky, Dreamy Dessert You’ll Crave
There’s something magical about a perfectly made Chocolate Cream Pie—the kind that makes forks pause mid-air and eyes widen in delight. The first time I made this pie, it was for a family gathering where my notoriously picky uncle (who never eats dessert) took one bite, then another… and then asked for the recipe. That’s when I knew this wasn’t just any pie—it was a showstopper.
With a velvety chocolate filling, cloud-like whipped cream, and a buttery, flaky crust, every bite is pure indulgence. Whether it’s for a holiday table, a summer barbecue, or just because you deserve it, this pie delivers rich, creamy satisfaction in every slice.
Why You’ll Love This Chocolate Cream Pie
-
Silky & Luxurious – The filling is impossibly smooth, blending melted chocolate, cocoa, and cream cheese for deep, balanced flavor.
-
Easy Yet Impressive – No fancy techniques needed, but it looks and tastes like it came from a bakery.
-
Make-Ahead Friendly – Chill it overnight for stress-free entertaining.
-
Crowd-Pleasing – Wins over chocolate lovers, skeptics, and even self-proclaimed “non-dessert” people.
-
Customizable – Swap the crust, adjust sweetness, or add toppings to make it your own.
The Unexpected Fan
My uncle, a man of few words and even fewer sweet indulgences, took a hesitant bite at Thanksgiving. By his third forkful, he was asking for the recipe—and seconds. That’s the power of this pie: it turns even the most reluctant dessert-eaters into believers.
What Makes It Special
-
Real Chocolate & Cocoa – A double dose of chocolate (semi-sweet chips and cocoa powder) ensures deep, rich flavor.
-
Cream Cheese Secret – Adds tangy richness and helps the filling set perfectly.
-
Homemade Whipped Cream – Light, sweet, and miles better than store-bought.
-
Buttery Crust – A crisp, golden base that balances the creamy filling.
Making It Happen
-
Bake the Crust – Start with a deep-dish pie crust, pricked with a fork or weighted with beans to prevent bubbles. Bake until golden, then let it cool.
-
Whip the Cream – Beat heavy cream and powdered sugar until stiff peaks form. Chill this fluffy goodness for later.
-
Create the Filling – In a bowl, blend softened cream cheese, cocoa powder, and powdered sugar until smooth. Melt butter and chocolate chips (in short microwave bursts), then mix into the cream cheese base.
-
Fold in the Magic – Gently stir in 3 cups of whipped cream—this keeps the filling light yet luscious.
-
Assemble & Chill – Spread the filling into the crust, then refrigerate for 4 hours (or overnight). Before serving, crown it with the remaining whipped cream and chocolate shavings for elegance.
You Must Know
✔ Use pie weights – Or dried beans to keep the crust flat while baking.
✔ Soft cream cheese is key – No lumps = silky filling.
✔ Chill thoroughly – Letting it set ensures clean slices.
✔ Extra chocolate? Yes! – Drizzle with ganache or sprinkle with sea salt for flair.
Serving Ideas
-
Pair with espresso, cold milk, or a glass of red wine for contrast.
-
Garnish with fresh berries, toasted nuts, or caramel sauce.
-
Serve alongside vanilla ice cream for an over-the-top dessert.
Make It Different
-
Gluten-Free? Use an almond flour crust or Oreo crust.
-
Lighter Option Swap heavy cream for coconut cream (chill the can first).
-
Flavor Twists Add a splash of bourbon, orange zest, or instant espresso to the filling.
Storage & Reheating Tips
-
Fridge – Keeps for 3–4 days covered.
-
Freezer – Wrap tightly; freeze for up to 1 month (thaw in fridge).
-
Whipped Cream Tip – Add fresh whipped cream just before serving for best texture.
Success Tips
-
Chill your mixing bowl before whipping cream for faster, fluffier peaks.
-
For clean slices, dip your knife in hot water before cutting.
-
If using store-bought whipped topping, opt for extra creamy versions.
Frequently Asked Questions
1. Can I use a graham cracker crust instead?
Absolutely! A chocolate cookie crust would be delicious too.
2. Why is my filling lumpy?
Your cream cheese wasn’t fully softened—microwave it for 10 seconds to help smooth it out.
3. Can I make this dairy-free?
Yes! Use coconut cream, vegan cream cheese, and dairy-free chocolate.
4. How do I prevent a soggy crust?
Let the baked crust cool completely before adding filling.
5. Can I skip the whipped cream topping?
Sure, but it adds texture and balance—try a dusting of cocoa powder instead.
Chocolate Cream Pie Recipe
Prep Time: 20 mins
Cook Time: 10 mins (crust)
Total Time: 4 hrs 30 mins (includes chilling)
Category: Dessert
Difficulty: Easy
Cuisine: American
Yield: 1 (9-inch) pie
Ingredients
Whipped Cream
-
3 cups heavy whipping cream
-
⅓ cup powdered sugar
Chocolate Filling
-
4 tbsp unsalted butter
-
4 oz semi-sweet chocolate chips
-
1½ cups powdered sugar
-
½ cup cocoa powder
-
1 (8 oz) pkg cream cheese, softened
-
3 cups prepared whipped cream (reserve rest for topping)
-
1 (9-inch) deep-dish pie crust, baked
Instructions
-
Bake the crust according to package directions, using pie weights or pricking with a fork to prevent bubbling. Cool completely.
-
Make whipped cream: Beat heavy cream and powdered sugar until stiff peaks form (about 5 mins). Chill.
-
Prepare filling: Beat cream cheese, cocoa powder, and powdered sugar until smooth.
-
Melt chocolate & butter in microwave (30 sec bursts, stirring between), then mix into cream cheese mixture.
-
Fold in 3 cups whipped cream until fully combined. Spread into crust.
-
Chill 4+ hours. Top with remaining whipped cream and chocolate shavings before serving.
Notes
-
For a time-saver, use store-bought whipped topping.
-
Let pie set fully for the cleanest slices.