Chocolate Fudge Layer Cake
The Ultimate Chocolate Fudge Layer Cake Recipe: Decadent, Rich, and Foolproof
There is something almost magnetic about a chocolate cake sitting on a kitchen counter. Not just any cake, but the kind that looks heavy, dark, and unapologetically indulgent. This Chocolate Fudge Layer Cake is the result of years of searching for that perfect balance between a tight, fudgy crumb and a frosting so silky it feels like velvet.
The first time I pulled these layers out of the oven, the kitchen filled with the scent of deep cocoa and toasted sugar. It’s a recipe that demands you slow down. Between the simmering ganache and the whipped Swiss-style buttercream, it’s as much an experience to make as it is to eat. Whether it’s for a milestone birthday or just a Tuesday that needs a little more joy, this cake is the gold standard.
Why You’ll Love This
-
The Texture: Unlike airy sponges, this cake has a dense, fudge-like quality that stays moist for days thanks to the sour cream.
-
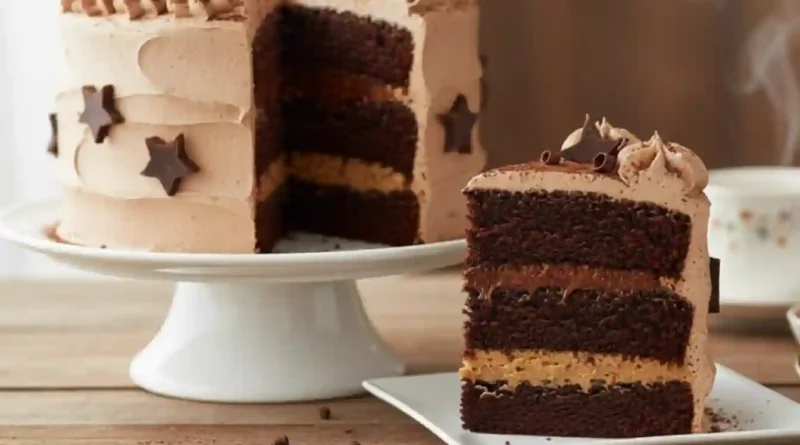
Three Layers of Chocolate: You aren’t just getting cake; you’re getting a deep chocolate crumb, a silky ganache, and a cloud-like buttercream.
-
Professional Results at Home: The assembly method using a springform pan ensures your layers are perfectly straight and your filling stays exactly where it should.
The Skeptic’s Favorite
I once served this to a close friend who claimed she “wasn’t really a dessert person.” She’d usually take a polite sliver of cake at parties and leave half of it on the plate. When I handed her a slice of this Chocolate Fudge Layer Cake, she took one bite, stopped talking, and finished the entire piece before I’d even sat down. She later confessed it was the first time a cake actually tasted as rich as it looked, without being cloyingly sweet. Now, it’s the only thing she asks me to bring to dinner parties.
What Makes It Special
-
Unsweetened Chocolate: By using pure chocolate in the batter rather than just cocoa powder, we achieve a much more intense, authentic fudge flavor.
-
The “Bloom” Effect: Adding near-boiling water at the end of the batter process helps the chocolate flavor expand and ensures a silky, pourable consistency.
-
Instant Coffee Powder: A secret weapon in chocolate baking; it doesn’t make the cake taste like coffee, but it makes the chocolate taste infinitely more like itself.
-
Real Egg-White Buttercream: This isn’t your standard powdered sugar frosting. By heating egg whites and sugar, we create a base that is incredibly smooth and light, perfectly offsetting the heavy fudge layers.
Making It Happen
The process begins with melting your unsweetened chocolate until it’s glossy and smooth. In your mixer, you’ll spend a good amount of time beating the butter and brown sugar—this isn’t a step to rush, as that aeration builds the cake’s structure. As you add the eggs one by one, the mixture becomes a pale, thick cream. You’ll alternate your dry ingredients with sour cream, finishing with a splash of hot water that transforms the batter into a dark, fragrant liquid.
While the cakes bake and cool, you’ll prepare two distinct finishes. The ganache is simple but luxurious: boiling cream poured over semisweet chocolate. The buttercream is more of a craft, requiring you to gently whisk egg whites over a double boiler until they reach $120°F$ before whipping them into stiff, snowy peaks and folding in rich butter and melted chocolate.
Assembly is where the magic is held together. By using the ring of a springform pan as a guide, you stack the layers, alternating between the airy buttercream and the dense ganache. A stint in the freezer sets everything in place, allowing you to remove the ring and reveal a perfectly cylindrical masterpiece ready for its final coat of frosting and decorative piped stars.
You Must Know
-
Temperature Matters: Ensure your butter is truly at room temperature. If it’s too cold, the buttercream will break; if it’s too hot, it will turn into a soup.
-
Don’t Over-mix: When adding the flour, use a low speed. You want to combine the ingredients just until the streaks of white disappear to keep the crumb tender.
-
The Chill Factor: Do not skip the refrigeration steps. Chilling the cakes makes them easier to slice and assemble without crumbling.
Serving Ideas
This cake is a showstopper on its own, but a few additions can elevate the experience:
-
The Classic Pair: A tall glass of ice-cold whole milk is the traditional partner to a heavy fudge cake.
-
A Fruity Contrast: Serve each slice with a handful of fresh, tart raspberries or a spoonful of blackberry compote to cut through the richness.
-
The Drink: For the adults, a glass of bold Cabernet Sauvignon or a stout beer with notes of chocolate and coffee complements the depth of the ganache perfectly.
Make It Different
-
The Mocha Version: Increase the instant coffee powder in the ganache to a full tablespoon for a prominent coffee kick.
-
Salted Fudge: Sprinkle a pinch of Maldon sea salt between each layer of buttercream for a modern, salty-sweet profile.
-
Gluten-Free: You can swap the cake flour for a high-quality 1:1 gluten-free baking blend. The high moisture content from the sour cream helps keep gluten-free versions from becoming dry.
Storage and Reheating
Because of the fresh egg whites in the buttercream, this cake should be stored in the refrigerator. Keep it in an airtight cake carrier or under a large bowl to prevent it from picking up fridge odors.
Pro Tip: Always let your slice sit at room temperature for about 15 minutes before eating. The butter in the frosting and the chocolate in the cake need to soften slightly to reach their peak “melt-in-your-mouth” texture.
Success Tips
-
Quality Chocolate: Since chocolate is the primary flavor, avoid using “candy melts.” Invest in a good quality bar of semisweet and unsweetened chocolate.
-
The Toothpick Test: Every oven is different. Start checking your cakes at the 40-minute mark. You want a few moist crumbs on the toothpick, but no wet batter.
-
Level Your Layers: If your cakes dome slightly in the oven, use a serrated knife to trim the tops flat. Level layers make for a much more stable and professional-looking cake.
Frequently Asked Questions
Can I use granulated sugar instead of brown sugar?
While you can, I don’t recommend it for this specific recipe. The light brown sugar provides moisture and a hint of molasses that gives the “fudge” its characteristic chew.
What if my buttercream looks curdled?
Don’t panic! This usually happens if the butter was a bit too cool. Keep whipping on high speed, and the friction will eventually warm the fats enough to emulsify into a smooth cream.
Why use a springform pan for assembly?
It acts as a mold. Because this cake has a soft ganache layer, the pan holds everything in a perfect circle until it sets in the freezer, preventing the layers from sliding.
Do I have to use a double boiler?
Yes, it’s safer. Direct heat can easily scorch chocolate or scramble egg whites. If you don’t have a formal double boiler, a glass bowl set over a pot of simmering water works perfectly.
Can I make the layers in advance?
Absolutely. You can bake the cake layers a day ahead, wrap them tightly in plastic wrap, and keep them in the fridge. They are actually easier to handle and slice when cold.
Recipe Card
-
Prep time: 1 hour
-
Cook time: 50 minutes
-
Total time: 4 hours (includes chilling/assembly)
-
Servings: 12-16 slices
-
Category: Dessert
-
Difficulty: Intermediate
-
Cuisine: American
-
Yield: One 4-layer 9-inch cake
Equipment
-
Two 9-inch cake pans
-
9-inch springform pan (for assembly)
-
Electric stand mixer
-
Double boiler
-
Offset spatula
-
Pastry bags and star tips
-
Instant-read thermometer
Ingredients
Fudge Cake:
-
4 oz unsweetened chocolate, chopped
-
2 cups cake flour
-
2 tsp baking soda
-
½ tsp salt
-
8 tbsp butter, room temperature
-
2 cups light brown sugar, packed
-
4 eggs
-
1 tsp vanilla
-
1 cup water
-
1 cup sour cream
Chocolate Ganache:
-
1 cup heavy cream
-
2 tbsp butter
-
2 tbsp sugar
-
8 oz semisweet chocolate, chopped
-
1 tsp instant coffee powder
Chocolate Buttercream:
-
8 oz semisweet chocolate, chopped
-
2 oz unsweetened chocolate, chopped
-
2 tsp vanilla
-
1 lb butter, room temperature
-
5 egg whites
-
1 cup sugar
Instructions
-
Prep: Preheat oven to $350°F$. Spray two 9-inch cake pans with non-stick flour spray.
-
Melt Chocolate: Microwave the 4 oz unsweetened chocolate in 30-second bursts, stirring until smooth. Set aside.
-
Cream Butter: In a stand mixer with a paddle, beat brown sugar and 8 tbsp butter on low for 3 minutes. Increase to high for 2 minutes, scrape, and beat for another 90 seconds.
-
Emulsify: Add eggs one at a time, beating for 30 seconds after each. After all eggs are in, beat on high for 2 minutes. Stir in vanilla and melted chocolate.
-
Mix Batter: Whisk flour, baking soda, and salt. Bring 1 cup water to a near boil. Alternately add flour and sour cream to the mixer on low. Finally, pour in the boiling water and mix for 30 seconds until smooth.
-
Bake: Divide batter into pans. Bake for 45–50 minutes. Cool in pans for 15 minutes, then move to a rack. Refrigerate the cooled cakes.
-
Make Ganache: Boil heavy cream, 2 tbsp butter, and 2 tbsp sugar. Pour over 8 oz semisweet chocolate and coffee powder. Let sit for 10 minutes, then stir smooth.
-
Prepare Buttercream Base: Melt 8 oz semisweet and 2 oz unsweetened chocolate in a double boiler. Stir in vanilla and set aside.
-
Whip Butter: Beat 1 lb butter in a mixer for 9 minutes total (low, then medium, then high) until very light. Move to a separate bowl.
-
Cook Egg Whites: Whisk egg whites and 1 cup sugar in a double boiler until they reach $120°F$. Transfer to mixer and whip to stiff peaks.
-
Combine Frosting: Fold melted chocolate into the whipped butter, then fold in the egg white meringue until uniform.
-
Assemble: Slice chilled cakes horizontally into 4 layers total. Place the first layer in the bottom of a 9-inch springform ring. Layer with 1.5 cups buttercream, then the next cake layer. Pour 1.25 cups ganache over that. Top with the third cake layer, another 1.5 cups buttercream, and the final cake layer (cut side down).
-
Set and Decorate: Freeze the assembled cake in the pan for 1 hour. Remove the ring. Frost the exterior with the remaining buttercream. Use pastry bags to pipe decorative stars of both buttercream and ganache on top. Chill for 1 hour before serving.
Nutrition
This is a rich, indulgent dessert. Each serving is high in quality fats and sugars. For a standard slice (1/16th of the cake), estimate approximately 580–650 calories.