Chocolate Kiss Cookies
The Best Chocolate Kiss Cookies Recipe: A Timeless Treat
There’s a certain kind of magic that happens in the kitchen during the holiday season, but for me, the true test of a cookie’s power is its ability to conjure joy on a random Tuesday. This Chocolate Kiss Cookies recipe is my secret weapon. It’s a recipe passed from my grandmother’s weathered recipe box to my mother’s kitchen, and now to mine. I can still picture my mom, a dusting of flour on her cheek, carefully pressing a chocolate kiss into the center of each warm, crackled cookie. The aroma of rich cocoa and melting chocolate that filled the house was nothing short of pure, unadulterated happiness. That’s the feeling I try to bake into every single batch.
Why You’ll Love This Recipe
-
Pure Nostalgia in Every Bite: This isn’t just a cookie; it’s a bite-sized memory. The classic combination of fudgy chocolate cookie and sweet, melting milk chocolate is a timeless treat that appeals to every generation.
-
Surprisingly Simple to Make: Don’t let their elegant appearance fool you. The dough comes together quickly with simple ingredients, making it a perfect project for bakers of all skill levels, even with little helpers.
-
The Ultimate Crowd-Pleaser: Whether it’s a cookie exchange, a school bake sale, or a simple dessert platter, these cookies disappear first. They have a universal appeal that’s hard to resist.
-
A Sensory Delight: From the deep, crackled surface of the baked cookie to the gooey, melted chocolate center, every textural element is a delight.
I once brought a tin of these to a stuffy neighborhood potluck. Among the fancy canapés and elaborate casseroles, my humble cookies seemed almost too simple. That was until I saw Mr. Henderson, a notoriously reserved and serious man, quietly sneak his third cookie onto his plate. He later sought me out to say, in his typically curt manner, “Those chocolate ones. Excellent.” High praise, indeed. It just goes to show that a truly great cookie can break down any barrier.
What Makes It Special
-
Double Chocolate Depth: We’re not just using cocoa powder. The addition of melted semi-sweet chocolate in the dough itself creates an intensely rich, fudgy base that makes these cookies stand out.
-
The Perfect Textural Contrast: The cookie itself is soft and tender, almost brownie-like, while the sugary, crackled crust gives way to the smooth, creamy milk chocolate kiss center.
-
A Hint of Complexity: Using a combination of granulated and light brown sugar adds a subtle molasses note that balances the sweetness and adds a deeper flavor profile.
Making It Happen
Begin by preheating your oven to 350°F (175°C) and lining your baking sheets with parchment paper or a silicone mat. This little step is your insurance policy against sticking. Pour a quarter cup of granulated sugar into a small bowl and set it aside for rolling—this is what gives our cookies that classic, sparkling crackle.
Next, let’s melt our chocolate. Gently melt the semi-sweet chocolate in a microwave-safe bowl in short 30-second bursts, stirring well after each interval. This prevents it from scorching and ensures it melts smoothly. Set it aside to cool slightly.
Now, in the bowl of a stand mixer fitted with the paddle attachment (or using a hand mixer and a large bowl), cream together the softened butter, the remaining half-cup of granulated sugar, and the light brown sugar. Beat it on medium speed for a good two to three minutes until the mixture becomes pale, fluffy, and wonderfully creamy. Scrape down the sides of the bowl, then beat in the egg and vanilla extract until everything is seamlessly combined.
It’s time for the dry team to join the party. Mix in the salt and baking powder, followed by the unsweetened cocoa powder and that lovely, melted chocolate we prepared earlier. The batter will become thick and gloriously dark. Finally, add the flour one cup at a time, mixing on low speed just until the flour disappears and a soft, slightly sticky dough forms. If the dough feels too soft to handle, a brief 15-minute chill in the fridge will firm it up perfectly.
Using a small cookie scoop or a tablespoon, portion the dough and roll it into smooth, one-inch balls. Roll each ball generously in the reserved granulated sugar until fully coated. Place them on your prepared baking sheets, giving them about two inches of space to spread.
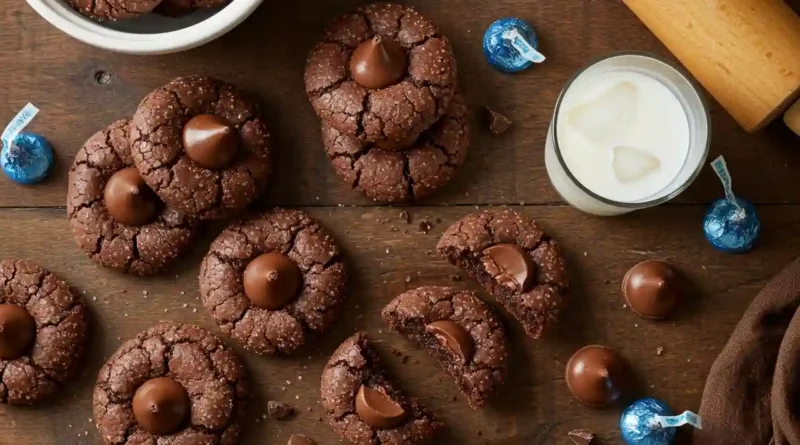
Bake for exactly 10 minutes. The cookies will look soft and puffy with beautiful cracked tops—this is perfect. The moment you pull them from the oven, it’s time for the signature move: gently but firmly press an unwrapped milk chocolate kiss straight into the center of each warm cookie. The cookie will settle around it. Let the cookies cool on the baking sheet for about 5 minutes before transferring them to a wire rack to cool completely. This allows the chocolate kiss to set back up.
You Must Know
-
Truly Softened Butter: Your butter should be soft enough to leave a slight indentation when pressed, but not oily or melted. This is crucial for creaming properly and achieving the right texture.
-
Measure Flour Correctly: For accuracy, fluff your flour with a spoon, spoon it into your measuring cup, and level it off with a knife. Too much flour is the number one reason cookies turn out dry and cakey.
-
Press Immediately: The kiss must be pressed into the cookie the very second they come out of the oven. The residual heat is what slightly melts the base of the kiss, fusing it to the cookie.
-
Let Them Set: Allow the cookies to cool completely on the wire rack. This allows the chocolate kiss to reset, so it doesn’t smudge everywhere when you handle them.
Serving Ideas
These cookies are a complete joy all on their own with a cold glass of milk—a pairing that will never go out of style. For a decadent dessert, crumble one over a scoop of vanilla bean ice cream. For a cozy adult pairing, serve them alongside a mug of rich hot coffee or a glass of red wine, whose berry notes complement the dark chocolate beautifully.
Make It Different
-
Peanut Butter Paradise: Use dark chocolate or peanut butter-filled kisses instead of milk chocolate for a delicious twist.
-
Mint Chocolate Delight: A peppermint extract (start with 1/4 tsp) added with the vanilla and peppermint kisses will create a refreshing holiday favorite.
-
Gluten-Free: Substitute the all-purpose flour with a 1:1 gluten-free baking blend for equally delicious results.
-
Salted Caramel Twist: After pressing in the kiss, drizzle the cooled cookies with a little salted caramel sauce for a gourmet touch.
Storage & Reheating Tips
Store your completely cooled Chocolate Kiss Cookies in an airtight container at room temperature. They will stay fresh and delicious for up to 5 days. For longer storage, they freeze beautifully. Layer them between sheets of parchment paper in a freezer-safe container for up to 3 months. Thaw at room temperature.
If you love a warm, melty kiss, you can briefly warm a cookie in the microwave for 5-8 seconds before serving.
Success Tips
The key to that perfect crackled top is rolling the dough balls firmly in granulated sugar right before baking. Don’t skip this step! If your dough becomes too soft or sticky while you’re working with it, don’t hesitate to pop it back in the fridge for 10-15 minutes. Chilled dough is much easier to handle and helps prevent the cookies from overspreading.
Frequently Asked Questions (FAQ)
Q: Can I use natural cocoa powder instead of unsweetened?
A: Yes, you can! The recipe calls for standard unsweetened cocoa powder (like Hershey’s), which is what is typically used. Natural and Dutch-process cocoa can sometimes behave differently, but in this recipe, the swap should work just fine.
Q: My kisses completely melted! What did I do wrong?
A: This usually happens if the cookies were left in the oven too long or the kisses were pressed into cookies that had cooled slightly. Make sure to press them in immediately after pulling the baking sheet from the oven.
Q: Can I make the dough ahead of time?
A: Absolutely. You can prepare the dough, cover it tightly, and refrigerate it for up to 2 days. Let it sit at room temperature for 15-20 minutes to soften slightly before scooping and rolling.
Q: Why are my cookies cakey and puffy?
A: This is most often caused by using too much flour. Remember to measure by spooning and leveling. Also, ensure your baking powder is fresh.
Q: Can I use a different kind of chocolate on top?
A: Of course! While the classic milk chocolate kiss is traditional, feel free to get creative with dark chocolate, white chocolate, or even caramel-filled kisses.
Chocolate Kiss Cookies
Prep time: 20 minutes
Cook time: 10 minutes per batch
Total time: 1 hour (including cooling)
Category: Dessert
Difficulty: Easy
Cuisine: American
Yield: About 3 dozen cookies
Ingredients
-
▢3/4 C unsalted butter, softened
-
▢3/4 C granulated sugar, divided
-
▢1/2 C light brown sugar, packed
-
▢1 large egg, room temperature
-
▢1 tsp vanilla extract
-
▢1/2 tsp salt
-
▢1 1/2 tsp baking powder
-
▢1/4 C unsweetened cocoa powder
-
▢2 oz semi-sweet chocolate, melted and slightly cooled
-
▢2 C all-purpose flour, spooned and leveled
-
▢36 Milk chocolate Kisses, unwrapped
Instructions
-
Preheat oven to 350°F (175°C). Line baking sheets with parchment paper or silicone mats. Place 1/4 cup of granulated sugar in a small bowl; set aside.
-
Melt the semi-sweet chocolate in a microwave-safe bowl in 30-second intervals, stirring between each, until smooth. Set aside to cool.
-
In a large bowl or stand mixer, cream together softened butter, 1/2 cup granulated sugar, and brown sugar until light and fluffy (2-3 minutes).
-
Beat in the egg and vanilla extract until combined. Mix in the salt and baking powder.
-
Scrape down the bowl and mix in the cocoa powder, followed by the melted chocolate.
-
With the mixer on low, add the flour one cup at a time, mixing just until incorporated. If dough is sticky, chill for 15-20 minutes.
-
Scoop and roll dough into 1-inch balls. Roll each ball in the reserved granulated sugar to coat completely.
-
Place dough balls 2 inches apart on prepared baking sheets. Bake for 10 minutes.
-
Immediately upon removal from the oven, press an unwrapped chocolate kiss firmly into the center of each cookie.
-
Let cookies cool on the baking sheet for 5 minutes before transferring to a wire rack to cool completely.
Notes
Allergy Info: Contains gluten, dairy, egg, and soy.
Nutrition: (per cookie, estimated) Calories: 120kcal | Carbohydrates: 16g | Protein: 1g | Fat: 6g | Saturated Fat: 4g | Cholesterol: 15mg | Sodium: 50mg | Sugar: 11g
