
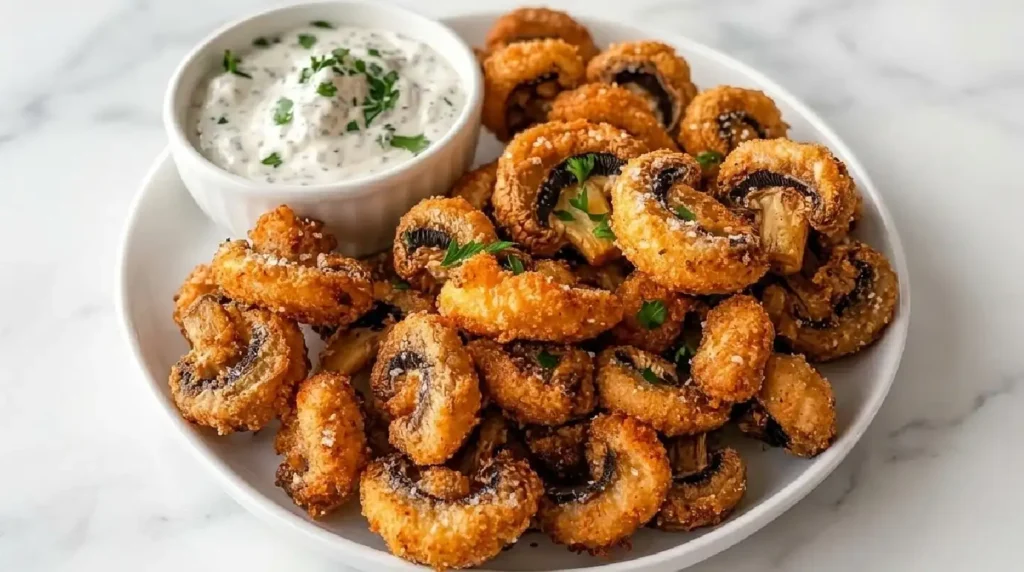
Crispy Fried Mushrooms Recipe
Table of Contents
ToggleCrispy Fried Mushrooms Recipe: The Golden, Crunchy Snack You’ll Make on Repeat
There’s a specific sound a mushroom makes when it hits hot oil just right — a low sizzle that climbs into a crackle. That sound is basically my Friday night. I started making crispy fried mushrooms years ago as a way to use up a carton of button mushrooms before they went soft in the fridge, and what came out of the pan changed the whole plan for dinner. Nobody wanted the main course anymore. We just stood around the stove eating mushrooms straight off the paper towel, blowing on our fingers because we couldn’t wait for them to cool.
That’s the thing about this recipe. It’s humble — mushrooms, buttermilk, seasoned flour, hot oil — but the payoff is enormous. Each bite gives you a shatter-crisp shell giving way to something tender and juicy and faintly earthy underneath, with a little smoky heat trailing behind. It’s the kind of snack that disappears before you’ve finished plating it.
Why You’ll Love This
- It’s ready in under 40 minutes, start to finish, with mostly hands-off frying time
- The contrast between the crunchy coating and the juicy mushroom center is genuinely addictive
- It works as an appetizer, a bar snack, a side dish, or a late-night craving fix
- You can make it as mild or as spicy as you want with a few simple swaps
- Even people who claim they “don’t like mushrooms” tend to eat the whole plate
The Backstory
My mother-in-law is not a mushroom person. She’s told me this, unprompted, at least four separate holiday dinners. So the first time I served these at a family gathering, I didn’t even bother offering her the plate — I figured it’d be a waste of a good “no thank you.” My husband, without asking, put three on her plate anyway. Ten minutes later she was asking who made them and whether there were any more in the kitchen. She ate seconds. She has since asked for the recipe twice, which in her family is basically a five-star review carved in stone. There’s something about the crunch that gets past people’s mushroom skepticism — it doesn’t taste “mushroomy” so much as it tastes buttery and savory and crisp, with the mushroom flavor showing up quietly in the background.
What Makes It Special
- Button or cremini mushrooms — firm enough to hold their shape in hot oil, with a mild, buttery bite that soaks up seasoning beautifully
- Buttermilk soak — tenderizes the mushrooms slightly and helps the flour coating cling tight, giving you that thick, craggy crust
- Seasoned flour blend — garlic powder, smoked paprika, and cayenne bring a smoky heat that lingers just behind the crunch
- Hot oil, properly heated — this is what turns the coating golden and shatter-crisp instead of greasy or soggy
- A squeeze of lemon at the end — cuts through the richness and wakes up every other flavor on the plate
Making It Happen
Start by cleaning your mushrooms with a dry brush or a barely damp paper towel — never submerge them in water, since they’ll soak it up like little sponges and that moisture works against you later in the fryer. Slice larger mushrooms in half or quarters so everything fries evenly; smaller ones can stay whole.
Pour buttermilk into a bowl, drop the mushrooms in, and let them sit for at least fifteen minutes. This step does double duty: it softens the mushrooms just slightly and gives the flour something to grip onto. While that’s happening, whisk together your flour, cornstarch, and spices in a separate bowl. The cornstarch is a small but important detail — it’s what pushes the crust from “nice and crispy” into “genuinely crackly.”
Heat your oil to 350°F in a heavy pot or deep skillet. This temperature matters more than people expect. Too cool, and the mushrooms drink up oil and turn greasy. Too hot, and the coating browns before the inside cooks through. Once you’ve got steady, shimmering heat, pull mushrooms from the buttermilk one at a time, letting the excess drip off, then press them into the flour mixture, packing the coating on generously.
Fry in small batches — overcrowding drops the oil temperature fast and you’ll lose that crispness. Give each batch two to three minutes, turning once, until they’re deep golden and floating with confidence. Lift them out with a slotted spoon onto a wire rack set over paper towels, not directly onto paper towels, so steam can escape from underneath and the bottoms stay crisp instead of turning soggy. Salt them the second they come out of the oil, while the coating is still hot enough to hold onto it.
You Must Know
- Pat mushrooms dry before the buttermilk soak so the coating doesn’t slide off in the oil
- Don’t skip the resting step after coating — letting them sit for a minute or two on the flour mixture helps the crust set and stick
- Fry in small batches; overcrowded oil means limp, greasy mushrooms
- A wire rack beats paper towels alone for keeping every side crisp
- Salt immediately after frying, not five minutes later — timing affects how well it sticks
Serving Ideas & Pairings
These are made for dipping. A cool ranch or garlic aioli plays nicely against the smoky heat, and a tangy buttermilk dip echoes the coating itself. For something with more bite, a spicy sriracha mayo does the job. Serve them alongside a crisp green salad with a sharp vinaigrette if you want a full plate, or keep it simple with a cold beer or a glass of dry white wine — something with enough acidity to cut through the richness of the fried coating.
Make It Different
Swap the all-purpose flour for a gluten-free blend if needed; the cornstarch already helps with crispness, so the swap holds up well. For a dairy-free version, use a plant-based buttermilk substitute (regular milk plus a splash of lemon juice works too). Want more heat? Add extra cayenne or a dash of hot sauce right into the buttermilk soak. Prefer things milder? Drop the cayenne entirely and lean on the smoked paprika for flavor without the burn. You can also swap in panko breadcrumbs for part of the flour mixture if you want an even craggier, more textured crust.
Storage & Reheating
Leftovers, if you have any, keep in the fridge for up to two days in an airtight container. Skip the microwave — it turns that crisp coating soft and a little sad. Instead, reheat in a 400°F oven or air fryer for about five to seven minutes, which brings back most of the original crunch. Frying is really a same-day affair; the texture is at its best within the first hour of cooking.
Success Tips
Keep one hand for the wet ingredients and one hand for the dry — it sounds fussy, but it stops your fingers from turning into a breaded, gluey mess halfway through. Check your oil temperature with a thermometer rather than guessing; a few degrees off in either direction changes the whole outcome. And resist the urge to stir the mushrooms constantly while they fry — let them sit undisturbed for the first minute so the crust has time to form before you touch them.
Frequently Asked Questions (FAQ)
Can I bake these instead of frying them? You can, though the texture will be closer to roasted than truly crispy. Bake at 425°F on a wired rack for about 20 minutes, flipping halfway, and spritz with oil for better browning.
What’s the best oil for frying mushrooms? Go with a neutral, high-smoke-point oil like vegetable, canola, or peanut oil. They won’t compete with the seasoning and can handle the heat without burning.
Why did my coating fall off in the oil? This usually happens if the mushrooms were too wet going into the flour, or if the oil wasn’t hot enough to set the crust quickly. Pat them dry after the buttermilk soak and double-check your oil temperature.
Can I use frozen mushrooms? Fresh is best here. Frozen mushrooms hold extra water that releases during frying, which leads to steaming instead of crisping.
Can I make these ahead of time for a party? You can prep the coating and slice the mushrooms ahead of time, but fry them as close to serving as possible. They’re best eaten within the first hour, while the crust is still at its crispest.
Recipe Card Info
Prep time: 15 minutes Cook time: 20 minutes Total time: 35 minutes Servings: 4 Category: Appetizer / Snack Difficulty: Easy Cuisine: American Yield: About 3 cups fried mushrooms
Equipment:
- Deep, heavy-bottomed pot or skillet
- Cooking thermometer
- Slotted spoon
- Wire rack
- Two mixing bowls
Ingredients:
- 1 pound (about 450g) button or cremini mushrooms, cleaned and halved
- 1 cup buttermilk
- 1 cup all-purpose flour
- 2 tablespoons cornstarch
- 1 teaspoon garlic powder
- 1 teaspoon smoked paprika
- 1/2 teaspoon cayenne pepper (adjust to taste)
- 1 teaspoon salt, plus more for seasoning after frying
- 1/2 teaspoon black pepper
- Vegetable or canola oil, for frying
- Lemon wedges, for serving
Directions:
- Clean mushrooms with a dry brush or barely damp cloth; halve or quarter larger ones.
- Soak mushrooms in buttermilk for at least 15 minutes.
- Whisk together flour, cornstarch, garlic powder, smoked paprika, cayenne, salt, and pepper in a separate bowl.
- Heat oil in a deep pot to 350°F.
- Remove mushrooms from buttermilk, letting excess drip off, then coat thoroughly in the flour mixture.
- Fry in small batches for 2 to 3 minutes, turning once, until deep golden brown.
- Transfer to a wire rack set over paper towels and salt immediately.
- Serve hot with lemon wedges and your dip of choice.
Notes: For extra crunch, double-dip the mushrooms by dredging in flour, dipping briefly back into the buttermilk, then coating in flour again before frying.
Nutrition (per serving, approximate): Calories: 210 | Protein: 5g | Carbohydrates: 22g | Fat: 12g | Fiber: 2g | Sodium: 380mg
