
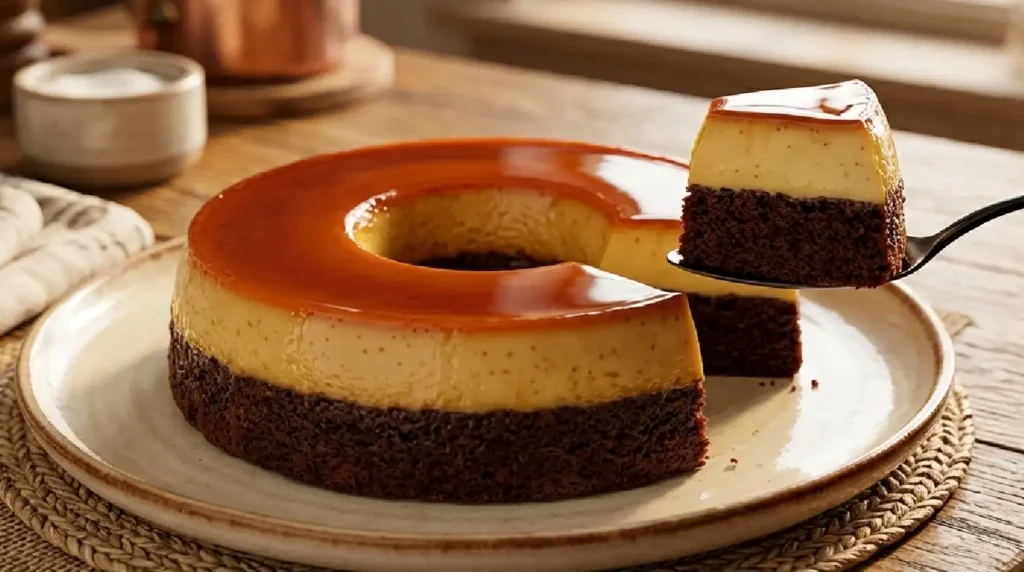
Flan Cheesecake
Table of Contents
ToggleSilky Flan Cheesecake Recipe: Creamy Elegance in Every Bite
Introduction
There’s a particular kind of magic that happens when two beloved desserts become one. Flan cheesecake is that rare creation—the luxurious, barely-set smoothness of traditional flan meets the dense, tangy richness of New York cheesecake, all crowned with a caramelized sugar layer that shatters under your spoon. The first spoonful reveals layers of flavor: burnt sugar notes melting into creamy custard, then that deeper, more complex cheesecake filling underneath. It’s the kind of dessert that makes people pause mid-conversation.
This version doesn’t require hours of fussing or culinary school credentials. It’s built on a foundation of straightforward technique and quality ingredients, designed to deliver restaurant-quality results in your own kitchen. What sets this flan cheesecake apart is the balance—you’re not sacrificing the flan’s silken texture for the cheesecake’s structure, or vice versa. Instead, they coexist in perfect harmony, each element enhancing the other.
Why You’ll Love This
- Two desserts in one: You get the smooth, caramelized charm of flan and the creamy indulgence of cheesecake without having to choose
- Surprisingly approachable: No water bath fussing or complicated techniques—this comes together with basic mixing and baking skills
- Makes a stunning impression: The glossy caramel top and elegant presentation make it feel far more complex than it actually is
- Serves a crowd: One cake delivers 12-16 slices, making it perfect for gatherings, holidays, or when you need dessert for multiple days
- Works for different occasions: Equally at home at a casual dinner party or a formal celebration
The Backstory
My sister swore she didn’t eat cheesecake. Too heavy, she’d say, pushing the slice around her plate. Flan was better—lighter, more refined. I’d heard this countless times over family dinners, watching her politely decline my attempts at various cheesecake recipes. One Thanksgiving, I decided to stop asking permission and just bake this flan cheesecake. I presented it without fanfare, simply setting a slice in front of her with a glass of coffee. She took one bite, went quiet, and finished the entire piece before looking up. “What is this?” she asked. When I told her it was cheesecake, she didn’t believe me. She had three more slices over the next two days. Some desserts convince people. This one converts them.
What Makes It Special
- Creamy center: The cheesecake base is smooth and tangy from a blend of cream cheese and sour cream, creating depth without heaviness
- Golden caramel crown: Homemade caramel poured directly over the batter before baking creates that signature crackling-sugar top and subtle burnt-sugar complexity
- Delicate crust: A light graham cracker base provides textural contrast without overwhelming the custard layers
- Silken flan layer: The custard component creates an impossibly smooth, creamy texture that rivals traditional flan preparations
- Balanced sweetness: Brown sugar in the caramel adds molasses notes that prevent the dessert from tasting one-dimensional or overly sweet
Making It Happen
Begin by setting your oven to 325°F and letting a 9-inch springform pan sit out—you’ll need it ready and unlined. Some bakers wrap the outside of the pan in foil to prevent water seepage, though this recipe uses a simpler dry-baking method that works beautifully without that step.
For the crust, pulse graham cracker crumbs with melted butter and a pinch of salt until the mixture resembles wet sand. Press this firmly into the bottom of your springform pan, using the bottom of a measuring cup to create an even, compact layer. Bake this for 8 minutes at 325°F just to set it, then remove and let it cool while you prepare the filling.
The cheesecake portion starts with bringing cream cheese to room temperature—this is non-negotiable. Cold cream cheese creates lumps, and lumps create uneven texture. Blend the softened cream cheese with granulated sugar until completely smooth, scraping down the bowl several times to catch any hiding pockets of cream cheese. Add eggs one at a time, mixing after each addition only until just combined. Overmixing at this stage introduces air, which leads to cracks during baking. Stir in sour cream and vanilla extract by hand using a spatula, folding gently until no white streaks remain.
Pour this mixture over your cooled crust, spreading it evenly. Now for the magic: prepare your caramel by combining brown sugar, butter, and water in a small saucepan over medium heat. Stir constantly until the butter melts and the sugar dissolves, then let it bubble gently for 2-3 minutes. The mixture will darken slightly and smell deeply of caramel. Remove from heat and let it cool for just 60 seconds—you want it warm enough to pour but cool enough not to scramble the eggs beneath.
Carefully pour the caramel over the cheesecake batter in a thin, steady stream. Use an offset spatula or the back of a spoon to gently spread it across the surface, being careful not to drag it down into the batter (some marbling is fine and actually adds visual interest). This layer will sink slightly and create a lacy pattern as it bakes.
Place the springform pan in the oven and bake for 40-45 minutes. The cheesecake is done when the edges are set but the center still has a slight jiggle—about a 2-inch diameter circle in the very middle should wobble gently when you tap the pan. This residual carryover cooking will set it to perfect custard-like consistency.
Turn off the oven and crack the door open about 4 inches. Let the cheesecake sit in this cooling environment for 30 minutes. This gradual temperature change prevents the dramatic cooling that causes surface cracks. Remove it from the oven and let it reach room temperature on the counter, then refrigerate for at least 8 hours, preferably overnight. Chilling is essential—it allows the flavors to meld and the texture to firm to that ideal, slice-able consistency.
You Must Know
- Room temperature is everything: Your cream cheese, eggs, and sour cream should all be at room temperature before mixing. Cold ingredients won’t blend smoothly and will affect both texture and baking time
- Don’t open that oven door: Resist the urge to check on the cheesecake before 35 minutes have passed. Temperature fluctuations cause cracking. Trust the process
- The jiggle test matters more than time: Ovens vary wildly. A perfectly baked flan cheesecake has a gentle wobble in the very center; it should not be completely set or it will be dense rather than creamy
- Caramel temperature is crucial: If your caramel is too hot, it will cook the eggs and create a cooked layer; too cool, and it won’t pour evenly. Sixty seconds of cooling time is the sweet spot
- Use full-fat everything: Don’t reach for reduced-fat cream cheese or sour cream. The fat content directly impacts that silken texture you’re after
Serving Ideas & Pairings
Serve this cheesecake in thin slices—the density and richness mean a smaller portion is deeply satisfying. Pair each slice with a small cup of espresso or strong black coffee, which cuts through the sweetness and complements the caramel notes. For something cooler, a scoop of vanilla bean ice cream melting into the warm caramel creates an unexpectedly perfect contrast. Fresh berries—raspberries or blackberries—add brightness without competing with the cake’s complex flavors.
For a gathering, arrange slices on a platter with small forks and napkins, allowing guests to serve themselves. The glossy caramel top is a visual asset; it photographs beautifully and signals that something special is being offered.
Make It Different
For salted caramel lovers: Sprinkle fleur de sel over the caramel layer before baking, or drizzle finished slices with salted caramel sauce.
For espresso depth: Dissolve 1 tablespoon instant coffee powder into your cheesecake batter for a subtle coffee note that enhances rather than defines the flavor.
For darker, molasses-forward caramel: Substitute all brown sugar for the granulated sugar in the cheesecake batter, and use an extra tablespoon of brown sugar in the caramel layer.
For a more pronounced flan experience: Add an extra egg yolk to the cheesecake mixture and reduce the baking time by 3-5 minutes to create a more custard-like consistency.
For dairy-free adaptation: Use quality dairy-free cream cheese and a coconut-based sour cream substitute. The result will be slightly less rich but entirely satisfying.
For chocolate variation: Melt 4 ounces of dark chocolate and swirl it into the cheesecake batter before adding the caramel—the chocolate adds a sophisticated bitter note against the sweet caramel.
Storage & Reheating
This flan cheesecake actually improves with time, as the flavors continue to develop. Store it in the refrigerator, loosely covered with plastic wrap or in an airtight container, for up to 5 days. Do not store it uncovered, as it absorbs odors from the refrigerator quickly.
For longer storage, freeze the entire cake (or individual slices) wrapped tightly in plastic wrap and then foil. Frozen cheesecake keeps beautifully for up to 2 months. Thaw it slowly in the refrigerator overnight before serving—rapid thawing can cause condensation and soften the texture.
There’s no need to reheat this dessert; serve it cold directly from the refrigerator. If your kitchen is particularly warm and the cake softens slightly, simply pop it back in the refrigerator for 30 minutes before serving. The cold temperature is actually essential to the texture—it allows the creamy filling to hold its shape and the caramel to have that satisfying slight resistance before it dissolves on your tongue.
Success Tips
Tap the pan gently: To test doneness, tap the side of the springform pan with your knuckle. The edges should feel firm, and you should see minimal movement at the edges. The center wobbles, but the outer 2-3 inches remain still.
Make your own graham cracker crumbs: Using a food processor or blender to make fresh crumbs from actual graham crackers yields a superior crust with better texture than pre-made crumbs.
Invest in a quality springform pan: A flimsy pan can leak caramel. A sturdy 9-inch springform with a tight seal is a worthwhile kitchen investment.
Don’t skip the cooling stage: The 30 minutes in the cracked oven isn’t optional. This controlled cooling prevents the thermal shock that creates surface cracks.
Slice with hot water: For clean slices, dip a sharp knife in hot water, wipe it dry, and cut. Reheat the knife between slices for the crispest cuts.
Frequently Asked Questions
Q: Can I make this cheesecake in a regular cake pan instead of a springform? A: Technically yes, but a springform pan is genuinely the better choice. The removable sides make serving far easier, and the caramel layer releases cleanly. If you must use another pan, line it with parchment paper extending up the sides for easy removal.
Q: Why did my cheesecake crack on top? A: Cracking typically happens from either oven temperature fluctuations, opening the door too early, or skipping the gradual cooling step. Ensure your oven temperature is accurate (use an oven thermometer), avoid peeking before 35 minutes, and always use the cracked-door cooling method.
Q: Can I use a food processor to make the cheesecake batter? A: You can, but be cautious. Food processors can overmix and incorporate too much air, leading to cracks. If using one, pulse briefly between additions and be conservative with processing time. Hand-mixing with a spatula gives better control.
Q: How do I know when the caramel is ready to pour? A: The mixture should look like melted butterscotch, deep golden brown, and smell richly caramelized. Let it cool for exactly 60 seconds—no more, no less. Test the temperature carefully with a clean spoon; it should be warm to touch but not hot.
Q: Can I make this ahead for a special occasion? A: Absolutely. Make it 2-3 days in advance for the best flavor development. It actually tastes better than freshly baked. Simply store it covered in the refrigerator until serving time. If freezing for longer storage, thaw overnight in the refrigerator before serving.
Recipe Card Info
Prep time: 20 minutes Cook time: 45 minutes Total time: 8 hours 45 minutes (includes chilling) Servings: 12-16 slices Category: Dessert Difficulty: Intermediate Cuisine: French-American fusion Yield: One 9-inch cheesecake Equipment: 9-inch springform pan, mixing bowls, electric mixer or mixing spoon, saucepan, food processor (optional, for crumbs)
Ingredients
- 1 cup graham cracker crumbs (about 8 crackers)
- 4 tablespoons unsalted butter, melted
- Pinch of salt
- 16 ounces cream cheese, room temperature
- 1/2 cup granulated sugar
- 3 large eggs, room temperature
- 1/2 cup sour cream, room temperature
- 1 teaspoon vanilla extract
- 3/4 cup packed brown sugar
- 3 tablespoons unsalted butter
- 2 tablespoons water
Directions
Step 1: Prepare the Pan and Oven Preheat your oven to 325°F. Set out your 9-inch springform pan—don’t grease it. This recipe bakes without a water bath, making the process simpler while still achieving perfect results.
Step 2: Make the Crust Combine graham cracker crumbs, 4 tablespoons melted butter, and a pinch of salt. Pulse if using a food processor, or mix by hand until the texture resembles wet sand. Press firmly into the bottom of the springform pan, creating an even, compact layer. Use the flat bottom of a measuring cup to press evenly. Bake for 8 minutes, then remove and allow to cool slightly while you prepare the filling.
Step 3: Prepare the Cheesecake Base Add room-temperature cream cheese to a large mixing bowl. Using an electric mixer on medium speed, blend until completely smooth, about 2 minutes. Scrape down the bowl frequently to catch any lumps. Gradually add the granulated sugar and beat until light and fluffy, about another 2 minutes. The mixture should be pale and airy.
Step 4: Add Eggs Carefully Add eggs one at a time, mixing on medium speed just until combined after each addition. Do not overmix—you’re looking for just enough stirring to incorporate, not to add extra air. Scrape down the bowl between each egg.
Step 5: Fold in Sour Cream and Vanilla Remove the bowl from the mixer. Using a rubber spatula or wooden spoon, gently fold in the room-temperature sour cream and vanilla extract by hand. Mix until no white streaks remain, but don’t overdo it. The batter should be smooth and creamy.
Step 6: Pour and Prepare for Caramel Pour the cheesecake batter over the cooled crust and spread evenly with an offset spatula. Now prepare the caramel layer while the batter sets for a moment.
Step 7: Make the Caramel In a small saucepan, combine the brown sugar, 3 tablespoons butter, and water. Place over medium heat and stir constantly until the butter melts and the sugar dissolves completely, about 2-3 minutes. Continue stirring as it comes to a gentle bubble, cooking for another 2-3 minutes. The caramel should darken slightly and smell deeply sweet with caramel notes. Remove from heat.
Step 8: Cool the Caramel Let the caramel cool for exactly 60 seconds. This step is crucial—it needs to be warm enough to pour evenly but cool enough not to cook the eggs in the batter below. Test the temperature with a clean spoon.
Step 9: Pour the Caramel Working carefully and slowly, pour the caramel in a thin, steady stream over the cheesecake batter. Pour from a low height to prevent splashing. Use the back of a spoon or an offset spatula to spread gently across the surface if needed, being careful not to drag it deeply into the batter. Some marbling and swirling is actually attractive.
Step 10: Bake Place the springform pan in the preheated 325°F oven. Bake for 40-45 minutes. The cheesecake is done when the edges are set and firm to a gentle tap, but the center—roughly a 2-inch circle in the very middle—still has a slight jiggle. This residual heat will continue cooking the center to perfect custard-like consistency.
Step 11: Cool Gradually This step prevents cracking. Turn off the oven and crack the door open about 4 inches. Leave the cheesecake in this cooling oven for exactly 30 minutes. Then remove it and let it finish cooling to room temperature on the counter, about 1-2 hours. During this time, the residual heat continues to cook the center gently.
Step 12: Chill Once cooled to room temperature, transfer the cheesecake to the refrigerator. Chill for at least 8 hours, preferably overnight. This chilling time is essential—it sets the texture to that ideal, sliceable consistency and allows flavors to fully develop.
Step 13: Serve Once fully chilled, run a thin knife around the inside edge of the springform pan, then gently release the sides. Slice with a sharp knife dipped in hot water and wiped dry between each cut for clean, beautiful slices.
Notes
- Room-temperature ingredients are essential for smooth, lump-free texture
- Do not skip the gradual cooling phase in the cracked oven—this prevents cracking
- The caramel will sink slightly during baking, creating a beautiful lacy pattern
- This dessert improves in flavor after 2-3 days; make it ahead for best results
- Store covered in the refrigerator for up to 5 days, or freeze wrapped tightly for up to 2 months
- Thaw frozen cheesecake overnight in the refrigerator before serving
Nutrition
Per serving (based on 12 servings):
- Calories: 385
- Total Fat: 24g
- Saturated Fat: 14g
- Cholesterol: 95mg
- Sodium: 285mg
- Total Carbohydrates: 42g
- Dietary Fiber: 0g
- Sugars: 38g
- Protein: 6g
(Note: Nutrition information is approximate and calculated using standard ingredient databases. Actual values may vary based on specific brands used.)
