Blue Velvet Oreo Cheesecake Cake
Table of Contents
ToggleBlue Velvet Oreo Cheesecake Cake: Tall, Creamy, and Wildly Blue
Introduction
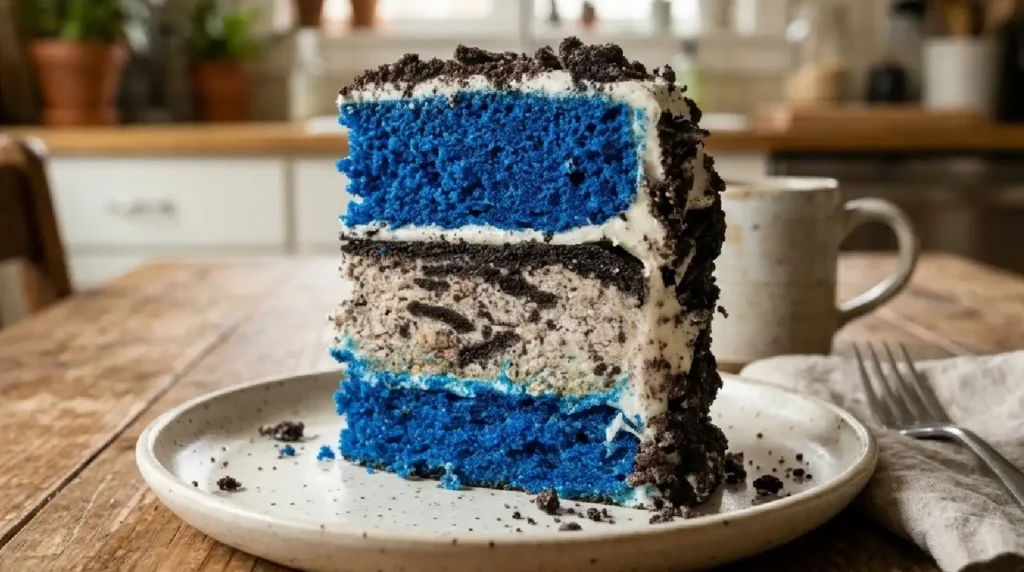
The first time I sliced into this Blue Velvet Oreo Cheesecake Cake, the knife went through a soft blue sponge, a thick band of creamy Oreo cheesecake, and another blue layer on top. I stood there for a second just looking at the cross-section. It looked like something from a bakery window, and I had made it in my own kitchen on a Tuesday night.
I came up with it while trying to use up half a package of Oreos and a block of cream cheese. Red velvet always gets the attention, but the blue version has the same tender, faintly cocoa crumb and a bit of tang from buttermilk, with a color that makes people ask questions. Put a cold, dense cheesecake layer in the middle and crushed Oreo cookies everywhere else, and you get a dessert that tastes like three favorites at once.
Why You’ll Love This
- The blue velvet layers bake up moist and buttery, with a soft crumb that holds together when you slice.
- The cheesecake center needs no oven and no water bath, so there is no cracking to worry about.
- Everything can be made a day ahead, which makes it a very good birthday or holiday cake.
- The cookies-and-cream flavor appeals to kids and adults, and the blue color gets people talking.
- You can make it with basic equipment: two cake pans, a mixer, and a freezer.
The Backstory
My brother-in-law, Karim, says he does not like cheesecake. He has said it for years, usually while pushing a plate of it politely to the side. He claims it is too heavy and too sour. At a family dinner last spring, I set this cake on the table without a word about what was inside. He took a slice mostly because the color was impossible to ignore. He finished it, and then he asked quietly if there was any more in the kitchen. When I told him the middle layer was cheesecake, he stared at his empty plate for a moment and said, “That’s not cheesecake.” He has since requested it for his own birthday.
What Makes It Special
- Blue gel food coloring: Gel gives you a deep, vivid blue without thinning the batter or leaving a bitter taste, which liquid coloring can do.
- Buttermilk and white vinegar: They react with the baking soda for a soft, tender crumb and a gentle tang that balances the sweetness.
- A little cocoa powder: One tablespoon adds the faint chocolate note that defines a velvet cake without muddying the blue.
- Full-fat cream cheese: It gives the filling and frosting a smooth, rich body. Low-fat versions turn loose and watery.
- Heavy cream, whipped: Folded into the filling, it makes the cheesecake layer light and mousse-like instead of dense and pasty.
- Oreo cookies: The bittersweet, crunchy chocolate cookie cuts through the creamy layers. They show up in the filling, the frosting, and on top.
- Unflavored gelatin: A small amount helps the no-bake layer set firm enough to slice cleanly.
Making It Happen
Start with the cheesecake layer, because it needs the longest to set. Line an 8-inch round cake pan with plastic wrap, leaving some overhang. Sprinkle the gelatin over cold water and let it sit for a few minutes until it looks spongy, then warm it for a few seconds in the microwave until it turns liquid. Beat the cream cheese with powdered sugar and vanilla until it is completely smooth, then stream in the melted gelatin. In a separate bowl, whip the cold heavy cream to stiff peaks. Fold it into the cream cheese in two additions, then fold in the crushed Oreos. Spread the filling into the lined pan, smooth the top, and freeze for at least four hours, until it feels solid.
For the cake, heat the oven to 350°F (175°C) and grease and line two 8-inch pans. Whisk the flour, cocoa, and salt together. Beat the butter, oil, and sugar until pale and fluffy, about three minutes. Add the eggs one at a time, then the vanilla and the blue gel coloring, and mix until the batter is a bright, even blue. Add the flour mixture in three parts, alternating with the buttermilk, and stop as soon as you see no dry streaks. In a small cup, stir the baking soda into the vinegar, let it fizz, and fold it quickly into the batter. Divide between the pans and bake for 28 to 32 minutes, until a toothpick comes out clean and the tops spring back lightly. Cool in the pans for ten minutes, then turn out onto a rack and let them cool completely.
For the frosting, beat the softened butter and cream cheese until fluffy. Add the powdered sugar a little at a time, then the vanilla and salt, and finish by folding in the finely crushed Oreos for a speckled, cookies-and-cream look.
To assemble, put one cake layer on a plate or board. Lift the frozen cheesecake disk out of its pan using the plastic wrap, peel off the wrap, and set the disk on top of the cake. Place the second layer over it. Spread a thin crumb coat of frosting all over and chill for twenty minutes. Then add the final coat of frosting, press crushed Oreos into the sides if you like, and top with halved cookies. Chill for at least two hours before slicing so the center settles.
You Must Know
- Bring the butter, eggs, buttermilk, and cream cheese to room temperature for the cake and frosting. Cold ingredients make a lumpy batter and grainy frosting.
- Use gel coloring, not liquid. You need about a tablespoon for deep blue, and liquid would add too much moisture.
- Make sure the cheesecake layer is frozen solid before assembly. A soft layer will slide and squish out when you stack the cake.
- Do not overmix once the flour goes in. Overmixed batter bakes up tough instead of soft.
- Use a sharp knife dipped in hot water and wiped dry between slices for clean edges.
Serving Ideas & Pairings
This cake is rich, so serve small, tall slices. A cup of strong black coffee or unsweetened iced tea balances the sweetness well. Cold milk is the obvious partner for the Oreo flavor. For a party, add a bowl of fresh raspberries or blueberries on the side, since their tartness cuts through the cream cheese. A scoop of plain vanilla ice cream works too, though the cake is already generous.
Make It Different
- Chocolate lovers: Swap the vanilla in the filling for a few tablespoons of cooled melted dark chocolate.
- Gluten-free: Use a cup-for-cup gluten-free flour blend and gluten-free sandwich cookies. The texture is slightly denser but still moist.
- No buttermilk: Stir one tablespoon of lemon juice into a cup of whole milk and let it sit for five minutes.
- Different colors: Red, green, or purple gel works the same way for holidays and birthdays.
- Mint twist: Replace the vanilla in the frosting with half a teaspoon of peppermint extract and use mint Oreos.
- Smaller batch: Bake the cake layers in a 9×13 pan, cut them in half, and set the cheesecake between the halves for a sheet-style version.
Storage & Reheating
Store the cake covered in the refrigerator for up to four days. Because of the cream cheese layers, it should not sit out for more than two hours. This cake is served cold, so there is nothing to reheat. If the slices feel too firm straight from the fridge, let them sit on the counter for ten to fifteen minutes to take the chill off and soften the cheesecake layer. To freeze, wrap individual slices tightly and freeze for up to two months, then thaw overnight in the refrigerator. Unfrosted cake layers can be wrapped and frozen for a month if you want to get ahead.
Success Tips
Weigh your flour if you can. Too much flour is the most common reason velvet cakes turn dry. If you use a measuring cup, spoon the flour in and level it off instead of scooping.
Crush the Oreos in a zip-top bag with a rolling pin for the filling, and use a food processor for the frosting so the crumbs are fine enough not to clog a piping tip. Scrape the bowl often when beating the cream cheese. A single cold lump will show up as white flecks in the filling.
If the cake layers dome while baking, trim the tops with a serrated knife so the stack sits level. The trimmings are good with coffee.
Frequently Asked Questions (FAQ)
Can I make Blue Velvet Oreo Cheesecake Cake a day ahead?
Yes, and it is better that way. The flavors settle and the layers firm up. Make the whole cake, cover it, and keep it in the refrigerator until serving.
Why did my cake layers turn out pale instead of bright blue?
The most likely cause is too little coloring or liquid coloring in place of gel. Use at least one tablespoon of gel. The color also deepens slightly as the batter bakes.
Can I skip the gelatin in the cheesecake layer?
You can, but the layer will be softer and harder to handle when stacking. If you skip it, freeze the filling longer, around six hours, and work quickly during assembly.
Is the cheesecake layer baked?
No, it is a no-bake filling made with cream cheese and whipped cream. It sets in the freezer, then softens to a creamy texture in the fridge.
Can I use a different pan size?
Yes. Use three 6-inch pans for a taller cake, or two 9-inch pans for a wider one with slightly thinner layers. Make the cheesecake layer in a pan that matches the size you choose, and check the cake for doneness a few minutes early.
Recipe Card Info
Prep time: 45 minutes (plus 4 hours freezing and 2 hours chilling)
Cook time: 30 minutes
Total time: About 7 hours 15 minutes
Servings: 12
Category: Dessert
Difficulty: Medium
Cuisine: American
Yield: One 8-inch, 2-layer cake with a cheesecake center
Equipment: Two 8-inch round cake pans, one 8-inch round pan for the cheesecake layer, plastic wrap, electric mixer, mixing bowls, rubber spatula, wire rack, offset spatula, serrated knife
Ingredients
Cheesecake layer
- 16 oz (450 g) full-fat cream cheese, softened
- 3/4 cup (90 g) powdered sugar
- 1 teaspoon vanilla extract
- 2 teaspoons unflavored gelatin
- 2 tablespoons cold water
- 1 1/2 cups (360 ml) cold heavy cream
- 1 cup crushed Oreo cookies (about 10 cookies)
Blue velvet cake
- 2 1/2 cups (300 g) all-purpose flour
- 1 tablespoon unsweetened cocoa powder
- 1/2 teaspoon salt
- 1/2 cup (113 g) unsalted butter, softened
- 1/4 cup (60 ml) neutral oil
- 1 1/2 cups (300 g) granulated sugar
- 2 large eggs, room temperature
- 1 tablespoon blue gel food coloring
- 1 teaspoon vanilla extract
- 1 cup (240 ml) buttermilk, room temperature
- 1 teaspoon baking soda
- 1 teaspoon white vinegar
Oreo cream cheese frosting
- 8 oz (225 g) full-fat cream cheese, softened
- 1/2 cup (113 g) unsalted butter, softened
- 3 cups (360 g) powdered sugar
- 1 teaspoon vanilla extract
- Pinch of salt
- 8 Oreo cookies, finely crushed
To decorate
- 6 Oreo cookies, halved
- 1/2 cup crushed Oreo cookies for the sides
Directions
- Line an 8-inch round pan with plastic wrap, leaving extra hanging over the sides.
- Sprinkle the gelatin over the cold water and let it sit for 5 minutes. Microwave for 5 to 10 seconds until liquid.
- Beat the cream cheese, powdered sugar, and vanilla until smooth. Mix in the melted gelatin.
- Whip the heavy cream to stiff peaks. Fold it into the cream cheese mixture in two additions, then fold in the crushed Oreos.
- Spread the filling into the lined pan, smooth the top, and freeze for at least 4 hours until solid.
- Heat the oven to 350°F (175°C). Grease and line two 8-inch cake pans with parchment.
- Whisk the flour, cocoa powder, and salt in a bowl.
- Beat the butter, oil, and sugar for 3 minutes until pale and fluffy. Add the eggs one at a time, then mix in the vanilla and blue gel coloring.
- Add the dry ingredients in three parts, alternating with the buttermilk, mixing only until combined.
- Stir the baking soda into the vinegar in a small cup. Once it fizzes, fold it into the batter.
- Divide the batter between the pans and bake for 28 to 32 minutes, until a toothpick comes out clean.
- Cool in the pans for 10 minutes, then turn out onto a wire rack and cool completely.
- For the frosting, beat the butter and cream cheese until fluffy. Add the powdered sugar gradually, then the vanilla and salt. Fold in the finely crushed Oreos.
- Place one cake layer on a serving plate. Lift the frozen cheesecake out using the plastic wrap, peel the wrap off, and set it on the cake.
- Top with the second cake layer. Spread a thin crumb coat of frosting over the cake and chill for 20 minutes.
- Apply the final coat of frosting. Press crushed Oreos onto the sides and top with halved cookies.
- Refrigerate for at least 2 hours before slicing.
Notes
- Use gel food coloring for the best color. Liquid coloring will give a paler cake.
- Keep the cheesecake layer frozen until the moment you assemble the cake.
- The cake keeps for 4 days covered in the refrigerator, and slices freeze for up to 2 months.
- Trim any domed cake tops so the layers stack evenly.
- Cutting with a hot, dry knife gives the cleanest slices.
Nutrition
Per slice (1 of 12), approximate values: Calories 640; Fat 38 g; Saturated fat 20 g; Carbohydrates 68 g; Sugar 50 g; Protein 7 g; Sodium 420 mg; Fiber 1 g. Values vary by brand and portion size.
I can also put this in a Word doc or a shareable page if you’d like.