Old Fashioned Cream Custard Pie
Table of Contents
ToggleOld Fashioned Cream Custard Pie Recipe: Silky, Nutmeg-Kissed, and Worth the Wait
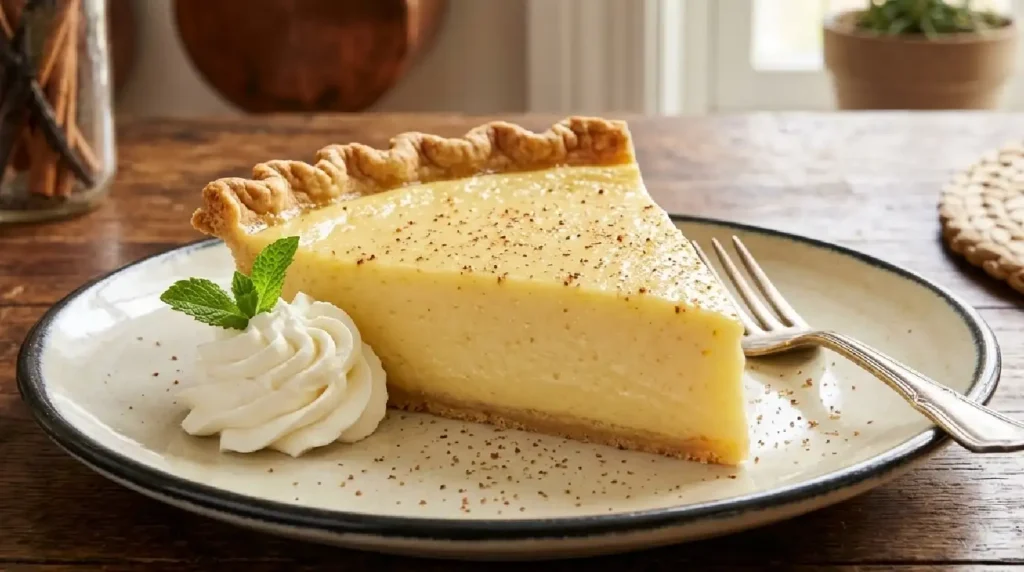
Some desserts don’t need a tall meringue or a drizzle of anything. They just sit there in their flaky shell, pale gold and gently trembling, and everyone at the table goes quiet. That’s the old fashioned cream custard pie recipe I want to share with you.
My grandmother made this pie on Sunday afternoons, usually when she’d run out of fruit and had no patience for a trip to the store. She kept eggs, milk, sugar, and vanilla around, so that’s what she used. The kitchen would smell of warm butter, sweet vanilla, and freshly grated nutmeg, and I’d hover near the oven door pretending I wasn’t waiting. The filling sets into something creamy and tender, with a thin, lightly browned top and a crisp crust underneath. It’s simple food, made well.
Why You’ll Love This
- It uses pantry staples: eggs, milk, cream, sugar, vanilla, and a pie crust. No special shopping trip required.
- The texture is silky and smooth, somewhere between a baked pudding and a soft cheesecake, without any heaviness.
- It’s forgiving on the day you serve it. You can bake it in the morning and slice it that evening.
- It’s a gentle dessert that suits almost everyone, from kids to grandparents.
- The prep takes about twenty minutes, and the oven does the rest.
The Backstory
My brother-in-law, Daniel, claims he doesn’t like pie. He says crusts are dry, fillings are too sweet, and fruit “ruins the whole thing.” At a family dinner a few winters ago, he politely declined a slice and then sat watching everyone else eat theirs. Eventually my sister slid a small wedge in front of him, and he took one bite out of manners. Then he took another. Ten minutes later he was scraping the last bit of custard off the plate with his fork and asking if there was more. He now requests this pie by name every holiday, and he still insists he doesn’t like pie.
What Makes It Special
- Whole milk and heavy cream: Together they give the custard its smooth, rich body. Milk keeps it light, while cream adds a velvety finish.
- Large eggs: They are the structure of the pie. Gentle baking turns them into a soft, sliceable custard rather than a scramble.
- Granulated sugar: Sweetens without overpowering, letting the dairy flavor come through.
- Pure vanilla extract: Adds warm, floral depth. It’s the main flavor here, so use the good bottle.
- Freshly grated nutmeg: Gives the top a faintly spiced, woodsy aroma and a classic look.
- Unsalted butter and flour (in the crust): A buttery, flaky shell that stays crisp against the creamy filling.
- A pinch of salt: Rounds out the sweetness and sharpens every other flavor.
Making It Happen
Start by heating your oven to 425°F and placing a rack in the lower third. Roll out your pie dough, fit it into a 9-inch pie plate, and crimp the edges. Prick the bottom a few times with a fork, line it with parchment, fill it with pie weights or dried beans, and blind bake for about 10 minutes. Remove the weights and parchment, then bake another 3 to 4 minutes until the crust looks dry and just barely pale gold. This step keeps the bottom from turning soggy later. Lower the oven to 350°F.
While the crust cools slightly, warm the milk and cream in a saucepan over medium-low heat until steam rises and small bubbles form at the edges. Don’t let it boil. In a large bowl, whisk the eggs, sugar, and salt until smooth and pale, then slowly pour in the warm milk mixture while whisking constantly. Going slowly keeps the eggs from cooking too fast. Stir in the vanilla.
Set the partially baked crust on a baking sheet, then strain the custard through a fine mesh sieve directly into it. This catches any stray egg bits and gives you a glassy, even surface. Grate fresh nutmeg generously over the top.
Slide the pie into the oven carefully and bake for 35 to 45 minutes. You want the edges set and the center still slightly wobbly, like gelatin when you nudge the pan. It will finish setting as it cools. Let it rest on a wire rack for at least an hour, then chill before slicing for the cleanest edges.
You Must Know
- Blind bake the crust. A wet custard on raw dough makes a pale, soggy bottom. A short pre-bake keeps it crisp.
- Pull it while the center still jiggles. Overbaked custard turns rubbery and can weep. A slight wobble in the middle is exactly right.
- Strain the custard. It takes ten seconds and makes the texture noticeably smoother.
- Warm the milk, never boil it. Hot enough to blend easily with the eggs, gentle enough not to cook them.
- Shield the crust edges. If they darken too fast, wrap them loosely with foil or a pie shield.
Serving Ideas & Pairings
This pie is lovely on its own, chilled or at room temperature. If you want to dress it up, add a small spoonful of lightly whipped cream, a few fresh berries, or a thin drizzle of warm caramel. Sliced peaches or stewed rhubarb on the side cut the richness nicely.
For drinks, a hot cup of black coffee or a strong English breakfast tea is the classic partner. In the evening, try a small glass of tawny port or a spiced chai. For kids, cold milk is hard to beat. It also pairs well after a savory Sunday meal like roast chicken, ham, or a pot of soup.
Make It Different
- Dairy-light version: Use all whole milk and skip the cream. The pie will be a little softer and less rich, but still lovely.
- Dairy-free: Swap in full-fat canned coconut milk and unsweetened oat or almond milk. Use a dairy-free butter or shortening in the crust.
- Lower sugar: Reduce the sugar by a couple of tablespoons, or replace part of it with maple syrup (cut back the milk by a splash to balance).
- Gluten-free: Use a gluten-free pie crust or a press-in crumb crust made from gluten-free graham-style cookies.
- Flavor twists: Add a strip of lemon zest or a split vanilla bean to the milk as it warms. A teaspoon of bourbon or a pinch of cardamom changes the character completely. A little ground cinnamon mixed with the nutmeg suits fall and winter.
- Chocolate bottom: Brush the baked crust with a thin layer of melted dark chocolate before filling.
Storage & Reheating
Cover the cooled pie loosely and refrigerate. Because it’s an egg-based filling, it shouldn’t sit out for more than two hours. It keeps well for up to 3 days in the fridge. Cover it with plastic wrap or foil once it has fully chilled, so condensation doesn’t drip onto the surface.
This pie is best served cold or cool, so reheating isn’t really necessary. If you prefer a slice slightly warm, place it on a baking sheet and heat it in a 275°F oven for 8 to 10 minutes, just until the chill is gone. Avoid the microwave if you can, as it can make the custard rubbery and the crust soft. I don’t recommend freezing a whole baked custard pie, because the texture turns grainy after thawing.
Success Tips
- Bring the eggs to room temperature before you start. They blend more smoothly and bake more evenly.
- Whisk gently rather than vigorously. Too much air creates bubbles and a foamy top instead of a smooth one.
- Pour the filling into the crust while it’s sitting on the oven rack, if you can manage it. A full pie travels poorly, and sloshing can crack the crust.
- If a few bubbles collect on the surface, pop them with a toothpick before baking.
- Don’t skip the cooling time. Cutting into it warm gives you a puddle instead of a slice.
- Fresh nutmeg makes a real difference. Pre-ground loses much of its warmth and aroma sitting on a shelf.
Frequently Asked Questions (FAQ)
1. Why did my custard pie turn watery?
Usually it’s overbaking, which makes the egg proteins tighten and squeeze out liquid. Pull the pie when the center still wobbles slightly, and let it finish setting off the heat.
2. Can I use a store-bought crust?
Absolutely. A refrigerated rolled crust works well. Just blind bake it first, as the recipe describes, so the bottom stays crisp.
3. How do I know when the pie is done?
Gently shake the pan. The outer two inches should look set, while the center, about the size of a silver dollar, jiggles a little. You can also insert a knife about an inch from the center. If it comes out mostly clean, you’re good.
4. Can I make it a day ahead?
Yes, and it’s actually better that way. The flavors settle and the slices cut more cleanly after a night in the fridge.
5. Why did my pie crack on top?
Cracks happen when the oven is too hot or the pie bakes too long. Keep the temperature at 350°F, watch the clock, and let the pie cool gradually at room temperature before chilling.
Recipe Card Info
Prep time: 25 minutes
Cook time: 50 minutes
Total time: 3 hours 15 minutes (includes cooling and chilling)
Servings: 8
Category: Dessert
Difficulty: Easy to Medium
Cuisine: American
Yield: One 9-inch pie
Equipment: 9-inch pie plate, rolling pin, saucepan, large mixing bowl, whisk, fine mesh sieve, baking sheet, parchment paper, pie weights or dried beans, wire cooling rack
Ingredients
For the crust:
- 1 single 9-inch pie crust (homemade or store-bought)
For the custard filling:
- 4 large eggs, at room temperature
- 1/2 cup (100 g) granulated sugar
- 1/4 teaspoon fine salt
- 1 1/2 cups (360 ml) whole milk
- 1 cup (240 ml) heavy cream
- 2 teaspoons pure vanilla extract
- 1/2 teaspoon freshly grated nutmeg, plus more for the top
Directions
Step 1: Heat the oven to 425°F (220°C) and place a rack in the lower third.
Step 2: Fit the pie crust into a 9-inch pie plate and crimp the edges. Prick the bottom with a fork.
Step 3: Line the crust with parchment, fill with pie weights, and bake for 10 minutes. Remove the weights and parchment and bake 3 to 4 minutes more, until dry and lightly pale gold.
Step 4: Reduce the oven temperature to 350°F (175°C).
Step 5: Heat the milk and cream in a saucepan over medium-low heat until steaming and small bubbles appear at the edges. Do not boil.
Step 6: In a large bowl, whisk the eggs, sugar, and salt until smooth and slightly pale.
Step 7: Slowly pour the warm milk mixture into the eggs while whisking constantly. Stir in the vanilla and nutmeg.
Step 8: Place the partially baked crust on a baking sheet. Strain the custard through a fine mesh sieve into the crust.
Step 9: Sprinkle extra nutmeg over the top.
Step 10: Bake for 35 to 45 minutes, until the edges are set and the center still jiggles slightly. Cover the crust edges with foil if they brown too quickly.
Step 11: Cool the pie on a wire rack for 1 hour, then refrigerate for at least 2 hours before slicing.
Notes
- Use whole milk and real cream for the best texture. Low-fat milk gives a looser, less creamy set.
- The pie will continue to set as it cools, so don’t wait for the center to look firm in the oven.
- Leftovers should be refrigerated and eaten within 3 days.
- For a deeper flavor, steep a split vanilla bean in the warm milk for 15 minutes before mixing it with the eggs.
Nutrition
Per serving (1 of 8 slices, approximate):
- Calories: 310
- Fat: 20 g
- Saturated fat: 11 g
- Carbohydrates: 26 g
- Sugar: 14 g
- Protein: 7 g
- Sodium: 190 mg
- Cholesterol: 135 mg
Nutrition values are estimates and will vary based on the ingredients and crust you use.