Make Subway Sandwich at Home
How to Make Subway at Home Recipe: The Ultimate Guide to the Perfect Sandwich
There is a very specific aroma that hits you the moment you walk into a sandwich shop—the scent of proofing dough, vinegary pickles, and toasted oregano. For a long time, I thought that magic was impossible to replicate in a home kitchen. I spent years settling for soggy cold cuts and lackluster bread until I realized the secret isn’t a hidden ingredient; it is the assembly and that quick, high-heat broil. This home version captures that iconic crunch and melted goodness, allowing you to pile on the toppings exactly how you like them without the extra charge for double cheese.
Why You’ll Love This
| Reason | Description |
|---|---|
| Complete Customization | You control the quality of the deli meat and the exact ratio of crisp vegetables to creamy sauce. |
| Budget Friendly | Making four footlongs at home costs a fraction of the price of the restaurant versions. |
| The Perfect Crunch | Using your own broiler ensures the bread stays golden and the cheese gets those beautiful charred bubbles. |
| Better Ingredients | You can opt for nitrate-free meats and organic produce for a fresher, cleaner taste. |
The Skeptic’s Sandwich
My younger brother has always been a die-hard fan of the Italian B.M.T. He claimed no one could replicate the “fold” or the specific way the oils from the pepperoni soak into the bread. Last Sunday, I invited him over and served this version without telling him it was homemade. He took one bite of the toasted, crusty bread and looked at me in genuine confusion. He actually preferred the way the cheese had fused with the turkey and ham under my oven’s broiler compared to the standard conveyor belt ovens. Now, it is a weekly request for game days.
What Makes It Special
| Ingredient Component | Why It Works |
|---|---|
| Freshly Sliced Deli Meat | Using thin, ribbons of high-quality meat creates air pockets that hold the sauce better than a flat stack. |
| The Triple-Cheese Melt | A mix of Swiss, Provolone, or American provides that signature creamy stretch. |
| Aromatic Seasoning | A simple dust of dried oregano and black pepper transforms a basic sandwich into a deli classic. |
| The “Hinge” Cut | Slicing the bread but keeping the back intact allows you to stuff it full without losing toppings. |
Making It Happen
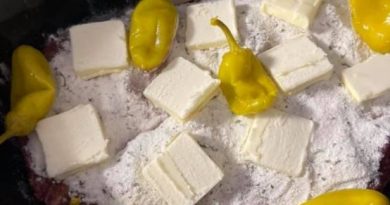
The process begins with the architecture of the bread. Take your footlong loaf and slice it lengthwise, but be careful not to cut all the way through; you want a sturdy hinge at the back to act as a cradle for your ingredients. Lay the bread open on a baking sheet and begin layering your deli meat. Instead of laying the slices flat, fold or ribbon them to create volume.
Once the meat is settled, drape your cheese slices across the top. This is the crucial stage. Slide the entire tray under your oven’s broiler. Keep a close eye on it—you are looking for the cheese to transition from solid slices to a bubbling, golden blanket. This usually takes less than two minutes.
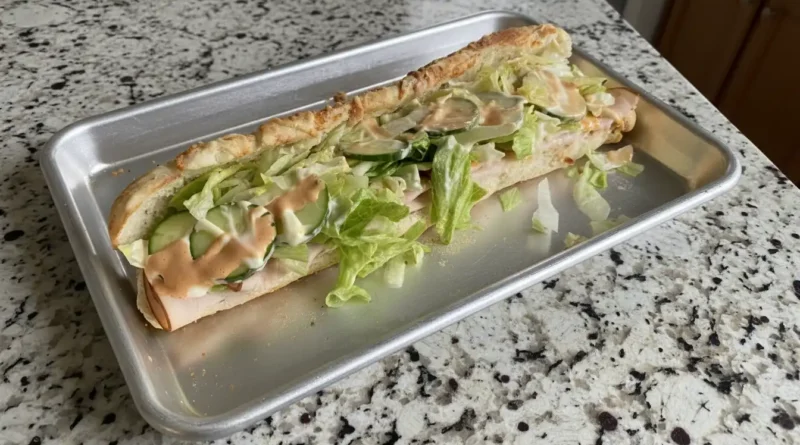
After you pull the toasted sub from the heat, it is time for the greenery. Pile on the shredded lettuce, crisp cucumbers, and any other vegetables you crave. Finish with a generous drizzle of your favorite sauce. The final touch is the seasoning: a pinch of salt, a crack of black pepper, and a sprinkle of dried oregano. Close the hinge, press down slightly to marry the flavors, and serve while the bread is still warm.
You Must Know
| Tip | Detail |
|---|---|
| Watch the Broiler | Broilers vary in intensity. Stay by the oven to prevent the edges of the bread from burning. |
| The Vegetable Order | Put the “heavy” veggies like cucumbers and peppers on first, then top with lettuce to keep it crisp. |
| Sauce Placement | Apply the sauce directly onto the toasted meat and cheese before the veggies to lock in moisture. |
| Bread Choice | A soft hoagie roll or a French baguette works best to mimic the restaurant texture. |
Serving Ideas
This sandwich is a meal on its own, but it pairs beautifully with a side of kettle-cooked sea salt chips for that essential crunch. If you want something lighter, a simple vinegar-based coleslaw provides a nice tangy contrast to the savory deli meats. For drinks, a cold lemon-lime soda or an iced tea with plenty of lemon balances the richness of the melted cheese and sauces.
Make It Different
To make this recipe your own, consider the following swaps:
- Gluten-Free: Use a sturdy gluten-free baguette to ensure it holds up under the broiler.
- Spicy Kick: Swap standard mayo for a chipotle aioli and add sliced jalapeños before toasting.
- Vegetarian: Replace the deli meat with marinated portobello mushrooms or extra layers of smashed avocado added after toasting.
- Leaner Option: Use turkey breast and low-fat mozzarella for a lighter lunch that still feels indulgent.
Storage and Reheating
If you have leftovers, store the meat and bread separately from the fresh vegetables if possible. If the sandwich is already assembled, wrap it tightly in parchment paper and then foil. To reheat, avoid the microwave as it will make the bread rubbery. Instead, place the sandwich in a 350 degree oven for about 5-8 minutes until the center is warm and the exterior regains its crunch.
Success Tips
For the most authentic experience, use a serrated knife to cut your vegetables as thinly as possible. Shaving the onions and peppers allows them to soften slightly from the residual heat of the toasted bread. Also, don’t skip the oregano; it is the “secret” scent that defines the Subway profile.
Frequently Asked Questions
| Question | Answer |
|---|---|
| Can I use a toaster oven instead of a big oven? | Yes, a toaster oven is actually perfect for single servings and often toasts more evenly. |
| What is the best sauce to use? | Honey mustard, sweet onion, or a simple oil and vinegar blend are the most popular choices. |
| How do I keep the bread from getting soggy? | Toast the bread with the meat and cheese first to create a barrier before adding “wet” vegetables like tomatoes. |
| What kind of vegetables does Subway use? | Common options include shredded iceberg lettuce, tomatoes, red onions, green peppers, cucumbers, olives, and pickles. |
| Can I make these ahead of time for a party? | It is best to toast them fresh, but you can prep all the meat and veggie trays in advance for a “build-your-own” station. |
Subway at Home Recipe Card
| Category | Information |
|---|---|
| Prep Time | 10 Minutes |
| Cook Time | 2 Minutes |
| Total Time | 12 Minutes |
| Servings | 4 People |
| Category | Lunch / Main Course |
| Difficulty | Easy |
| Cuisine | American |
| Yield | 4 Footlong Sandwiches |
| Equipment | Baking Sheet, Bread Knife, Oven Broiler |
Ingredients
- 4 Footlong Loaves
- 20 slices Deli Meat
- 12 slices Cheese
- Lettuce
- Vegetables (Onions, Peppers, Cucumbers, Tomatoes)
- 12 tablespoons Sauce
- Salt, Pepper, and Oregano (to taste)
Instructions
- Cut your bread in half lengthwise, leaving it attached at the back. Open it and layer 5 slices of deli meat of choice along the bread. Top with 3 slices of cheese.
- In your oven, put the open sandwich under the broiler until the cheese is melted and bubbling.
- Remove from the oven and top with your choice of vegetables. (See the “What kind of vegetables” section in the FAQ for recommendations).
- Top with 3 tablespoons of sauce per sub. Finish with a sprinkle of salt, pepper, and oregano if desired. Serve immediately.
Notes
For the best texture, ensure your deli meat is at room temperature before toasting so it heats through evenly without over-browning the bread.
Nutrition
Estimated per serving: 580 Calories | 24g Fat | 52g Carbohydrates | 38g Protein (Values vary based on specific bread and meat choices).
I would love to hear how your home sandwich shop turns out! Do you have a favorite secret sauce or a specific vegetable combo that makes your sub perfect? Let me know in the comments below!