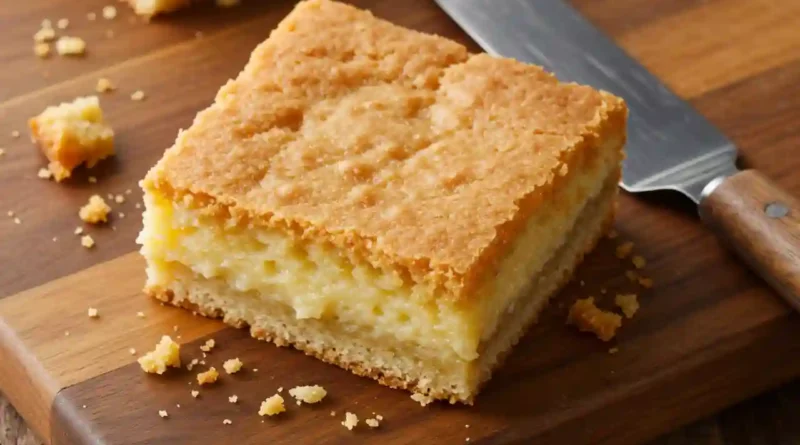
Gooey Butter Cake Bars
The Ultimate Gooey Butter Cake Bars: A St. Louis Classic Reimagined
The first time I tasted Gooey Butter Cake, it wasn’t in a fancy bakery but at a bustling community potluck in the Midwest. A kind-faced woman with a knowing smile pressed a small, unassuming square into my hand. “Try this, dear,” she said. One bite was all it took. The contrast was pure magic—a firm, buttery shortbread-like base giving way to an impossibly rich, sweet, and yes, gloriously gooey cream cheese topping. It was love at first taste. I’ve been chasing that perfect bite ever since, and this recipe is the happy result. These Gooey Butter Cake Bars are my homage to that classic dessert—a foolproof, bar-style version that delivers that iconic texture and deep, comforting flavor in every single bite.
Why You’ll Love This Recipe
-
Pure Comfort in Every Bite: This dessert is the edible equivalent of a warm hug. The rich, creamy topping and buttery base are the ultimate comfort food combination.
-
Surprisingly Simple to Make: With a base made from a cake mix, this recipe comes together in minutes with minimal fuss, making it perfect for both beginner bakers and seasoned pros.
-
The Crowd-Pleasing Powerhouse: Whether it’s a bake sale, potluck, or family gathering, this dish disappears fast and earns rave reviews every single time.
-
Perfect Make-Ahead Dessert: These bars actually benefit from being made ahead, as they set up perfectly and are even easier to cut cleanly after chilling.
A Story of Sweet Success
I’ll never forget the time I brought a pan of these to my friend’s holiday party. Her father, a man famously skeptical of any dessert that wasn’t plain chocolate cake, eyed the powdered-sugar-dusted bars with suspicion. After some gentle coaxing, he took a small piece. Ten minutes later, I caught him sneaking a second, much larger square. He later confessed, “I don’t usually go for this kind of thing, but that… that’s something else.” It’s a testament to the irresistible, nostalgic charm of these bars—they win over even the most stubborn of skeptics.
What Makes It Special
-
Yellow Cake Mix: This isn’t just a shortcut; it’s the secret to the perfect dense and chewy base layer that defines an authentic Gooey Butter Cake.
-
Cream Cheese: The star of the show! When baked, it creates that signature tangy, rich, and molten-like topping that is the heart and soul of this dessert.
-
A Full Pound of Powdered Sugar: This is key for achieving the classic sweet flavor and the distinctively gooey, fudgy texture of the filling.
-
Pure Vanilla Extract: Using a good quality vanilla enhances the buttery, warm notes in both the base and the creamy topping.
Making It Happen
Let’s create some magic. Start by preheating your oven to 350°F (175°C). This is crucial for even baking. Take a 9×13 inch baking dish and line it with parchment paper, letting the edges hang over the sides. This simple step is your best friend—it guarantees you can lift the entire batch out for flawless, crack-free slicing later.
Now, for the base. In a large bowl, combine the yellow cake mix, the melted butter, two of the eggs, and one teaspoon of that lovely vanilla. Use a hand mixer to beat this until it comes together into a thick, cohesive dough. It will be thick and a bit stubborn! Transfer this dough into your prepared pan. Here’s a pro tip: lightly spray the back of a spoon or your fingers with cooking spray and use it to press the dough into a smooth, even layer across the bottom of the pan.
Time for the famous gooey layer. In a medium bowl, beat the softened cream cheese until it’s smooth and lump-free. Add the remaining two eggs and the second teaspoon of vanilla, and beat again until the mixture is silky. Now, gradually beat in the powdered sugar. I add it one cup at a time to avoid a sweet, snowy cloud in your kitchen! Keep mixing until everything is perfectly smooth and velvety.
Pour this beautiful cream cheese batter over your cake base and gently spread it all the way to the edges. Slide the pan onto the middle rack of your oven and bake for 35 to 40 minutes. You’re looking for the edges to be set and a beautiful light golden brown, while the center will still jiggle just a little when you gently shake the pan—that’s the promise of gooeyness!
This is the hardest part: walk away. Let the pan cool completely on a wire rack. For the cleanest cuts and the best texture, I highly recommend then covering it and popping it into the refrigerator for a few hours or even overnight. The wait is absolutely worth it.
You Must Know
-
Do Not Overbake: The center must still be slightly jiggly when you remove it from the oven. It will continue to set as it cools. Overbaking is the enemy of gooeyness.
-
Room Temperature is Key: Ensure your cream cheese is truly at room temperature to avoid a lumpy filling.
-
Patience is a Virtue: Cooling completely is non-negotiable. Cutting into warm bars will result in a mess, as they need time to set their structure.
-
The Parchment Paper Sling: Don’t skip the parchment paper! It’s the easiest way to get picture-perfect bars out of the pan.
Serving Ideas
These rich bars are fantastic all on their own, dusted with an extra shower of powdered sugar. For a delightful contrast, serve them with a handful of fresh berries like raspberries or strawberries to cut through the sweetness. A dollop of lightly sweetened whipped cream is also a magnificent pairing. For a drink, a glass of cold milk, a hot coffee, or a dessert wine like a Riesling complements the sweet, rich flavors perfectly.
Make It Different
-
Chocolate Lover’s Twist: Use a devil’s food cake mix instead of yellow cake for a chocolate base.
-
Citrus Zing: Add the zest of one lemon or orange to the cream cheese filling for a bright, fresh flavor.
-
Nutty Crunch: Sprinkle a handful of chopped pecans or walnuts over the top before baking.
-
Cookie Dream: Fold a half-cup of chocolate chips or white chocolate chips into the cake base layer.
Storage and Reheating Recipe Tips
Store any leftovers (lucky you!) in an airtight container in the refrigerator for up to 5 days. You can enjoy them cold straight from the fridge for a firmer, fudgy texture, or let them sit out for 15 minutes to come closer to room temperature. For that “fresh-from-the-oven” experience, you can microwave a single bar for 10-15 seconds until just slightly warm.
Success Tips
For the ultimate clean slice, wipe your knife clean between each cut. If you’re a fan of a more defined layered look, chilling the bars thoroughly before slicing is the absolute best method. For an extra professional touch, sift a little extra powdered sugar over the top right before serving.
Frequently Asked Questions (FAQ)
Can I use a different type of cake mix?
Absolutely! While yellow cake is traditional, you can experiment with others. Butter recipe yellow cake, white cake, or even spice cake mix work wonderfully.
My filling turned out lumpy. What happened?
This is almost always because the cream cheese was too cold. Make sure it’s truly softened at room temperature for at least an hour before you begin.
How do I know when it’s done baking?
The edges will be set and golden brown, and the center will have a slight jiggle—like Jell-O—when you gently shake the pan. If the center is still liquidy, it needs more time; if it’s completely firm, it’s overbaked.
Can I freeze Gooey Butter Cake Bars?
Yes! They freeze beautifully. Cool completely, then cut into squares. Wrap individual bars tightly in plastic wrap and place them in a freezer-safe bag or container for up to 3 months. Thaw in the refrigerator overnight.
Is this the same as a cheese cake?
While it has a cream cheese layer, the texture is distinctively different. It’s denser, chewier, and much sweeter than a classic New York-style cheesecake.
Prep time: 15 minutes
Cook time: 40 minutes
Total time: 55 minutes (plus cooling time)
Category: Dessert
Difficulty: Easy
Cuisine: American
Yield: 24 bars
Ingredients
-
1 (18.5 ounce) package yellow cake mix
-
½ cup butter, melted
-
4 large eggs, divided
-
2 teaspoons vanilla extract, divided
-
1 (8 ounce) package cream cheese, softened to room temperature
-
4 cups confectioners’ sugar
Instructions
-
Preheat oven to 350°F (175°C). Line a 9×13 inch baking pan with parchment paper, allowing the edges to overhang for easy removal.
-
In a large bowl, combine the cake mix, melted butter, 2 eggs, and 1 teaspoon vanilla extract. Beat with a hand mixer on medium speed until a thick dough forms.
-
Press the dough evenly into the bottom of the prepared pan. (Lightly greasing your fingers or a spoon helps prevent sticking).
-
In the same bowl (cleaned), beat the softened cream cheese until smooth. Add the remaining 2 eggs and 1 teaspoon vanilla extract; beat until combined.
-
Gradually add the confectioners’ sugar, beating on low speed until fully incorporated and the mixture is smooth.
-
Pour the cream cheese filling over the cake layer and spread it evenly to the edges.
-
Bake for 35-40 minutes, or until the edges are golden brown and the center is set but still has a slight jiggle.
-
Remove from the oven and place the pan on a wire rack to cool completely. For best results, refrigerate for at least 3-4 hours or overnight before lifting out of the pan and cutting into squares.
Notes
Store leftovers in an airtight container in the refrigerator for up to 5 days. These bars can be frozen for up to 3 months.
Allergy Info: Contains gluten, dairy, eggs, and soy.
Nutrition (per serving, 1 bar): Calories: ~275kcal | Carbohydrates: 45g | Protein: 2g | Fat: 10g | Saturated Fat: 5g | Cholesterol: 50mg | Sodium: 220mg | Sugar: 37g