How to Make Golden Santa Bread (Tutorial)
A step-by-step photo tutorial for how to make Golden Santa Bread! I promise it is NOT as hard as it looks. This is such a fun breakfast to make ahead for Christmas morning! Very kid-friendly. Actually it’s pretty much errbody-friendly.
Ingredients
3 & 1/2 cups bread flour, spooned and leveled
1 & 1/2 teaspoons salt
1/2 cup milk
1/4 cup water
1/4 cup butter, cubed
1/2 cup sugar
2 tablespoons yeast
2 eggs
2 raisins
2 egg yolks, separated in 2 bowls
red food coloring
Instructions
In a large bowl or stand mixer, combine 2 cups of the bread flour and the salt.
In a glass measuring cup, heat the milk, water and butter to 120°-130° in the microwave (or in a pot on the stove.) (Heat the mixture until the butter is partially melted, then stir it to melt it the rest of the way. Don’t add the liquid to the yeast mixture until your finger dipped in it feels comfortably warm, but not hot.)
Add the sugar and yeast to the liquid. If you are confident that your yeast is not dead, then move on to the next step. Otherwise wait 5 minutes to see if it starts to foam.
Add liquid to dry ingredients; beat just until moistened. Beat in 2 eggs until smooth.
Stir in enough of the remaining flour to form a dough. The dough should come together in a ball, but it’s okay if it sticks a little. Add flour until you can handle the dough without it a big mess on your hands.
Turn onto a floured surface; knead until smooth and elastic, about 6-8 minutes. (Or beat with the dough hook for 6-8 minutes.)
Place in a greased bowl, turning once to grease top. Cover and let rise in a warm place until doubled, at least an hour and a half, mine took 2.
Punch dough down. Turn onto a lightly floured surface; divide into two portions, one slightly larger than the other.
Shape the larger portion into an elongated triangle with rounded corners for Santa’s head and hat. Transfer to a large greased cookie sheet.
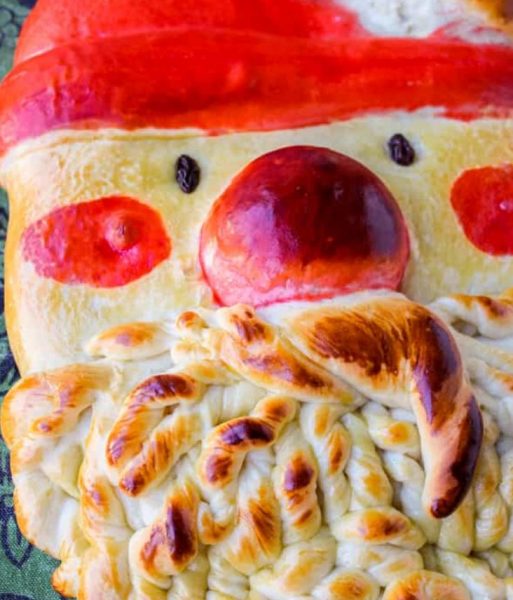
Divide the smaller portion in half. Shape and flatten one half into a beard. Using scissors or a pizza cutter, cut into strips to within 1 in. of top. Cut the strips pretty thin so that they are easy to twist. Position on Santa’s face; twist and curl strips.
Use the remaining dough for the mustache, nose, hat pom-pom and brim. Shape a portion of dough into a mustache; flatten and cut the ends into small strips with scissors. Place above beard.
Place a small ball above mustache for nose. Fold tip of hat over and add another ball for pom-pom.
Roll out a narrow piece of dough to create a hat brim; position under hat and tuck the edges underneath the base dough.
With a scissors, cut two slits for eyes; insert raisins into slits.
In separate small bowls, beat egg each yolk. Brush plain yolk over portions of dough that will not be red. Add red food coloring to one yolk; carefully brush over hat, nose and cheeks. (You have to do the regular yolk first otherwise the color will run.)
Cover loosely with foil that has been coated with nonstick spray. Try to avoid letting the foil touch the bread, you don’t want to tear your bread.
Let dough rise another half hour. Bake at 350° for 15 minutes. Uncover; bake 5-10 minutes longer or until golden brown. Cool on a wire rack. Take pictures. Bask in the admiration of whoever sees it.
Notes
Santa Bread is a great make-ahead Christmas breakfast. Make the bread a few days or even a couple weeks before you want to serve it, then freeze, sealed tightly. (Use aluminum foil and plastic wrap. If it will fit into a 2-gallon freezer ziplock, use that.) Remove from the oven and let thaw on the counter without unwrapping it. Set your oven to 350 degrees. When the oven is hot and the bread is thawed, bake for 5-10 minutes, just until heated. Serve warm.