Pineapple Upside Down Cake with Brown Sugar Recipe
The Best Classic Pineapple Upside Down Cake with Brown Sugar Recipe
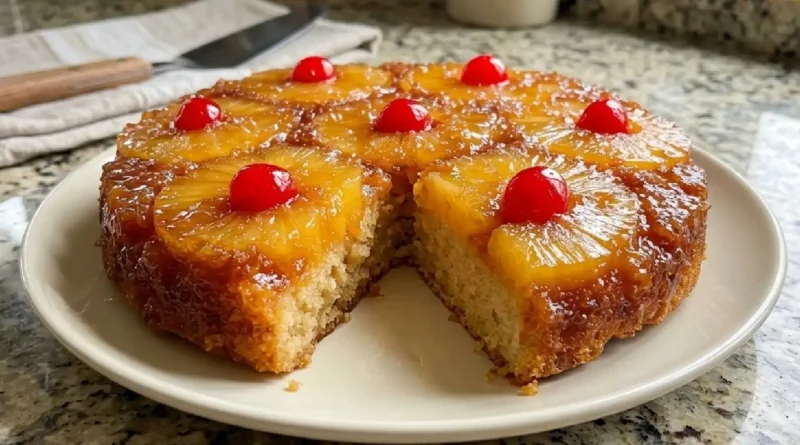
There is something deeply comforting about flipping a warm cake pan over and revealing a perfectly arranged, glistening mosaic of caramelized fruit. This pineapple upside down cake with brown sugar recipe brings back memories of Sunday afternoons in my grandmother’s kitchen, where the scent of melting butter and sweet fruit filled the air long before the oven timer dinned. It is a dessert that feels nostalgic yet completely timeless. Every slice offers a balance of tender, soft sponge cake soaked in rich juices, topped with vibrant pineapple rings and sweet cherries that look as beautiful as they taste.
Why You’ll Love This
-
The rich, buttery brown sugar glaze creates a natural topping that keeps the cake incredibly moist.
-
It requires basic pantry staples, making it an easy option for last-minute gatherings.
-
The striking contrast between the golden cake and the bright fruit makes it an instant center-piece for any table.
-
It tastes even better the next day as the fruit juices settle deeper into the crumb.
The Backstory
My uncle was notorious for refusing any dessert that contained fruit. He was a strict chocolate-only person for decades, turning his nose up at pies, tarts, and cobblers alike. One summer, I brought this pineapple upside down cake to a family barbecue. Lured by the intense aroma of caramelized brown sugar, he reluctantly took a tiny slice just to be polite. To everyone’s shock, he finished the entire piece and immediately asked for seconds. He confessed that the combination of the buttery sponge and the deeply sweet, caramelized pineapple completely changed his mind about fruit desserts.
What Makes It Special
-
Dark Brown Sugar: This creates a deep, smoky caramel layer on top of the cake, offering a richer flavor than standard light brown sugar.
-
Canned Pineapple Rings: Using rings canned in 100% juice ensures uniform thickness and a bright, tangy contrast to the sweet batter.
-
Buttermilk: The acidity in buttermilk breaks down the gluten in the flour, resulting in an exceptionally tender, fine-grained crumb.
-
Pure Vanilla Extract: A generous splash rounds out the flavors, tying the fruity topping and the buttery cake together seamlessly.
Making It Happen
Preparing this classic dessert begins with the topping, which actually goes into the pan first. You melt a stick of unsalted butter and pour it directly into the bottom of a heavy cake pan or cast-iron skillet. Sprinkle a thick, even layer of dark brown sugar over the melted butter, pressing it lightly so it absorbs the liquid. Next, arrange the pineapple rings in a single layer on top of the sugar, placing a bright maraschino cherry in the center of each ring and in the gaps between them.
For the batter, you cream softened butter and granulated sugar together until the mixture is light and fluffy. Beat in the eggs one at a time, ensuring each is fully incorporated before adding the next. In a separate bowl, whisk together the flour, baking powder, and salt. Alternate adding the dry ingredients and the buttermilk to the creamed butter, starting and ending with the flour mixture. Mix just until combined to keep the cake tender. Spoon the thick batter gently over the arranged fruit, smoothing the top with a spatula so you don’t disturb the design underneath. Bake until the top is deeply golden and a toothpick inserted into the center comes out clean.
You Must Know
-
Always dry the pineapple slices thoroughly with paper towels before placing them in the pan to prevent the caramel layer from becoming too watery.
-
Let the cake cool in the pan for exactly ten minutes before flipping; flipping too soon can cause the cake to break, while waiting too long makes the caramel stick to the bottom.
-
Use a pan with sides at least two inches high to prevent the bubbling butter and sugar from overflowing in your oven.
-
Run a thin knife around the edges of the pan just before inverting it onto your serving platter to ensure a clean release.
Serving Ideas & Pairings
This cake is spectacular when served warm, right after it is flipped. A dollop of unsweetened whipped cream balances the sweetness of the caramel beautifully. For a richer treat, serve a slice alongside a scoop of vanilla bean ice cream, letting it melt slightly into the warm pineapple. It pairs wonderfully with a cup of dark roast coffee or a hot black tea, which cuts through the buttery richness of the dessert.
Make It Different
You can easily adapt this recipe to suit different tastes or dietary needs. For a tropical twist, substitute the buttermilk with full-fat coconut milk and toss a handful of shredded coconut into the cake batter. If you need a gluten-free option, a high-quality 1-to-1 gluten-free baking flour blend works perfectly in this dense sponge. You can also replace the cherries with pecan halves or walnuts for a pleasant, crunchy texture that complements the soft fruit.
Storage & Reheating
Store any leftovers in an airtight container in the refrigerator for up to four days. Because of the fresh fruit topping, leaving it at room temperature for more than a day can cause it to spoil. To reheat, place a slice on a microwave-safe plate and warm it on medium power for 15 to 20 seconds. This softens the caramel layer and brings back the freshly baked texture without drying out the sponge.
Success Tips
-
Measure your flour using the spoon-and-level method rather than scooping directly from the bag, which packs the flour and results in a heavy cake.
-
Ensure your eggs, butter, and buttermilk are all at room temperature before you begin mixing to create a smooth, emulsified batter.
-
If the top of the cake browns too quickly in the oven before the center is cooked, tent a piece of aluminum foil loosely over the pan for the remaining baking time.
Frequently Asked Questions (FAQ)
Can I use fresh pineapple instead of canned?
Yes, you can use fresh pineapple, but ensure it is fully ripe and sliced to an even thickness. Fresh pineapple contains more moisture and less sugar than canned, so your caramel layer might be slightly thinner.
Why did my cake turn out soggy on top?
A soggy top usually happens if the pineapple rings weren’t dried well enough before assembly, or if the cake was left in the pan too long after baking, causing the steam to trap moisture.
Can I bake this in a cast-iron skillet?
Absolutely. Baking this cake in a 10-inch seasoned cast-iron skillet works wonderfully. It distributes the heat evenly and gives the brown sugar coating an excellent, slightly crisp edge.
Can I freeze pineapple upside down cake?
Yes, you can freeze this cake. Wrap the completely cooled cake tightly in plastic wrap, followed by a layer of aluminum foil. Freeze for up to three months, and thaw overnight in the refrigerator before reheating.
What can I use if I don’t have buttermilk?
You can make a quick substitute by adding one tablespoon of lemon juice or white vinegar to a cup of whole milk. Let it sit for five minutes until it curdles slightly before using.
Ingredients
For the Topping:
-
1/2 cup unsalted butter, melted
-
1 cup dark brown sugar, packed
-
1 can (20 ounces) pineapple slices in juice, drained and patted dry
-
12 to 15 maraschino cherries, stems removed and patted dry
For the Cake Batter:
-
1 1/2 cups all-purpose flour
-
1 1/2 teaspoons baking powder
-
1/4 teaspoon salt
-
1/2 cup unsalted butter, softened to room temperature
-
1 cup granulated sugar
-
2 large eggs, room temperature
-
1 teaspoon pure vanilla extract
-
1/2 cup buttermilk, room temperature
Instructions
Step 1: Preheat your oven to 350 degrees Fahrenheit. Pour the melted butter directly into the bottom of a 9×2-inch round cake pan, tilting the pan to coat the bottom completely.
Step 2: Sprinkle the dark brown sugar evenly over the melted butter. Press the sugar down gently with the back of a spoon to ensure an even layer.
Step 3: Arrange the dried pineapple slices on top of the brown sugar layer. Place one slice in the center and arrange the others around it. Place a maraschino cherry in the center of each pineapple ring and fill any open spaces between the rings with remaining cherries. Set the pan aside.
Step 4: In a medium bowl, whisk together the all-purpose flour, baking powder, and salt. Set aside.
Step 5: In a large bowl or stand mixer fitted with the paddle attachment, beat the softened butter and granulated sugar on medium speed for about 3 to 4 minutes until the mixture is light, fluffy, and pale in color.
Step 6: Add the eggs one at a time to the butter mixture, beating well after each addition. Stir in the vanilla extract until fully incorporated.
Step 7: Reduce the mixer speed to low. Add one-third of the dry ingredient mixture, followed by half of the buttermilk. Repeat with another third of the dry ingredients, the remaining buttermilk, and finish with the final third of the dry ingredients. Mix just until combined, taking care not to overmix.
Step 8: Spoon the cake batter gently over the arranged pineapple slices and cherries in the pan. Use a spatula to smooth the top evenly without disturbing the fruit design underneath.
Step 9: Bake in the preheated oven for 45 to 50 minutes, or until the top is a deep golden brown and a toothpick inserted into the center of the cake comes out clean.
Step 10: Remove the cake from the oven and place the pan on a wire rack to cool for exactly 10 minutes.
Step 11: Run a thin, sharp knife around the edges of the pan to loosen the cake. Place a large serving platter upside down over the top of the cake pan. Invert the pan and the platter together quickly and confidently.
Step 12: Let the pan sit inverted over the platter for 1 to 2 minutes to allow the caramel to drizzle down over the cake. Gently lift the pan away to reveal the fruit topping. Serve warm or at room temperature.
Recipe Card Info
-
Prep time: 20 minutes
-
Cook time: 50 minutes
-
Total time: 1 hour 10 minutes
-
Servings: 8 servings
-
Category: Dessert
-
Difficulty: Medium
-
Cuisine: American
-
Yield: 1 nine-inch cake
-
Equipment: 9×2-inch round cake pan, mixing bowls, electric mixer, rubber spatula, paper towels, large serving platter
Notes
To optimize results for the primary flavor profile, avoid substitution of the dark brown sugar with white sugar, as white sugar lacks the molasses content required to create the signature sticky caramel layer. If you have leftover pineapple juice from the can, you can substitute 2 tablespoons of the buttermilk with the juice for an even stronger fruit flavor in the sponge. Note that while this recipe focuses on the pineapple upside down cake, the technique pairs wonderfully with a modern baking rotation alongside cookies and other seasonal treats.
Nutrition
Calories: 420 | Total Fat: 18g | Saturated Fat: 11g | Cholesterol: 85mg | Sodium: 160mg | Total Carbohydrates: 62g | Dietary Fiber: 1g | Sugars: 46g | Protein: 4g